MadeToTag features an UI, which allows step-by-step guidance through tasks for creating accessible, tagged PDF files. This new concept offers a better overview of the necessary tasks and provides a higher level of control.
MadeToTag has been developed to prepare InDesign documents for export to well tagged and thus accessible PDF. The user interface of MadeToTag directly supports the necessary main steps:
In addition, specific features are offered, for example to verify that text uses sufficient contrast.

Export tags are associated with paragraph styles and represent semantic labels (also referred to as “tags”) used to indicate the type of the parts of a document’s content, like whether a piece of text is a paragraph or a title. In order for export tags to work well, paragraph styles have to be used consistently across the document. For paragraphs and headings, export tags have to be assigned by the user. For lists, tables and tables of contents, InDesign automatically creates the correct tags when exporting to PDF, but only if the respective features of InDesign are used.
With MadeToTag assigning the right export tags for paragraphs and headings is easy – just assign the right export tag to a text that is using the respective paragraph style:
There is no need to set an export tag for lists or a table of contents generated by InDesign – just leave the export tag at “automatic”. For tables, the content in table cells is formatted as any other text content, for example as a regular paragraph or a list. Please avoid headings inside tables as this is usually not adequate. Instead, header cells in a table are configured through the table setup in InDesign.
In order to make it easy to find out whether all text in an InDesign document is using the correct export tag, check the “Highlight export tags” check box to activate color highlighting for export tags:
The color highlighting is only shown on screen and will not be visible in print output or exported PDF files.
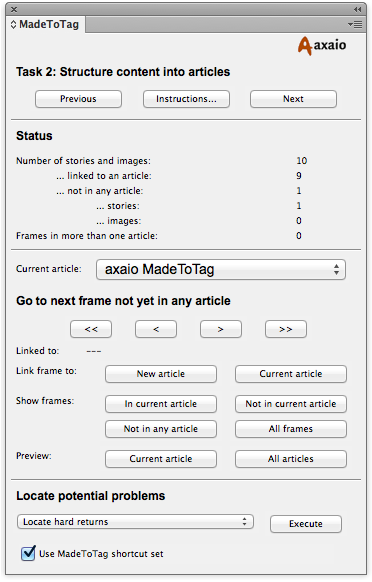
InDesign comes with a feature called “articles” – accessible through the “Article” panel – which makes it possible to organize the content of an InDesign document in a sequence of “articles”, each containing a sequence of frames defining the order of the document’s content, in the order it will usually be consumed by a reader.
MadeToTag provides keyboard short cuts to make creation of articles faster.
Important to know:
MadeToTag offers various possibilities to temporarily hide or show frames, depending on whether they are associated with the current article or any article or not. For example the short cut Command-Shift-“X” hides all frames already associated with the current article, to make it easier to identify frames that still have to be associated with that article. The available possibilities can be found in the fly out menu of the MadeToTag panel.
In order to check and review the content order and semantic structure of an article, use the “Show preview” feature (shortcut: Command-Shift-“V”). The MadeToTag preview feature will display a new window containing a stylized structural view of the content of the current article. For creating an overview of the whole document, including all its articles, use “Preview for all articles” (shortcut: Command-Shift-“B”).

In order to make the content of a PDF file to users with certain disabilities, loss of vision, low vision or learning disabilities, it is essential to provide a text equivalent for non-text content like images.
There are two ways to locate frames requiring alternate text:
In order to review the alternate text in the context of the surrounding content, simply use the article preview feature, by pressing Command-Shift-“V” for a structural preview of the current article, or Command-Shift-“B” for a structural preview of all articles.

The MadeToTag panel provides a view of the most important metadata fields (for a dialog offering access to all metadata fields, use InDesign’s “File Info” feature). In order to make an exported tagged PDF accessible it is important to at least provide a meaningful document title. Further fields can be filled out as suitable.
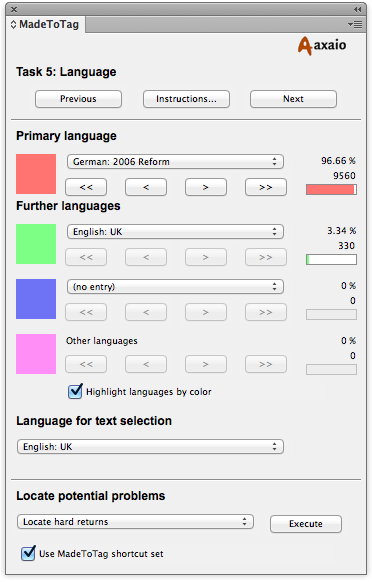
In order to enable proper speech synthesis for text-to-speech – e.g. when accessing PDF documents with a screen reader program, or when converting PDF content to an audio file or audio stream – it is important that all text in the PDF document is marked with the correct language. In InDesign this can be controlled through a language setting in the paragraph and character styles. Correct language settings also have the advantage to enable suitable hyphenation and spell checking.
In order to make it easy to find out whether all text in an InDesign document is using the correct language check the “Highlight language” check box to activate color highlighting for the languages used in the document:
The color highlighting is only shown on screen and will not be visible in print output or exported PDF files.
When an unwanted language needs to be located, the navigation buttons under each language popup menu can be used to go to the first, previous, next or last occurrence of that language in the InDesign document.
When text is selected there are the following methods to adjust the language in a given text to the primary, second or third language (as reflected in the MadeToTag panel):
In order to set the language for selected text to languages other than the primary, second or third language, use the “Set language for current text” pop-up menu in the MadeToTag panel to set the language as local formatting. Furthermore, all the language options built into InDesign for setting the language of text and paragraph or character styles of course remain available.

MadeToTag makes it possible to tag tables for advanced navigation support. The main purpose of this function is to differentiate table headers from regular table cells (often referred to as data cells).
The “Status” area provides information about the number of tables in articles, and in frames anchored in text frames belonging to an article. It also shows the number of tables that are not associated with an article. Users can use the arrow keys in the navigation area to navigate between available tables and edit every table in order. The configuration area can be used to define how table headers are configured. This can be done in three different ways:
This involves using the headers as defined in InDesign when creating the table. This is limited to column headers, row headers are not supported in this mode.
Quick Headers are expressed as the number of row headers and the number of column header. The values can simply be entered in the corresponding fields.
It is also possible to specify which cells should be tagged as header cells using the “Activate Smart Headers editing mode” button. The cursor can be used to select table cells. These are then highlighted in green. The selected table cells can then be associated with other cells in the table to establish a parent child relationship, where each parent cell serves as a header cell for the associated child or children. These relationships can be nested - a cell can serve as a header cell for some other header cell, which serves as the header for some data cells. For this to function, the geometric position of the cells in the table grid is not relevant. Thus the Smart Header function can be used to set up even complex, possibly nested relationships between header cells and data cells.
The basic sequence of necessary steps is:
The color highlighting is only shown on screen and will not be visible in print output or exported PDF files.

While it is possible to export to a tagged PDF using InDesign’s built-in features, the MadeToTag panel provides its own tagged PDF export mechanism. The MadeToTag tagged PDF export carries out several extra steps not otherwise available in InDesign. Among other things it fixes a number of bugs in the InDesign tagged PDF export, and optimizes the exported tagged PDF, for example by removing empty paragraphs from the tagged content structure, marking all objects that are not part of the tagged content as artifacts, setting the default language of the exported tagged PDF, and so forth. In the MadeToTag panel there are only the following options that can be configured:
After exporting the PDF it is recommended to review the tagging structure in the exported PDF with the free callas pdfGoHTML plug-in (requires Acrobat 9, X or XI for Mac or Windows), a joint development by axaio software and callas software, and available for download from www.callassoftware.com.
Did you like the video? Then you might want to have a look at related videos in the following playlist!