26 mai 2021
ColorLogic has today released it's newest version of ZePrA Color Management Software, discover what's new!
Iteration can be necessary to achieve the best possible color match, especially when proofing. To apply an iteration, a special test chart must be converted with the desired color management settings of a given configuration, printed and measured. With the measurements the DeviceLink profile can be optimized. After one to three iteration cycles, a closer match in terms of DeltaE values is achieved. This process is error-prone if done manually, however, it is easy to accomplish with the help of the DeviceLink Iteration Wizard, which guides you through each step.
The iteration starts by selecting the configuration containing the DeviceLink to be iterated. This can be done in three different ways:
The DeviceLink Iteration Wizard dialog consists of two tabs, the Current Iteration and the Archive tabs. The Current Iteration tab contains the actual iteration wizard and typically, if a configuration is selected that has not yet been iterated, the wizard is started directly there. The Archive tab contains all the iteration steps that have been carried out, including all the evaluation details.
The wizard guides the user through the iteration process in four steps:
The first step of a new iteration is the creation of the test chart to be printed. Here, there are two possibilities. Either you use the included Default Iteration Chart, which of course is always optimized for the color space of the given configuration. Or, if you have your own reference file from a custom chart that you want to use, you can select an appropriate reference file (TXT, CXF3, XML) under Custom Iteration Chart.
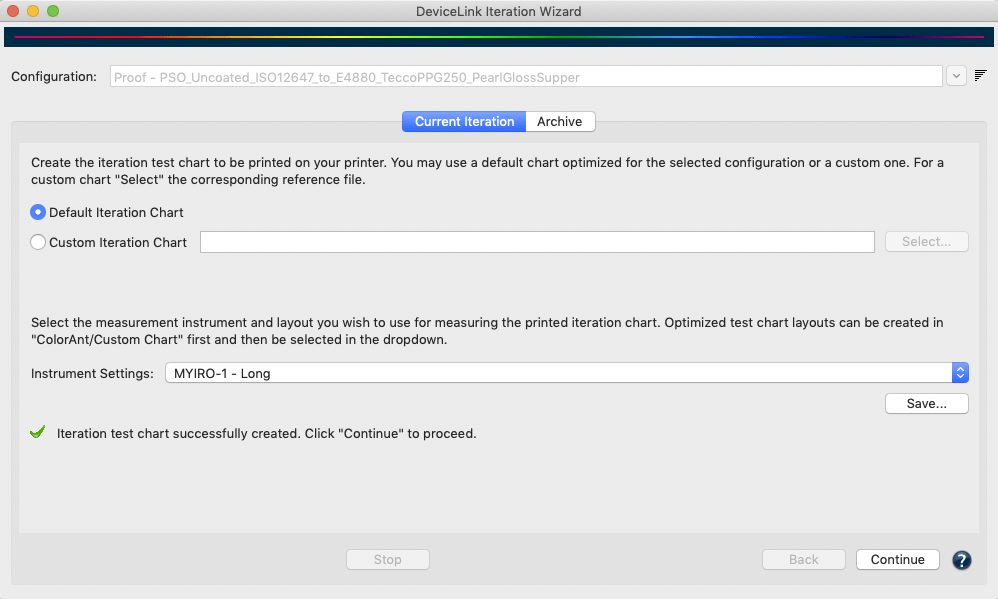
After that, select your measurement Instrument Settings. Various settings for the supported measurement equipment can be selected from the drop-down menu in the Measure Tool (the Measure Tool is included in ZePrA).
Note: Customers using ColorLogic ColorAnt can create their own instrument settings optimized for their specific requirements in the Export Chart tool.
Click Save and select a file format (PDF, TIFF or PSD) to create the test chart in the selected location. All color management settings of the configuration will be applied automatically.
Note: In some cases the creation of the chart may take some time, for example if the Conversion settings SmartLink or Device Profile are used in the configuration, as the wizard will then need to create a DeviceLink profile first.
After you successfully created the chart and the associated reference file, a message and a green check mark indicates that you can now proceed by clicking the Continue button.
The second step consists of two operations. First, the chart created in step 1 must be printed on the printer without color management settings. Then, after drying, the print must be measured. If the Measure Tool is to be used, simply click on the Measure button. You do not need to worry about the reference file and layout, as this is already preselected within the Measure Tool. Instructions on how to select your device and make measurements using the Measure Tool can be found here.
Note: Alternatively, you can use the previously exported reference file and measure your printed chart with a different measurement tool. Make sure that the measurements are saved in standard file formats that can be read by ZePrA, such as CGATS TXT, XML or CXF3. The external measurement files can be loaded using the Load button.
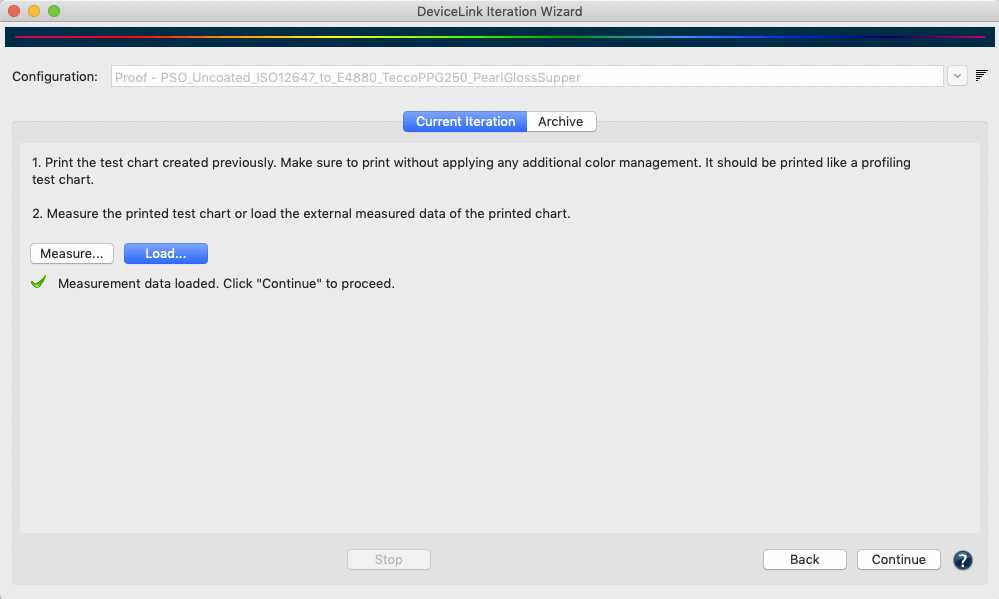
Once the measurement data has been transmitted from Measure Tool or loaded from external sources and it conforms to the printed chart a green check mark indicates a match and you can proceed by clicking Continue.
Note: When loading measurement data that does not match the chart layout or the corresponding patches in the reference file, you are alerted by a warning message and proceeding to the next step is not possible.
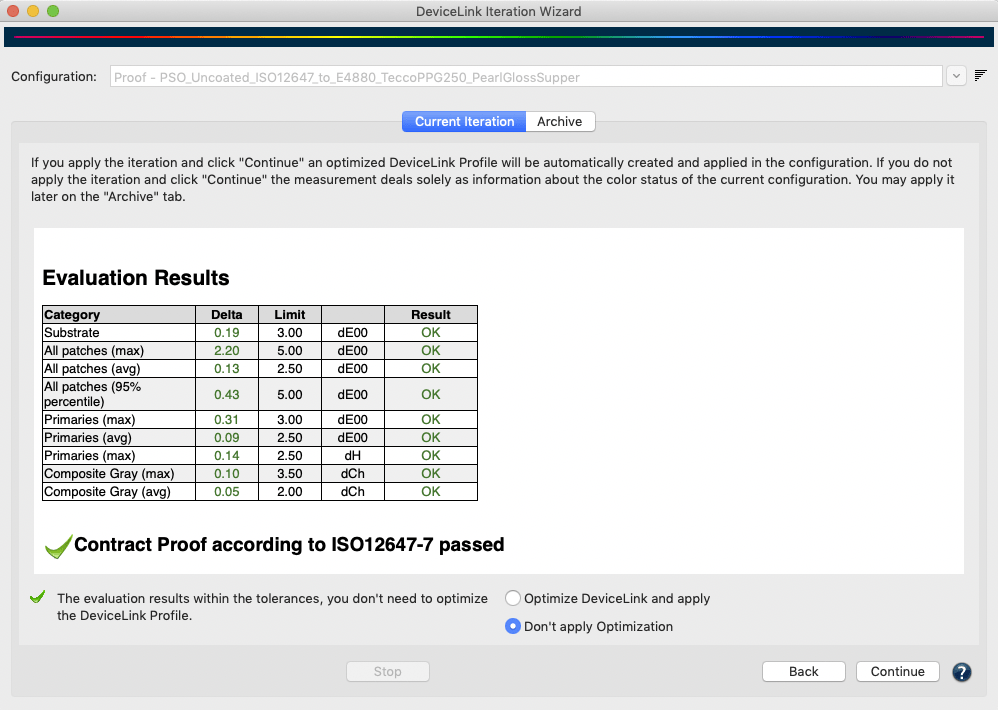
The third step shows the Evaluation Results of the measurements compared to the desired color conversion. If all categories such as substrate, the maximum and average deltaE for all patches, etc. are within their limits they are marked green and the overall result is marked okay. In a proofing case, for example if an absolute colorimetric rendering intent is used in the configuration, the proof print can be evaluated by the DeviceLink Iteration Wizard according to ISO 12647-7. If all categories are within the tolerances after the measurement, the print is a Contract Proof according to ISO12647-7, which is indicated by a green check mark. A further iteration is then not required, hence the Don’t apply Optimization radio button is preselected.
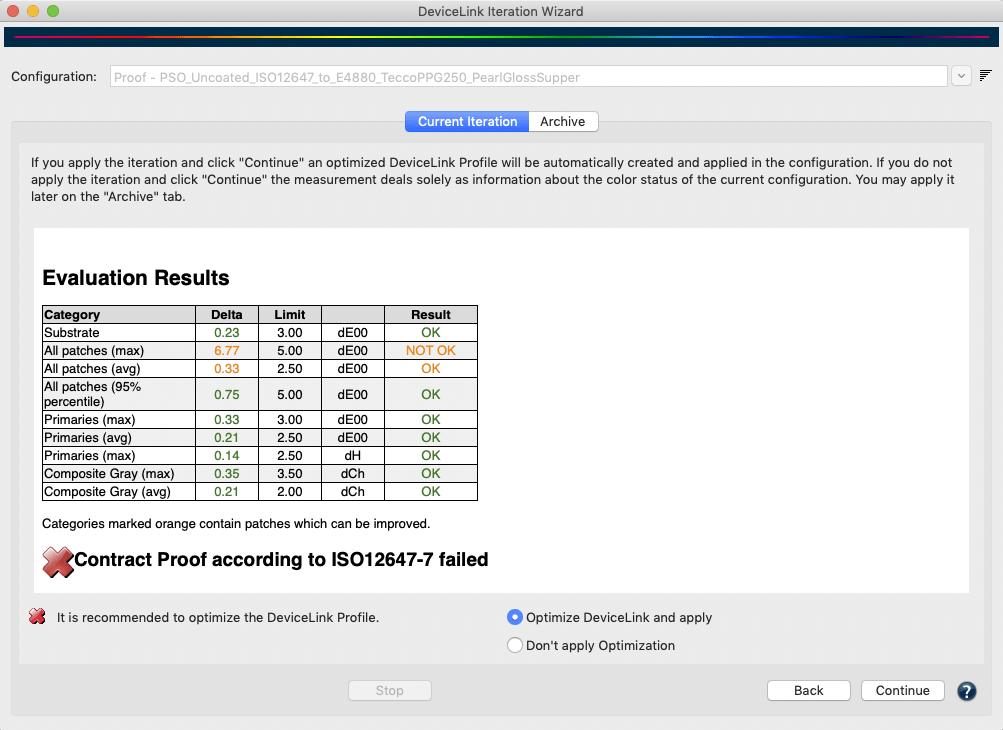
However, the preselection can be overridden and another iteration cycle applied if the results are to be improved even further. To do this, select the Optimize DeviceLink and apply radio button and click Continue. Alternatively, apply the iteration later via the Archive tab.
If only a single category is displayed in orange or red in the table of Evaluation Results, the proof print is considered to be not okay and the validation has failed. In this case, a warning is displayed and it is suggested to apply an iteration to improve the result. The corresponding radio button Optimize DeviceLink and apply is then preselected.
By selecting Optimize DeviceLink and apply and clicking on Continue, an iterated DeviceLink is created on-the-fly and automatically entered in the configuration.
But ZePrA offers even more intelligent features, as it checks for out-of-gamut colors and evaluates whether those colors can be improved. Colors that are displayed in red in the Evaluation Results and Report are considered out-of-gamut and their deltaE00 values can most likely not be improved. Nevertheless, an iteration can slightly change the rendering of out-of-gamut colors, for example, to correct hue errors when colors are far from the desired hue. Colors that are displayed orange, however, can be improved with further iteration. If there are only red colors left, ZePrA informs, that further iterations are of no use and preselects the Don’t apply Optimization radio button. If, however, there are orange displayed colors, the color values can be further optimized and ZePrA suggests Optimize DeviceLink and apply.
The fourth step concludes the iteration cycle. Here, there are three options to choose from. Based on the previous results, the wizard already preselects a logical option for you to follow:
ZePrA 9 includes a new Spot Color Iteration Wizard that replaces the old dialog. It is much easier and faster to use. The user is guided through all steps and the evaluation results and pass/fail information are provided directly in the wizard.
Starting the Spot Color Iteration Wizard is already genuinely easy in ZePrA 9: If a job with spot colors has been converted via a queue in ZePrA and the configuration used has the spot color conversion enabled, then the Spot Color Iteration Wizard can be started from the ZePrA Overview dialog in the Processed Jobs section by simply right-clicking on this job and selecting Spot Color Iteration. Here we assume that the user wants to print the spot colors of this job optimally and that a better match can be achieved by iterating these spot colors.
The wizard guides the user through the iteration process in five steps:
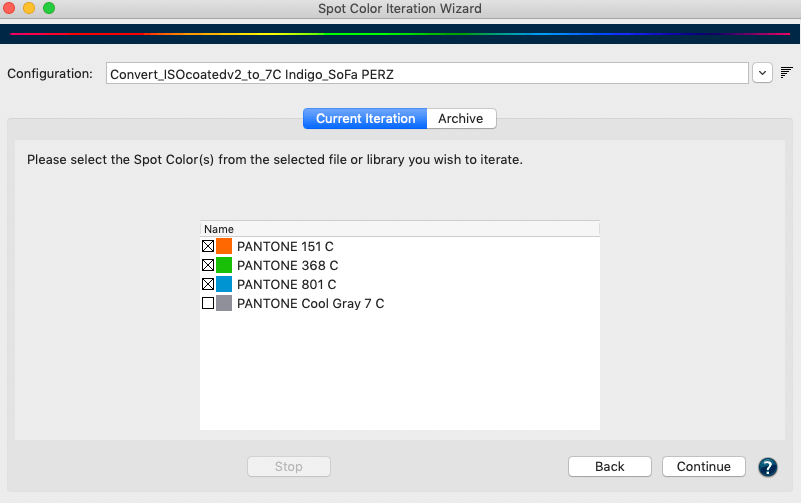
Step 1: When the Spot Color Iteration Wizard is started via the Processed Jobs the first step is the selection of the Spot Colors to be optimized. All spot colors of the job (PDF or image file) will be automatically extracted and used in the wizard. You can select the spot colors to be optimized and disable the colors that are not to be iterated. By default all spot colors of the job are preselected.
Step 2: After clicking Continue, you can Create a Test Chart with the spot colors previously selected or – even easier – you can use the print job for measuring if it has measurable areas large enough for the full tones. In this case the Don’t create Test Chart option needs to be selected.
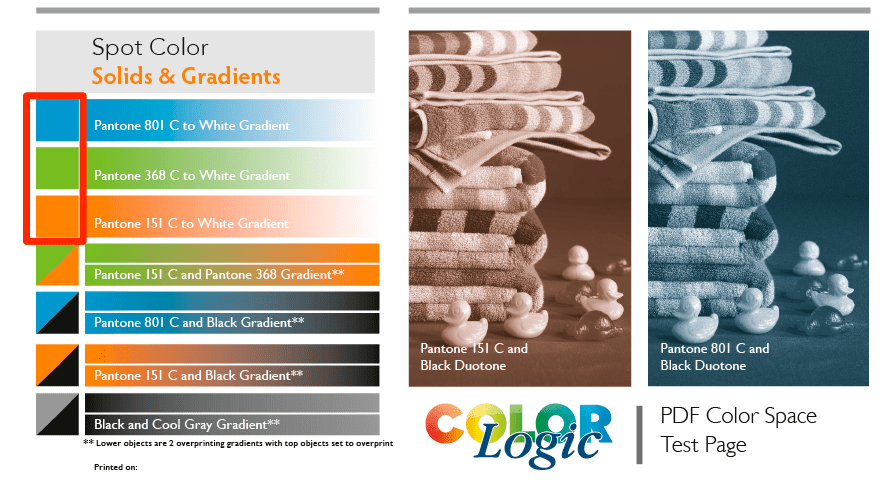
Note: The screenshot of a sample PDF file shows the patches of spot colors that can be used for measuring the spot color full tones. Some prints contain control patches of spot colors that could be used for measuring or, if there are larger areas in the design containing the 100% tone of a spot color, that could be used, too.
When the Create Test Chart option is selected an Instrument Setting must be set and the test chart must be Saved before the Continue button is enabled. If Don’t create Test Chart has been selected the Continue button is available right away.
Step 3: Now the printed spot colors need to be measured. For this purpose, the actual printed job or a test chart created in advance can be used. When using the test chart, it must be printed on the printer without any color management and can be measured after drying. If the Measure Tool is to be used, simply click on the Measure button. You do not need to worry about the reference file and layout, as this is already preselected within the Measure Tool. Instructions on how to select your device and make measurements using the Measure Tool can be found here.
Note: Alternatively, if you have created a test chart you can use the associated exported reference file and measure your printed chart with a different measurement tool. Make sure that the measurements are saved in standard file formats that can be read by ZePrA, such as CGATS TXT, XML or CXF3. The external measurement files can be loaded using the Load button.
Once the measurement data has been transmitted from MeasureTool or loaded from external sources and it conforms to the printed chart a green check mark indicates a match and you can proceed by clicking Continue.
Note: When loading measurement data that does not match the chart layout or the corresponding patches in the reference file, you are alerted by a warning message and proceeding to the next step is not possible.
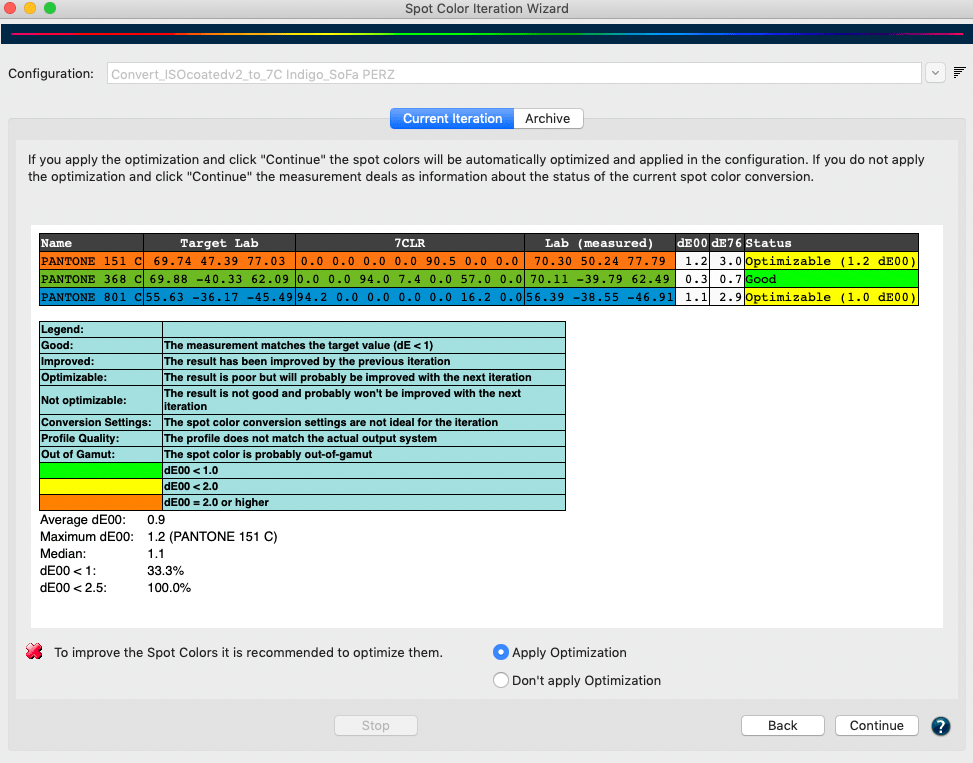
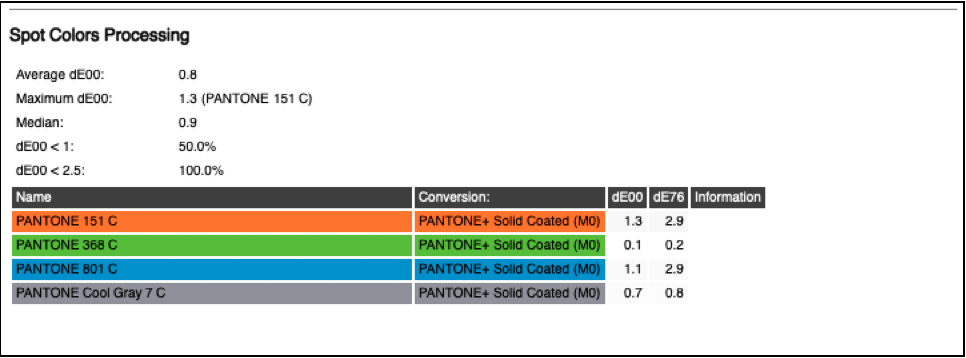
Step 4: In the penultimate step, the evaluation results of the measurements of each spot color are displayed in comparison to the reference Lab values of the original spot colors. In addition to the DeltaE00 and DeltaE76 values, a Status information text is also displayed, either in green, yellow or orange. The Legend below the table explains the indication colors and status information.
In essence, if the spot color match is less than 1 dE00, a perfect match is achieved and the status color is highlighted in green in the table. Further optimization is then no longer required. If the spot color match is less than 2 dE00 but higher than 1 dE00 and the Status column indicates that the match can be improved further, then this is indicated with a yellow color. And finally, if a spot color has a higher deviation than 2 dE00 the color is marked orange. If a color is not optimizable or out-of-gamut, it can not be improved which is indicated in the Status information column, too.
ZePrA preselects one of the two options (Apply Optimization or Don’t apply Optimization) depending on the evaluation results. However, the preselection can be overridden and another iteration cycle can be applied if the results are to be improved even further. To do this, select the Apply Optimization radio button and click Continue. Alternatively, if you just need the measurements for evaluation select the Don’t apply Optimization radio button.
Step 5: The concluding step of the iteration cycle contains three options and a checkbox to choose from. Based on the previous results, the wizard already preselects a logical option for you to follow:
The checkbox Repeat Job works independently from the three radio buttons. If it is enabled when clicking Continue the last job is converted again with the configuration. This is especially helpful if the spot colors of that last job have been optimized by the wizard which in turn optimizes the spot color settings in the configuration to improve the spot color rendering.
The Spot Color Iteration Wizard dialog consists of two tabs, the Current Iteration and the Archive tabs. The Current Iteration tab contains the actual iteration wizard and typically, if a configuration is selected that has not yet been iterated, the wizard is started directly there. The Archive tab contains all the iteration steps that have been carried out, including all the evaluation details.
The 2nd edition of the Photoshop extension Push-2-ZePrA has network capability. This eliminates the need for ZePrA to be installed on the same computer as Photoshop.
To make this possible, a Push-2-ZePrA remote server has been integrated into ZePrA 9. The new Push-2-ZePrA Photoshop extension now acts as a client application that can access the ZePrA server from Photoshop over the network.
In this way, several users can work with the extension installed in their respective Photoshop versions over the network with the same ZePrA server. The Photoshop clients can thus be used on different computers, but also under different operating systems than the ZePrA server.
The Push-2-ZePrA v2 Photoshop extension is integrated with a 1-client license in ZePrA XL and XXL. A 5-client or a 10-client multi-user license can be purchased additionally. For ZePrA 9 Entry, Basic and L, the Push-2-ZePrA v2 Photoshop extension and the multi-user licenses can be purchased as add-ons.
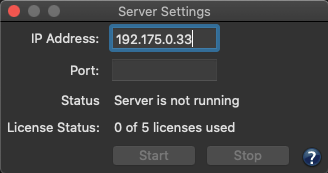
To configure the ZePrA server, go to the Tools menu and open the Server Settings. There you specify the IP address of the computer on which ZePrA is installed and set a Port. Then click Start. The status changes to Server is running and the License Status indicates the number of licenses in use as well as the number of available licenses.
The minimum requirement is Adobe Photoshop CC 2017 and on Apple systems macOS 10.13 and higher is required.
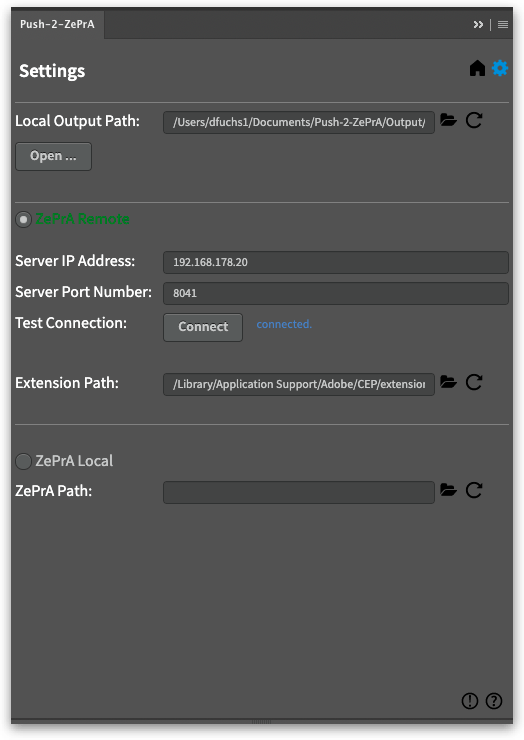
After installation, open the extension in Photoshop, click the Gear icon, enter the previously defined ZePrA server settings (IP and port) under ZePrA remote and click Test Connection. The connection status is displayed. When the connection is successfully established, define your Local Output Path to save the converted files in and click the Home button. You can then immediately use the extension.
If all available licenses are linked with the ZePrA server, additional Push-2-ZePrA extension users will not be able to connect to the ZePrA server.
Note: In order to use the Photoshop extension, the remote server must be started in ZePrA. Once the server has been started in ZePrA, it will run even if the ZePrA application is closed later on. Only when the computer is shut down, the server is also shut down and must be restarted in ZePrA after the computer is restarted.
The Images/Vectors tab in the Configuration has been completely redesigned and also offers additional new features. As a result, the conversion options for images and vectors are now easier to understand and configure. To make it clearer how images and vectors are processed, for example CMYK images from PDF files, the main conversion option Convert to Document Color Space has been renamed to Convert with Normalization. This is to clarify that images are first converted to the document color space (this is the normalization step) and in a second step the entire document is converted from the document color space to the target color space. The old name implied that the conversion ends with the first step, when the images are converted to the document color space, which is not and never was the case. The new naming should now make this clearer.
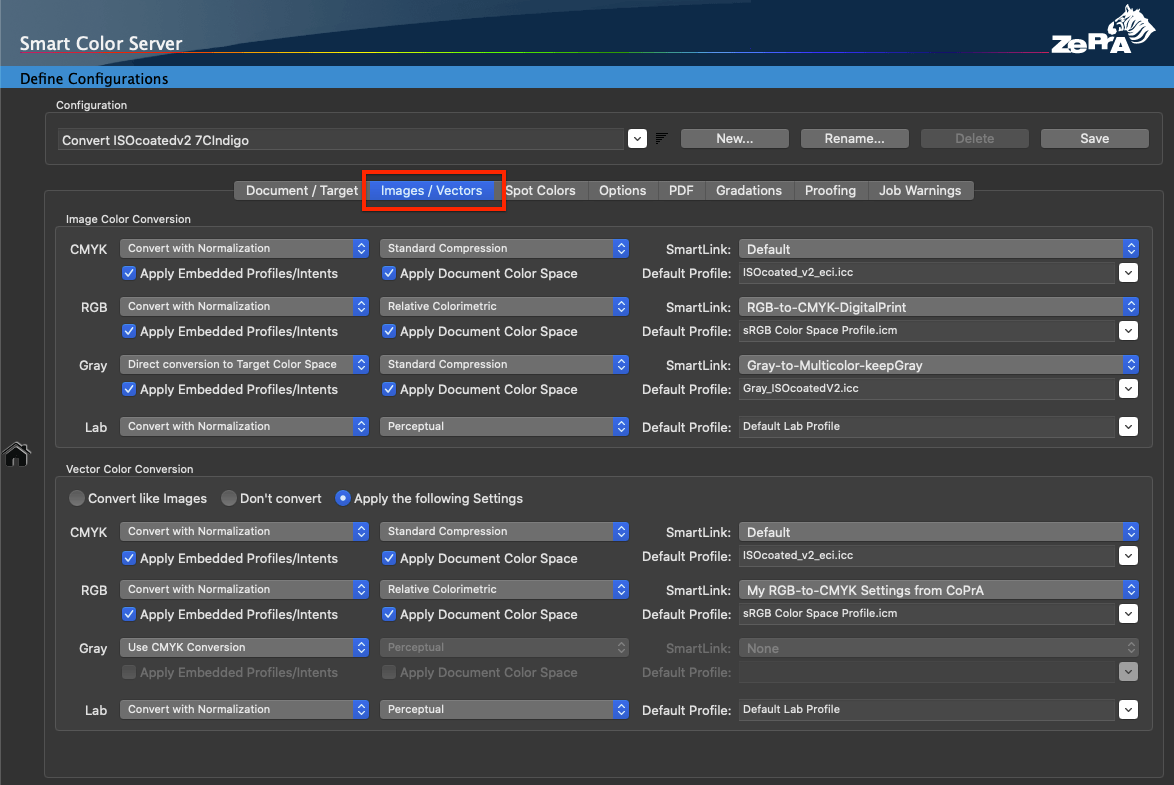
The Apply SmartLink checkbox, which was available in the Images/Vectors tab for each color space in previous versions of ZePrA, has been replaced by a drop-down menu containing all possible SmartLink options for a given color space. This allows users to select a specific SmartLink method for a particular color space conversion, making the conversion tailor-made, which was not possible before. This flexibility is certainly a huge gain for power users, but at the same time the ease of use of the Default SmartLink methods, which have been tried and tested for many years, is still available. The default setting when creating new configurations uses a dedicated default method for each color space and conversion step, but if required, users can deviate from this default method and select other or custom methods.
The new checkbox Apply Matching Document Color Space for each color space is a practical new feature that allows the color space defined as Document Color Space to be applied to undefined images and vectors with the same color space. This makes it possible to set up a single hot folder and configuration for all types of PDF/X files to be converted to a single target color space. For example, it resolves a problem with an RGB document color space and the Prefer Output Intent checkbox when the output intent of a file would be CMYK and vice versa.
This feature replaces the Same as Document Color Space option previously available in the profile drop-down menu. However, this option was only available in a single drop-down menu for the one and only color space that was selected as the Document Color Space. In the past, if the Prefer Output Intent checkbox was selected, this could lead to an unsolvable problem. Since the output intent can be either CMYK, RGB, Gray or even Multicolor, depending on the type of PDF/X file that is dropped into ZePrA, a conflict could arise in the past if the color space manually selected as the Document Color Space and the color space of the output intent did not match. With the new checkbox, the profile from any color space selected as output intent can now be used correctly for converting images and vectors. The checkbox is enabled by default when a new configuration is set up using the Auto Setup Wizard.
If both checkboxes are activated (Apply Embedded Profiles/Intents and Apply Matching Document Color Space), ZePrA first checks whether an embedded profile is available. If this is the case, this profile is used. If no embedded profile is present, ZePrA checks whether the color space of the image matches the document color space. If this is the case, the document color space profile is used for the image. Only if there is no match, the Default Profile that the user can select from the profile drop-down list will be used.
Note: To ensure that a specific Default Profile is used in any case, the checkboxes Apply Embedded Profiles/Intents and Apply Matching Document Color Space should be disabled.
The Spot Color Report is a great feature to check the spot color conversion and color rendering of a production file before actually converting and printing. Previously, only one file (PDF or image file) could be loaded and checked against one or more configurations. With the new File List feature, multiple files can now be added and checked simultaneously. In the Preview and the spot color PDF report that can be created with the Save button we have added an Overview and a Best Configuration section that describes how the file(s) were processed with the various user-selectable configurations. In addition, a table of contents (TOC) in the PDF file allows an easy navigation to the details of each configuration. Especially if many spot colors such as an entire spot color library with hundreds or even thousands of spot colors have been evaluated, this is a great help in getting directly to the details of the individual configuration results. The configuration with the lowest deltaE will be automatically determined and listed as Best Configuration on top of the report.
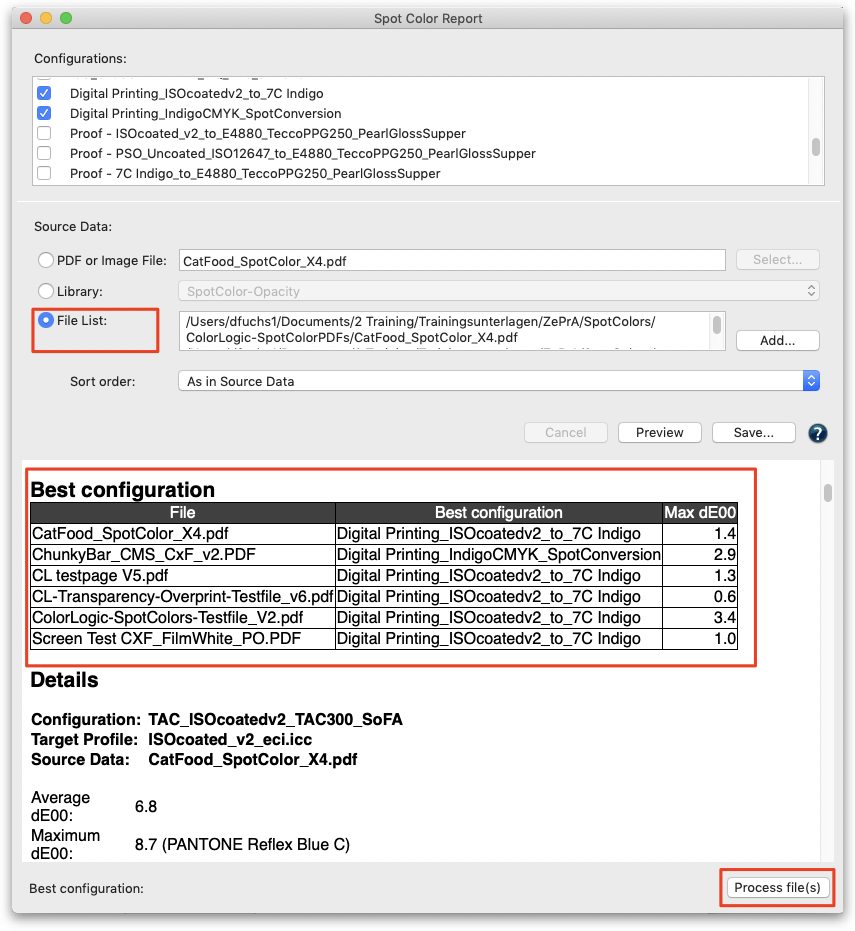
Moreover, selected file(s) can be processed directly from the Spot Color Report window with the best configuration. By clicking the Process File(s) button at the bottom right of the window, the files are automatically moved to the input folder of the corresponding configuration and automatically processed.
First, different configurations can be set up, for example for printing with the same printer but using different target profiles with CMYK, 5 colors, 6 colors or 7 colors. Then the production PDF file(s) can be checked with all possible color configurations. It may be found that the production PDF file(s) do not need 7C, but are already well suited with a certain set of 5 colors or even CMYK.
This way, many clicks in digital printing or many plate productions in conventional printing could be saved. After checking the file(s) and determining the best matching configurations, the file(s) can be automatically processed with the configurations having the lowest maximum DeltaE directly from the Spot Color Report dialog.
The Job Properties report, available in the Processed Jobs section of the Overview window when right-clicking on a job, contains additional information about the processed spot colors. When the spot colors of a job are converted to process colors, the report displays similar color information as the Spot Color Report.
For all spot colors of the job, the average and maximum deltaE00 values are listed, as well as the expected dE00 and dE76 values for each spot color. Additional information, for example whether a spot color was iterated, is also provided in the information column of the table.
The Job Properties report can be saved in two new formats: Raw data in XML format and Raw data in JSON format. For new workflows it is recommended to use one of these formats. The older XML format is no longer recommended and is only available for compatibility with older workflows.
In the Options tab under Configurations, the Ink Saving section has been renamed to Ink Amount. In addition to the Calculate Ink Saving checkbox, which is useful for ink saving conversions as it reports the amount of savings, the new checkbox Calculate Ink Amount in converted File has been added. If the Calculate Ink Saving checkbox is enabled, the checkbox Calculate Ink Amount in converted File is also enabled.
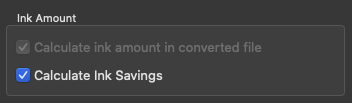
When enabling the checkbox Calculate Ink Amount in converted File, the new section Ink Amount is added to the Job Report (accessible by right-clicking on a processed job in the Overview). It provides the calculated amount of ink for each channel for each processed job.
Note: For some use cases in digital printing saving channels means saving costs and by using specific DeviceLink profiles, a reduction of channels is possible (e.g. removing Black from CMYK). Not used channels can be checked in the Job Report as those channels are marked either “-” or “0”.
If the Job Report is to be saved automatically or used for automation with other tools such as Enfocus Switch or Impressed IWS the new Raw data in XML format should be used. The information can be found in “ConvertedDocumentProperties” in “InkInfo”.
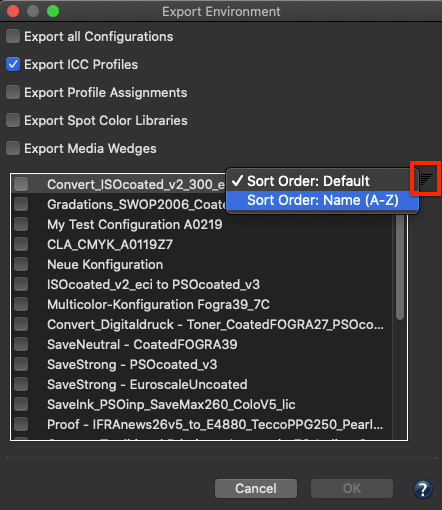
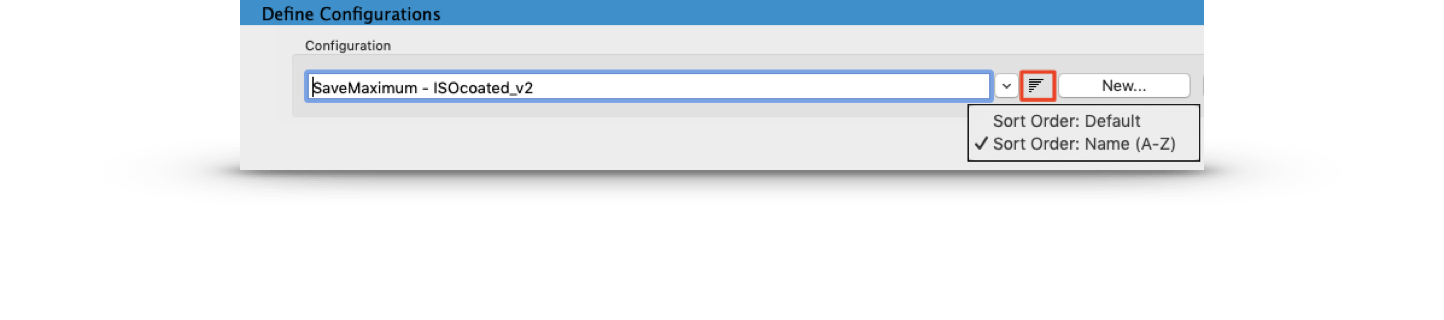
The Export Environment dialog allows configurations to be listed either in the default sort order (by creation date) or in an alphanumeric sort order. The sort order can be changed using the small icon to the right of the list of configurations. The alphanumeric sort makes it easier to find a specific configuration name to export.
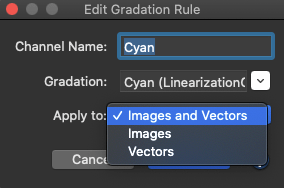
The Gradations tab under Configurations has been improved. First, the two checkboxes Apply Gradations to Images and Apply Gradations to Vector Graphics, which have been available since ZePrA 8, have been moved in the Apply to drop-down menu of the Edit Gradation Rule dialog. In the past the same gradation curve could be applied to Images, Vectors or both, but different curves could not be applied to Images and Vectors. This is now possible as you can set up two rules for one channel (for example the Cyan channel), with one curve assigned to images and the other curve assigned to vectors.
Since the user cannot add or delete the All Spot Colors entry in the table, there are two entries in ZePrA, one for images and one for vectors. If the same curve is to be applied to All Spot Colors of images and vectors both entries must be changed.
Notes:
Two buttons for Export and Import of gradation rules have been added in the Gradations tab. This allows to export gradation rules from one configuration and import them into another configuration.
At program start, all folders of a queue (Input, Output, etc) are checked. If a folder is missing or not writeable, the queue is stopped and a workflow warning is generated. When the program is running, the Input folder is constantly checked, while the other folders (Output, etc.) are not checked for performance reasons. If a job is being processed and cannot be written or moved to its destination folder, all folders in the queue are checked. If a queue has been stopped after checking, it will be started automatically when the folder is accessible again.
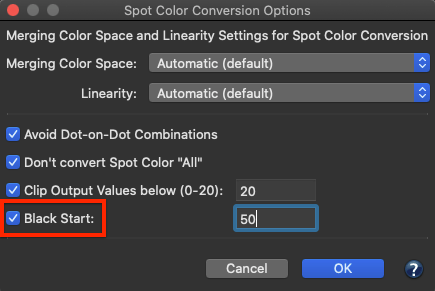
In the Spot Color Conversion Options dialog (under Configurations/Spot Colors/Special Options) is a new feature to define the Black Start for spot color conversions. Typically ZePrA prefers using black when converting spot colors to process colors whenever possible. However, in some applications this can lead to peppering effects for light colors using low resolution printing. In this case a late black start will use more of the other process colors and with a very late black start it can be forced to use no black at all in the process color build.
Typically, when converting files, image and vector areas that were originally designed to be transparent and do not use ink (e.g 0% ink or white) are also converted using the selected color management settings. When using perceptual rendering intents this leads to 0% ink in the converted file, and in case of proofing with the absolute colorimetric rendering intent this results in a paper simulation. In both cases, ZePrA ensures that the correct paper white (either 0% ink or paper simulation) is used and will place the paper white under the entire art box. In some cases, especially when printing on transparent foils and using white inks, this is undesirable since areas with 0% ink are supposed to be transparent after conversion. For such cases a new exception has been added to the Options tab that applies to images and vectors. When enabled, areas with 0% ink are preserved and will not be color managed. To accommodate the new feature the former section Vector Graphics and Text has been renamed to Exceptions and the new third option Preserve White for Images and Vectors has been added.
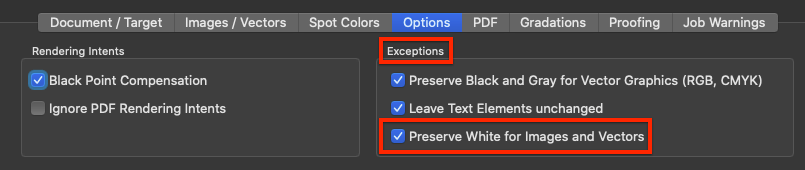
Note: When the exception is enabled and there is a strong paper simulation in the converted file, there will be a hard edge between the preserved white and close colors such as 1%.
ZePrA’s user interface has been further improved, ensuring that text elements are no longer truncated on modern macOS versions such as Catalina (macOS 10.15) and Big Sur (macOS 11). In addition, the dark mode is supported on macOS, too (not available for Windows).
The colors of errors and warnings shown in the Overview dialog have been slightly changed to less colorful colors.
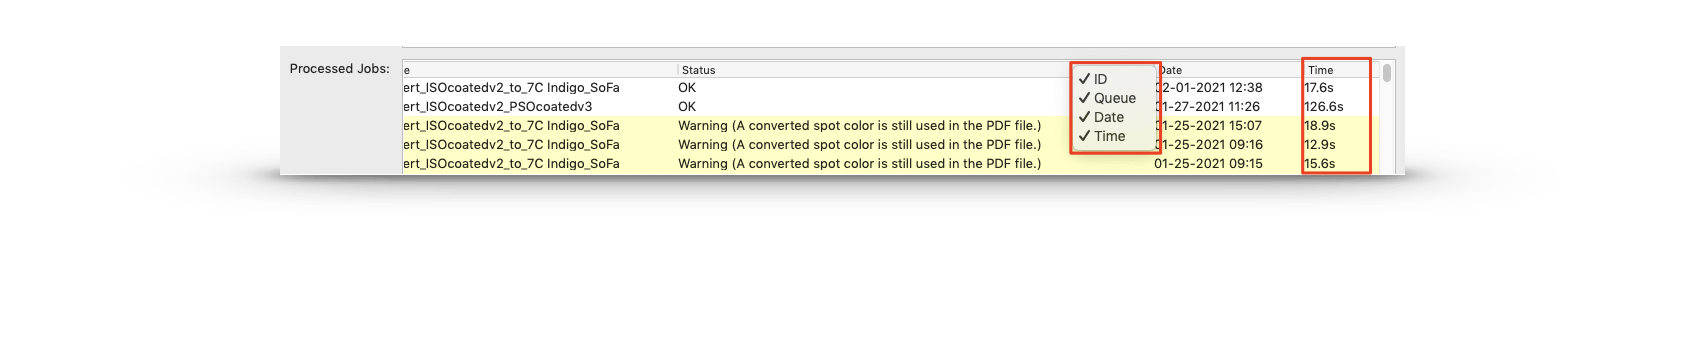
In the Processed Jobs section of the Overview, you can right-click on the header to enable/disable the ID, Queue, Date, and now also the Processing Time. The processing time is displayed in seconds.
The PDF Layers function in the PDF tab and the table in the Spot Colors tab under Configurations have both been provided with an Export and Import function. This allows you to export rules from a configuration and import them into another configuration.
In the drop-down menus for selecting a configuration under Queues, New Queue and Configurations, the sort order can now be changed from default to alphanumeric via an icon. Clicking this icon displays the same drop-down menu as before.


I'm your contact person. Don't know where to start? Call me, schedule a video call, or send me an email. I'm all ears. Together we'll figure this out!
![]()
![]()
![]()
Nous utilisons des cookies pour suivre l'utilisation et les préférences. Pour en savoir plus, consultez notre page sur les cookies.