Imp
Fully automated layout planning and imposition tool
Imp is a one-click planning automation tool to create and impose layouts for books, ganging and packaging jobs on both sheet- and web-fed presses.
Imp Flow automates the power of imposition, ganging and nesting found in Imp through easy to set up hot folders. Imp Flow is also key for the integration of Imp’s power in larger workflows as it fully supports being XML driven and can provide detailed XML information about the plans it created.
Pricing
If you are interested in Imp Flow, let us know and we'll make you a quote.
CPU: Intel Core i3-3240 Processor (3M Cache, 3.4 GHz)
RAM: 4GB
HDD (free space): 10GB
Graphics card: With an inbuilt memory of 1GB. The car must support OpenGL.
Operating system
- Microsoft Windows 10 / 8 / 8.1 / 7 / Vista / XP
- Microsoft Windows Server 2012 / 2008
Central processing of imposition jobs
Install Imp Flow on a central server and allow anyone in the network to drop PDF files, CSV files or XML files into a hot folder shared over the network. Imp Flow will process the files as set-up in the workflow serving that hot folder and provide output files in the output folder.
Unlimited number of hot folders
Different types of jobs or files from different clients may have to be handled differently. Imp Flow allows setting up as many different workflows as necessary, each with their own hot folder.
Being driven by XML
Imp Flow reads PPXML files: those are a special XML 'dialect' that allow specifying which jobs need to be handled, and optionally what needs to happen to these jobs. This provides for very easy integration into an MIS (or similar) system or into a workflow application, such as FileTrain, Switch, Prinergy ...
When the imposition or ganging is done, Imp Flow can write out a Plan XML to be picked up by the MIS or workflow system. A Plan XML contains all details about the calculated layouts and can be used to feed information back into the MIS system.
Benefits
- Full, lights-out automation: Being able to set up hot folders means that imposition and ganging of nesting are handled completely automatically, without the need of an operator.
- Semi-automatic workflows: Because Imp Flow can also save Imp product files, the results of an automated workflow can still easily be opened in Imp for validation.
- Integration in MIS or ERP systems: Imp Flow hot folders can accept XML files written by an MIS or ERP system. This allows the MIS system to fully control not only the jobs that will be imposed or ganged, but also how they will be handled.
Imp, developed by InSoft, is a one-click planning automation solution that creates and imposes layouts for book work, ganging and packaging jobs on sheet-fed as well as web-fed presses. InSoft has been developing innovative software solutions for the graphic arts and e-publishing businesses worldwide since 1996.

One application tool to impose them all
The intelligent Imp algorithm is designed for users to create any kind of layout without selecting the press type. Jobs will only be planned when the required machines are selected. Suitable for commercial print, packaging and large format applications.

Time-saving mistake filter
By eliminating manual labor for rushed job layouts, the Imp frees up time for proactive color or layout projects and efficient scheduling.

Constant assessment for constant evaluation
Imp constantly evaluates the layouts against any constraints defined by printing, folding, die cutting and other finishing process - keeping the user informed at all times of any problem.

Easy and single user interface for different types of users
Imp is a single tool, one-click solution for estimators, planners & pre-press operators to create efficient, accurate layouts for multiple presses with very different demands. Everybody in the process looks at the same file on the same program, leaving no room for discussion later on.
Talk to our sales team about this product.
Talk to usContact us to get started.
Talk to usDownloads
Version history
Showing the 5 most recent of 11 releases.
9.1 - 24.067f
BINARIES UPDATE PROCEDURE:
Close Imp UI & Imp Flow if running
- Make a copy of your working Imp 9.1 folder to a safe location
- Download the update zip file from the above links as per system OS – 32 or 64-bit
- Right click the downloaded Zip file > Properties > Click on Unblock (image below) > Apply & OK
- Extract the contents of the Zip file > Copy & replace in Imp install folder > C drive > InSoft Automation > Imp9
- Launch Imp > Help menu > About > the build should be 24.067f
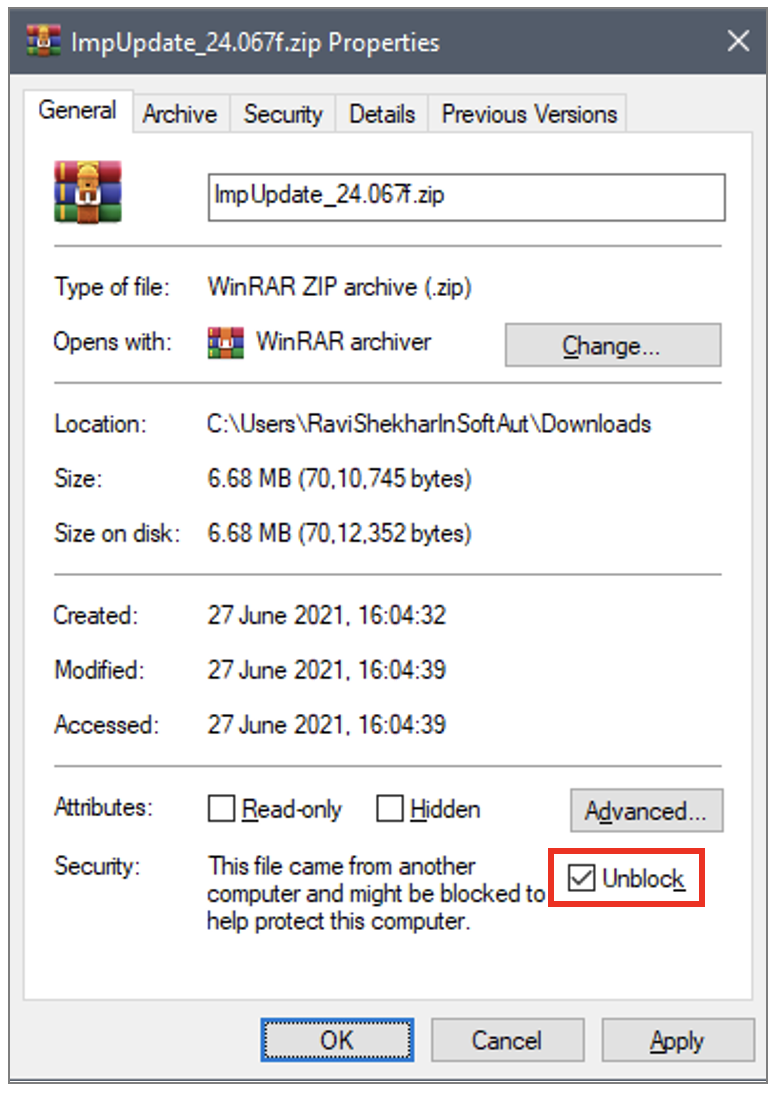
Note: This update is only valid on top of Imp version 9.1 build 24.023 or later. If you are using an older version, this update is not valid. Check your version and build from > Imp UI > Help > About.
Following are the bug fixes and refinement in this release:
Imp Crashes while planning
In some cases, Imp was crashing during auto planning. This bug is fixed.
Imp UI closes without any error when editing layouts
In some cases, Imp UI was closing without any error/crash log when working on layouts in layout editor. This bug is fixed.
Imp Flow – Error when generating Cutting JDF
Imp Flow was giving error while generating cutting JDFs. This bug is fixed.
Incorrect component Inks display in PDF reports
In printed reports, the component Inks were displayed wrong. Imp was showing total inks on layout for each component. This bug is fixed.
Export Cutting Data in CIP3 - PPF format
Imp can now export cutting in CIP3 PPF format. In Imp UI, the option is added in layout editor as below:
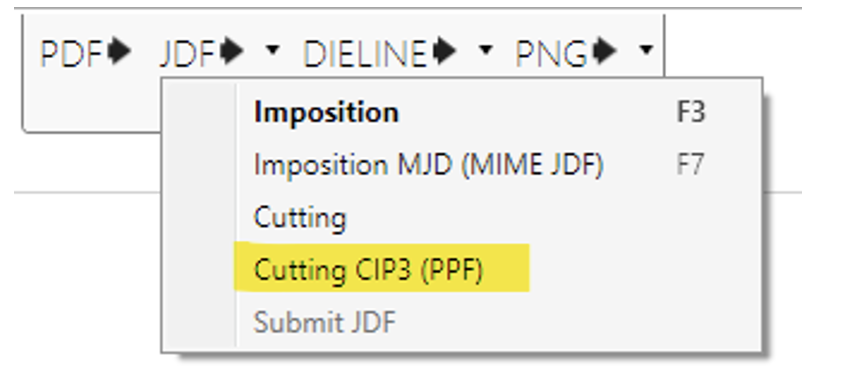
In Imp Flow a new action is added under Export category as below:
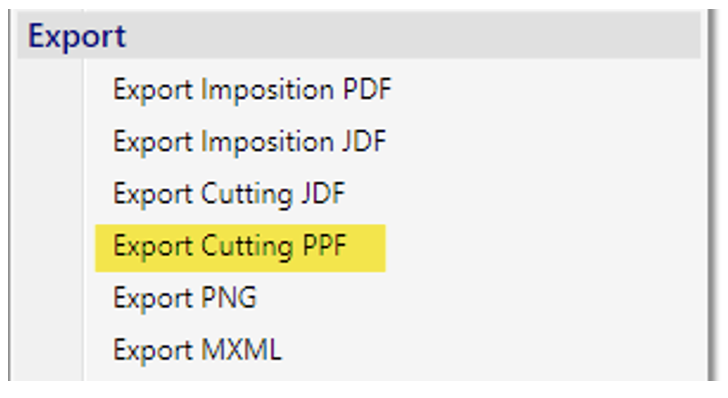
Export layout in PNG format
Imp can now export layouts in PNG format. In Imp UI, the option is added in layout editor as below:
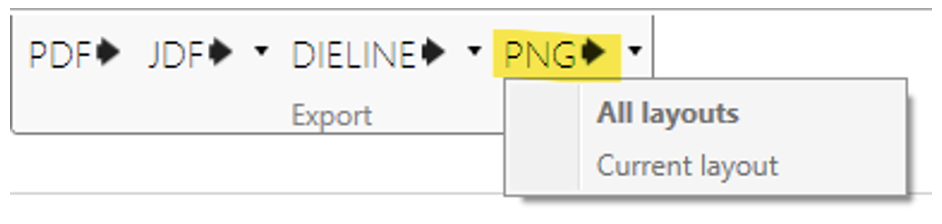
In Imp Flow a new action is added under Export category as below:
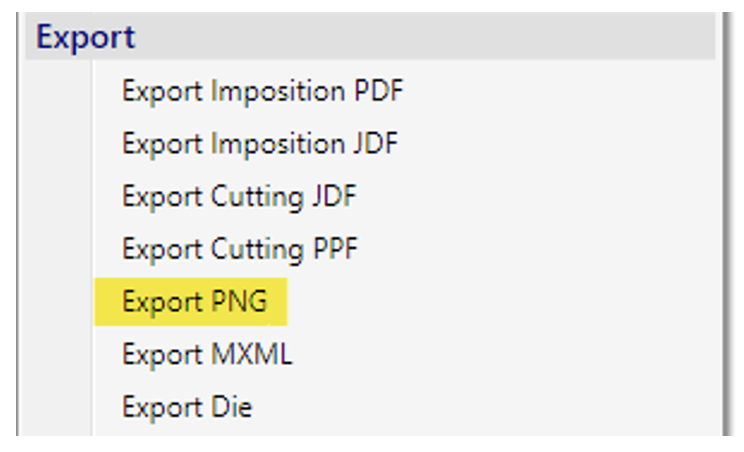
Internally, Imp ensures that the size of the PNG file is not more than 2000x2000 pixels.
Imp update 24.073f
We have released an update of Imp version 9.1, please update your Imp install using the below binaries.
64-bit Update binaries: https://www.dropbox.com/s/yx1y22vnk99oc01/ImpUpdate_24.073f.zip?dl=0
bit Update binaries: https://www.dropbox.com/s/s1gbgboyrdx5rg5/ImpUpdate_24.073f_x86.zip?dl=0
BINARIES UPDATE PROCEDURE:
Close Imp UI & Imp Flow if running
- Make a copy of your working Imp 9.1 folder to a safe location
- Download the update zip file from the above links as per system OS – 32 or 64-bit
- Right click the downloaded Zip file > Properties > Click on Unblock (image below) > Apply & OK
- Extract the contents of the Zip file > Copy & replace in Imp install folder > C drive > InSoft Automation > Imp9
- Launch Imp > Help menu > About > the build should be 24.073f
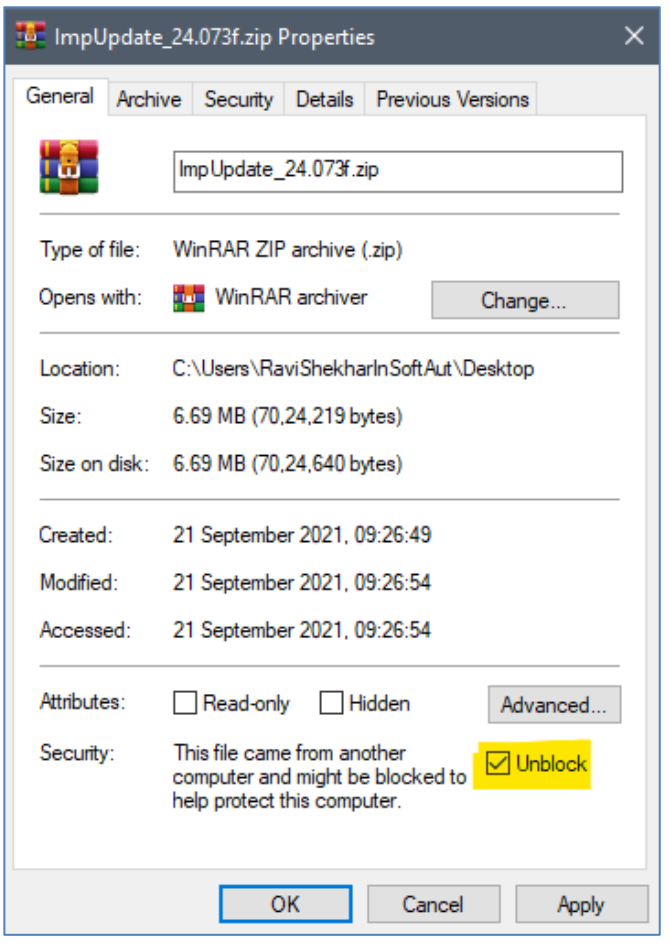
Note: This update is only valid on top of Imp version 9.1 build 24.023 or later. If you are using an older version, this update is not valid. Check your version and build from > Imp UI > Help > About.
Following are the new features and refinement included in this release:
Option to change field and property names used in Imp UI & Reports:
Imp’s UI and reports use hard coded field and property names till now. As users may have their own way of calling the field and property names used in Imp, a new CSV format is introduced with this release to input the name as desired in the given environment.
For example, if a user wants to change the default properties “Name” to “Item”. In Imp UI, currently the UI is shown as below with default values:
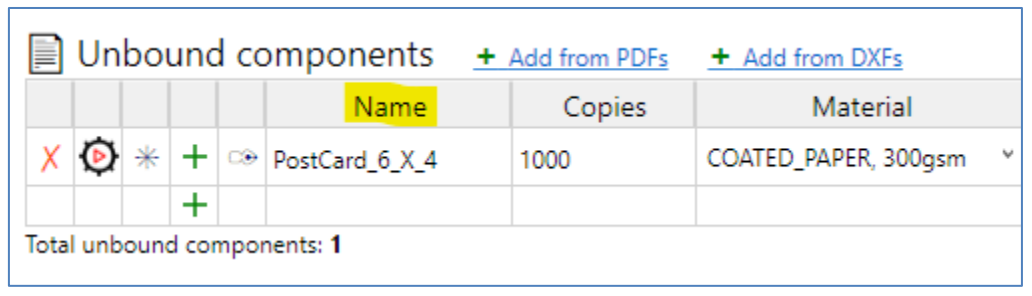
To change these, create a comma delimited CSV file and input the default property name first and then the desired name as below:
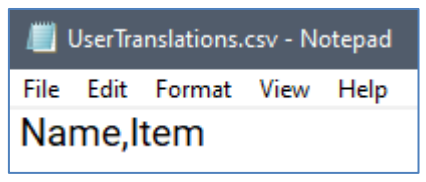
The file should be saved by the name “UserTranlations.csv” and placed inside “Data” folder in Imp9 installation folder typically in C:\InSoft Automation\Imp9\Data
On relaunching Imp, you can see the custom values as defined in CSV in Imp UI:
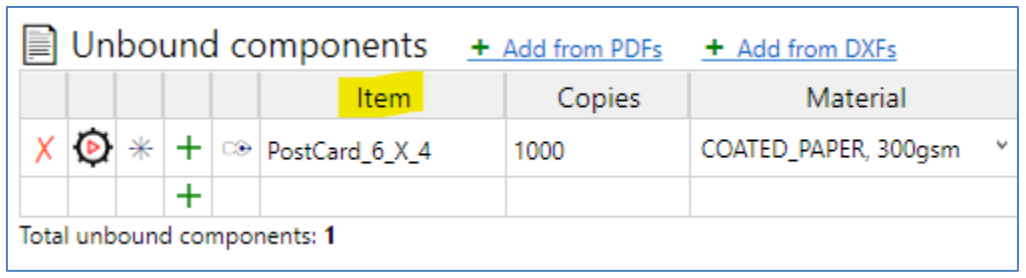
The change in property name is also updated in the plan reports:
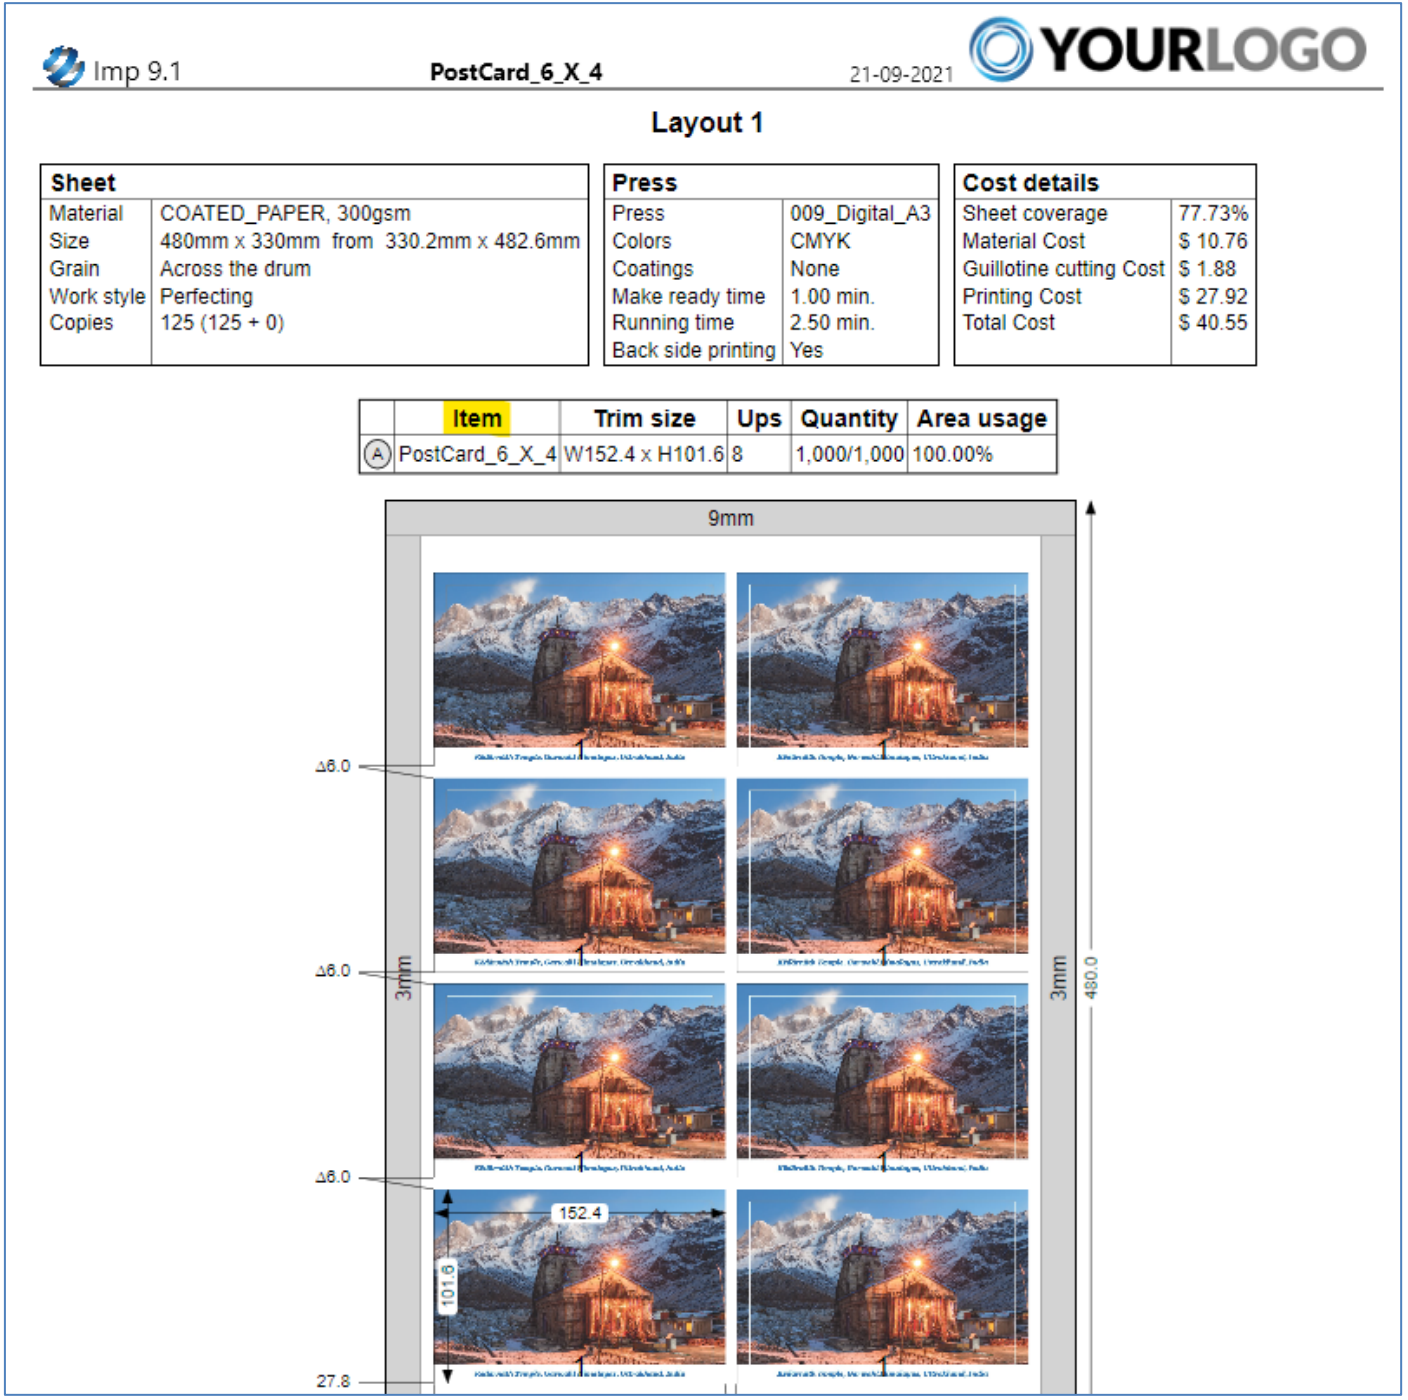
Please note these UI changes does not affect XML input, the attributes in XML remain defaults as provided in the documentation.
Option to change label information on layout diagram in Imp UI and Reports
Imp currently shows component name, group, and inks on the layout diagram and it can’t be customized.
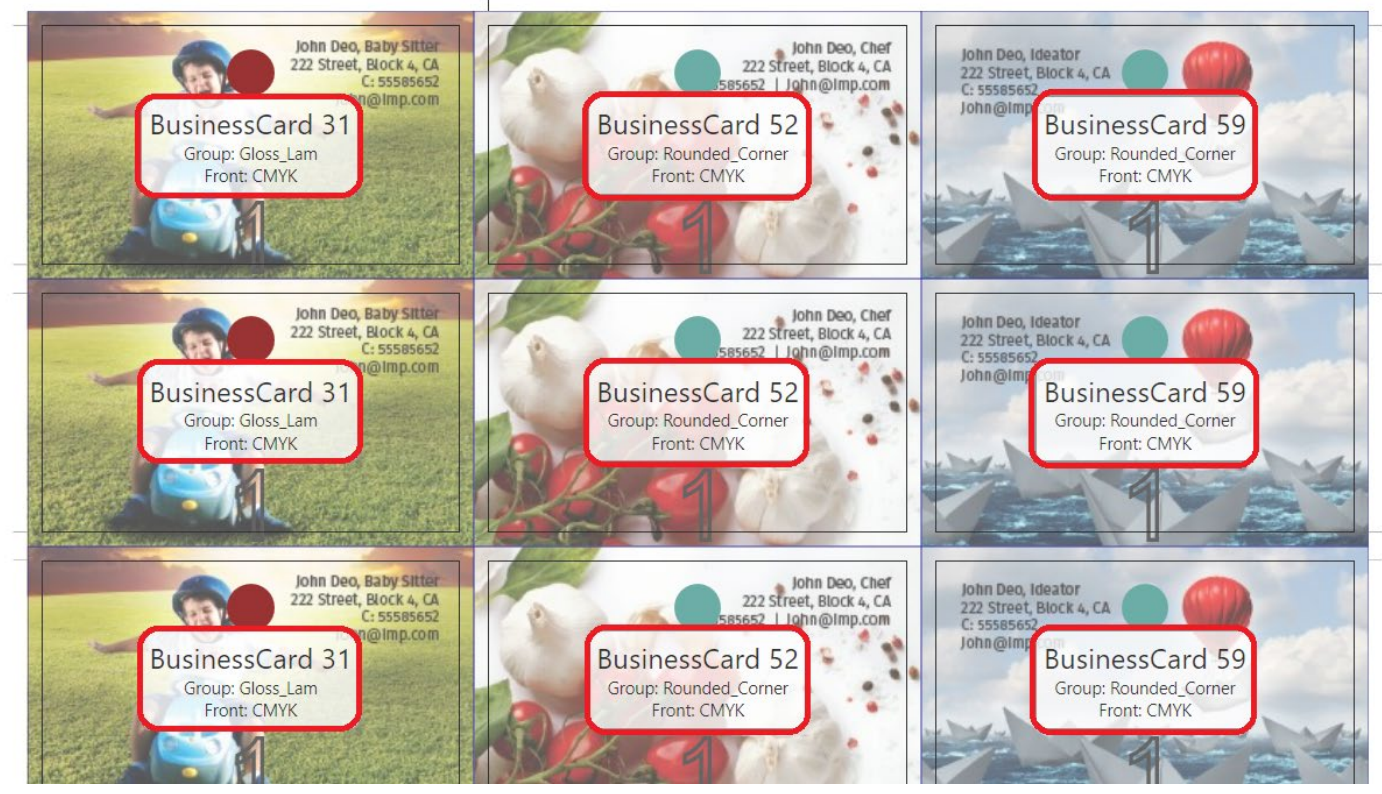
With this release, it is now possible to show the properties of your choice on the layout using the text mark variables. For this two new Impui.in flag settings are introduced – “UJobLabel” and “SignatureLabel”. UJobLabel is for unbound jobs and SignatureLabel is for bound jobs.
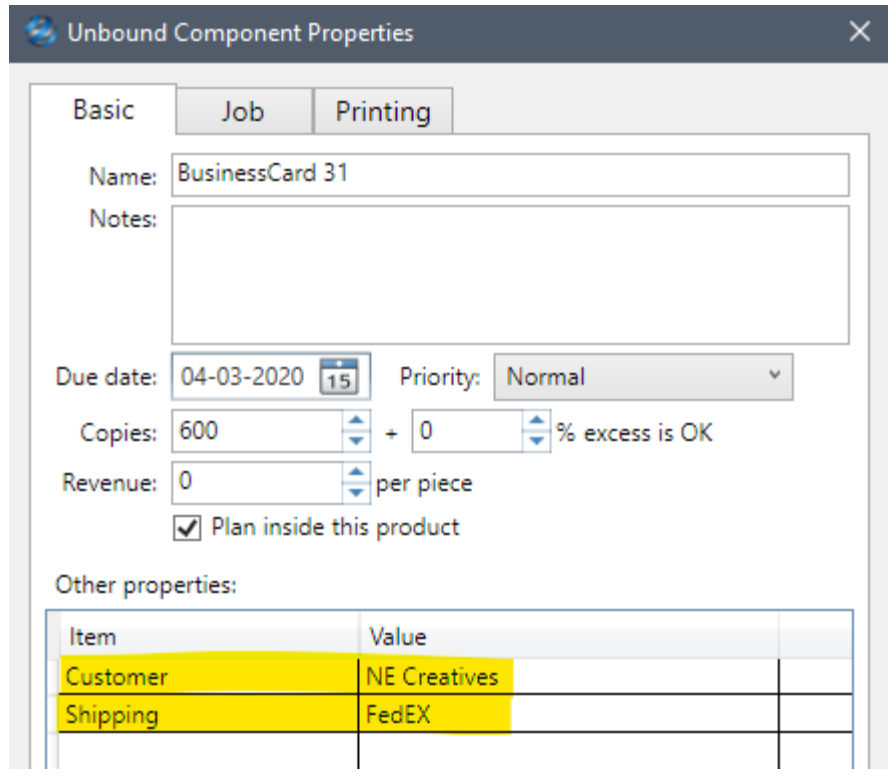
For example, a user wants to show PDF Artwork name, Customer and Shipping info on label of unbound jobs.
- PDF Artwork name comes from default <<Document name>> text variable.
- Customer is a custom property, for this the text mark variable will be <<Job.Customer>>
- Shipping info is again a custom property, it can be added by using <<Job.Shipping>>
To set Impui.in file with these properties, follow following steps:
- Go to Imp install folder in C drive > InSoft Automation > Imp9
- Locate and open Impui.ini file in Notepad
- Type UJobLabel=<<Document name>>\n<<Job.Customer>>\n<<Job.Shipping>> and save the file
(\n is a line break expression to generate each property in individual line)
- Launch Imp
Now import jobs with custom properties defined for each component:
The layout will now have labels as per Impui.ini flag setting in Imp UI and Reports layout diagram
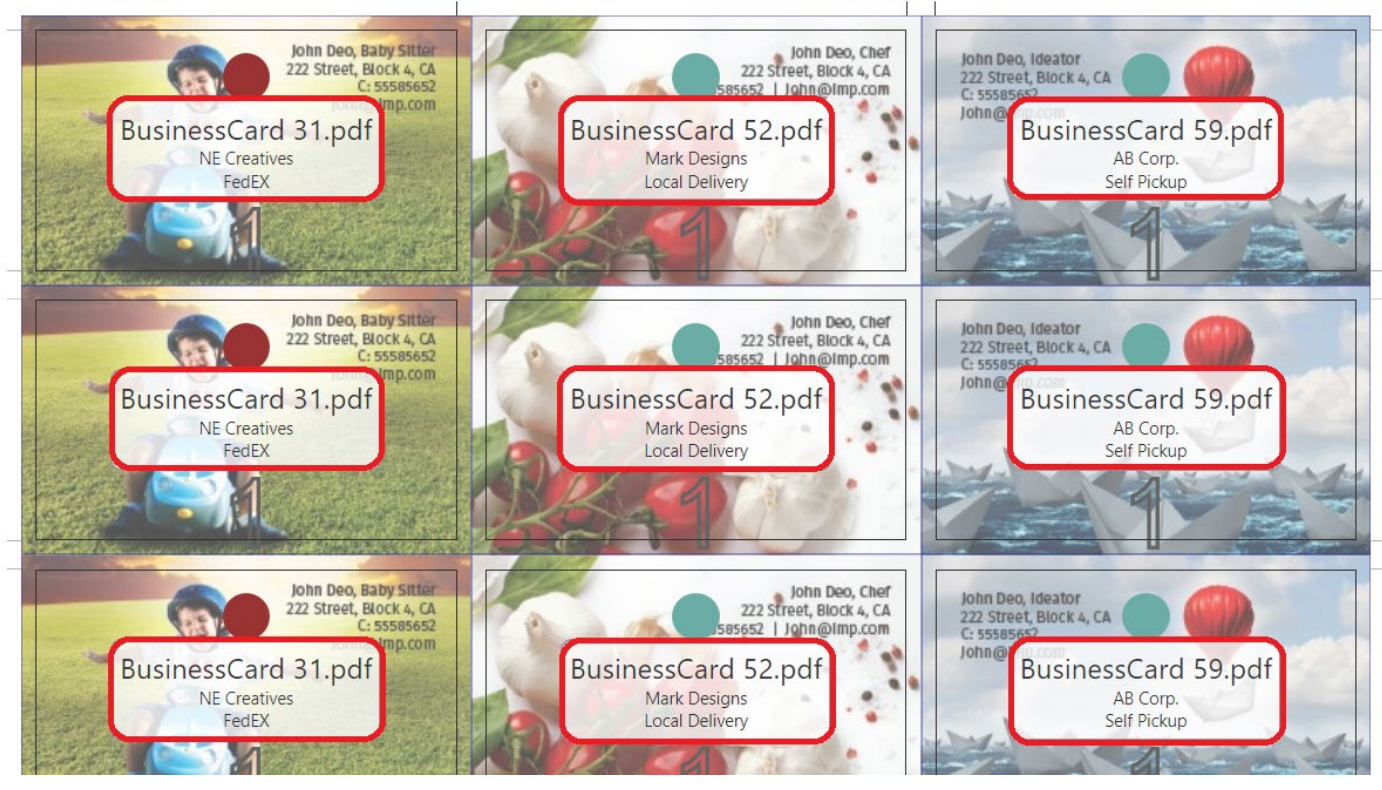
Similarly, you can set label text variables for bound job signatures also.
Option to define signature crop marks inside the signature boundary
Imp currently adds signature crop marks on the outer edges of signature boundary as marked below:
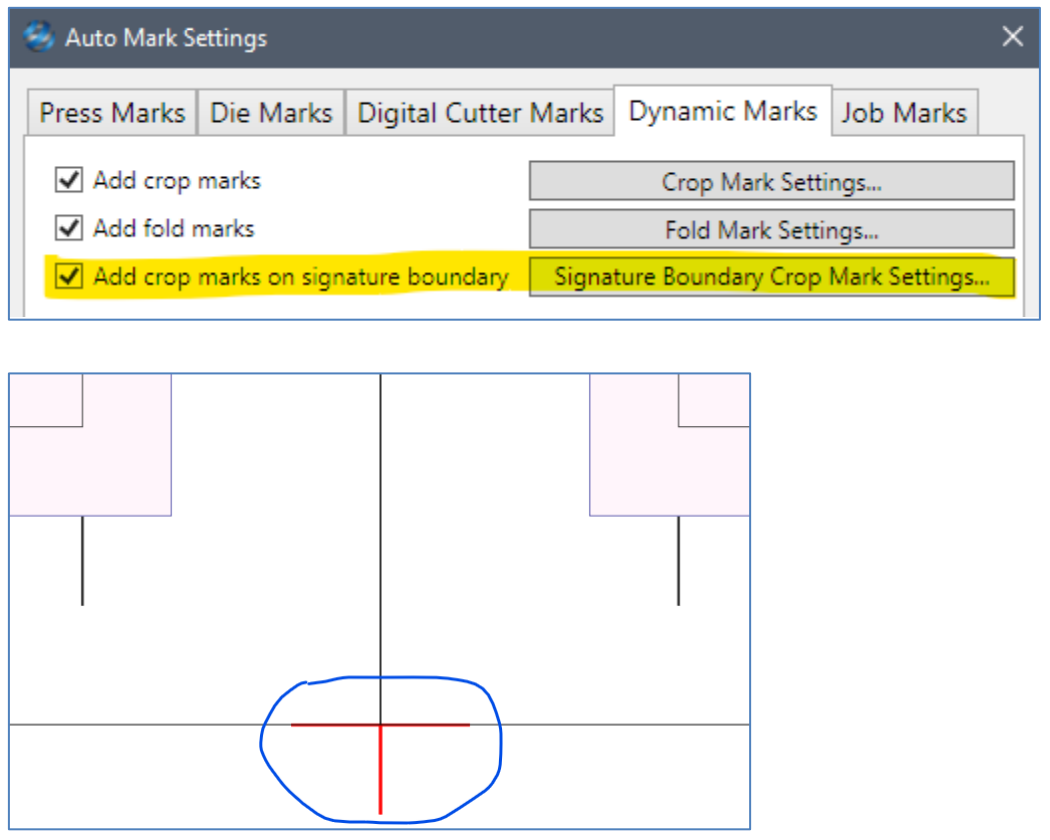
In some cases, these marks are required to be generated inside the signature boundary. For this we have a new “Offset” option in signature crop mark settings. If a negative value is defined, these marks will be generated inside the signature boundary, positive value for generating these on outside the boundary.
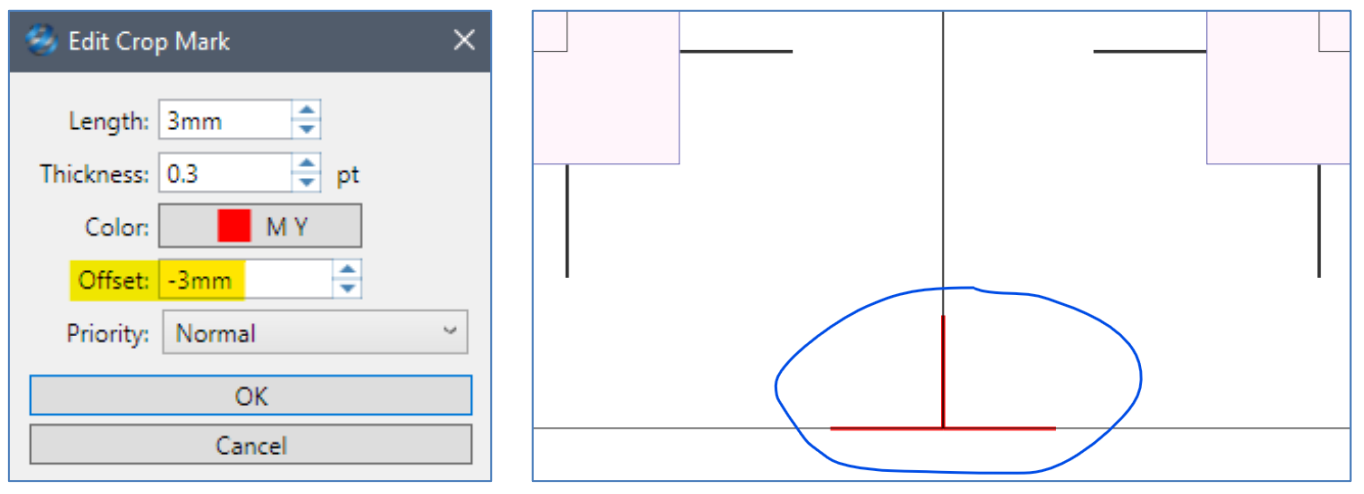
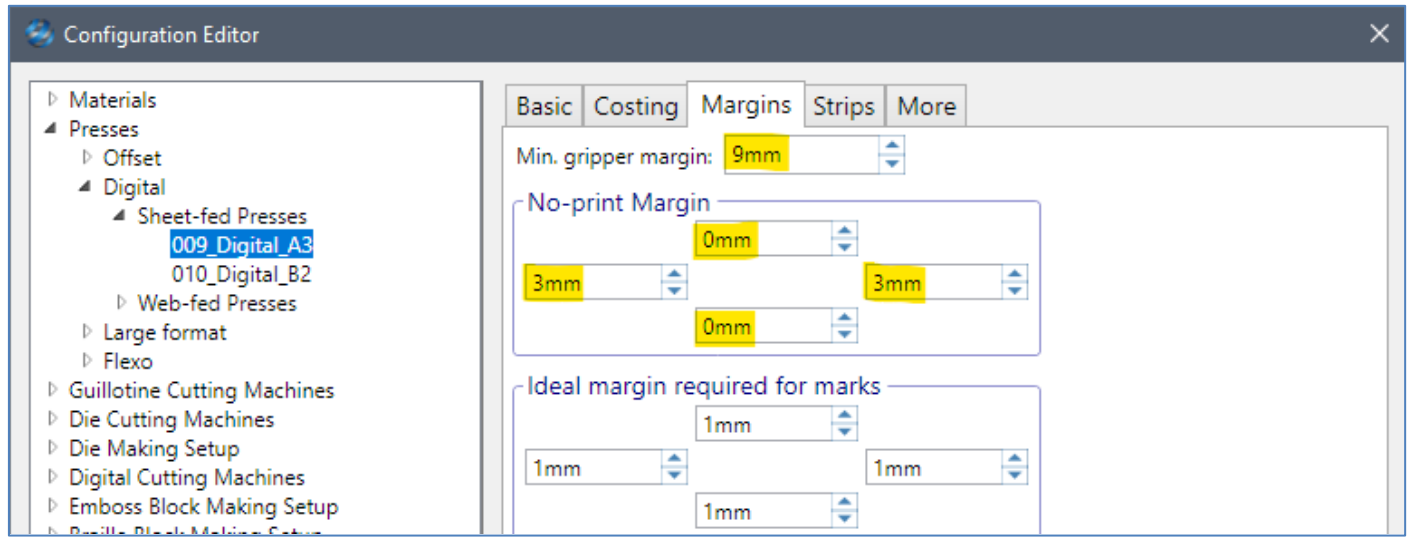
Show no-print margin in layout reports
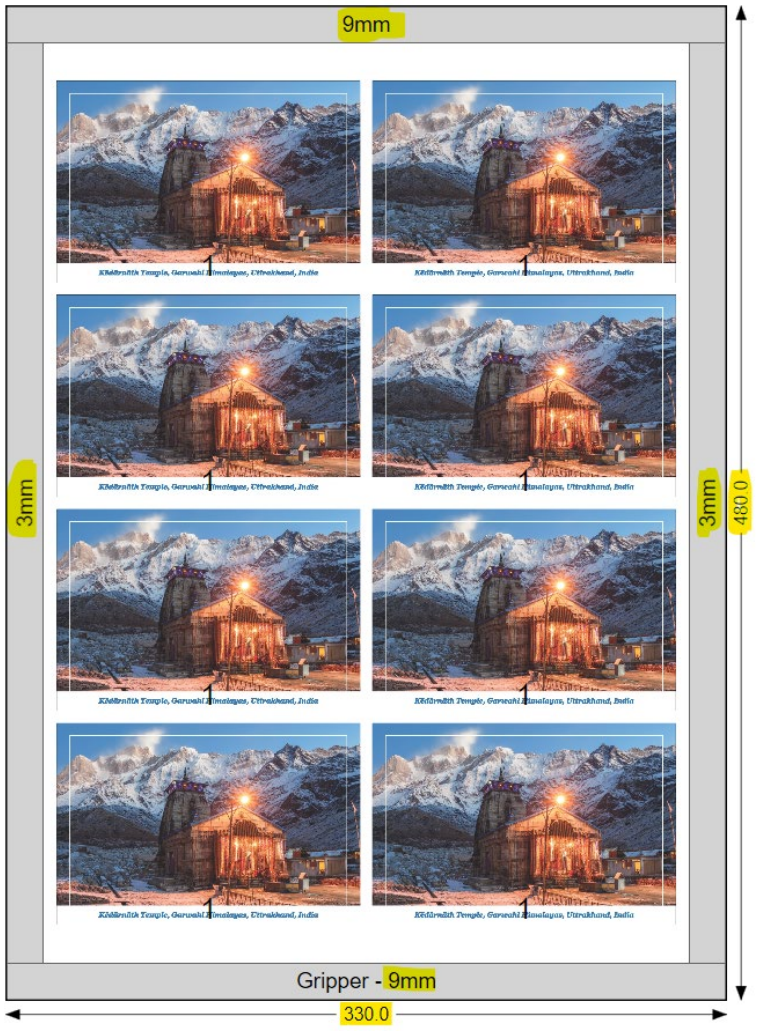
Imp now shows the no-print margins along with gripper margin in layout diagram in reports:
Increase book block thickness range in binding methods
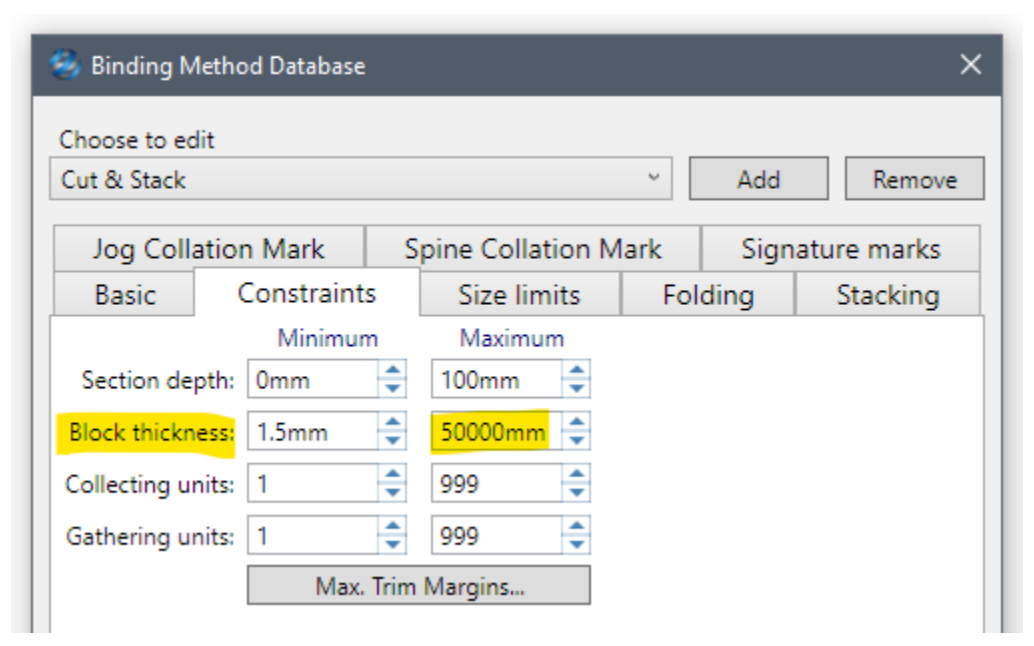
Imp currently supports a maximum block thickness of 1000mm or 39.37in the binding methods. We got requests from customers to increase this range especially to handle variable data / direct mail jobs having thousands of records.
Now, the maximum block thickness is increased to 50000mm or 1968.5in.
Signature text mark to align from bleed edge
The signature text marks defined in binding methods are placed referenced to the trim box corner requiring users to input offsets to place it in the bleed region. With this release, Imp now places the signature text marks referenced to bleed box corner.
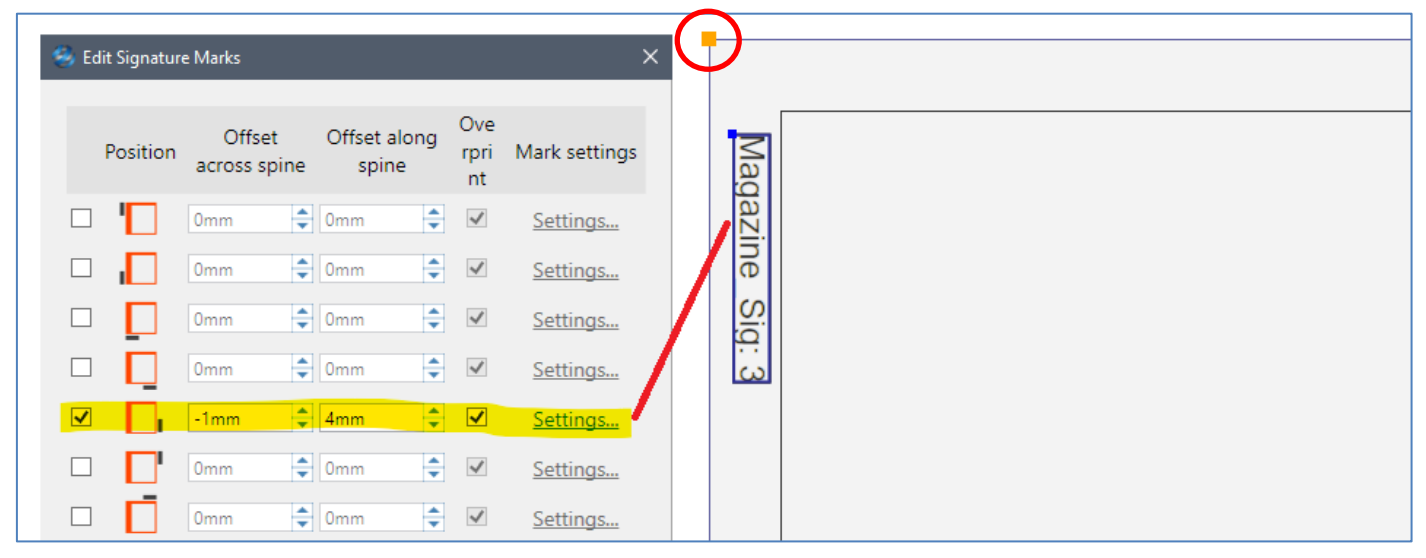
To ensure this fix does not disturb the existing customers using signature text mark from trim box reference, a new Impui.ini flag has been introduced, PlaceSigMarksOnBleedBox=1. Without this setting, Imp will add signature text marks from trim box reference only.
To set this flag please follow below procedure:
- Go to Imp install folder in C drive > InSoft Automation > Imp9
- Locate and open Impui.ini file in Notepad
- Type PlaceSigMarksOnBleedBox=1 and save the file
- Launch Imp > Plan a job and you will see signature text marks assigned from bleed box reference.
Following are the bugs fixed in this release:
Imp plans collision layout when ganging bound jobs if "Ignore guillotine cutting cost" option is not selected in the auto plan settings
In a particular job, Imp was generating a layout with pages overlapping each other. The reason was “Ignore guillotine cutting cost” option was not selected. This bug is now fixed. Imp will not create a collision layout irrespective of the ignore guillotine cutting cost option is selected or not.
Imp crashed when layout templates (.LYT files) are created or saved layout templates are edited
In some cases, Imp crashed on saving or editing layout templates (.LYT). This bug is now fixed; Imp will not crash on saving or editing layout template files
12
Introducing Imp Version 12, built on latest Windows .Net 5 framework and Adobe PDF library. With a host of new features and refinements, it takes layout plannnig, ganging, imposition and estimation to a new level.
Imp version 12 requires a fresh install. It does not require uninstalling older versions. It can be installed parallel to older versions.
Download a PDF version of the release notes here
INSTALLATION PROCEDURE
Please follow the steps below to install Imp version 12:
Download the installer from above link
- Right click the installer > Properties > Click on “Unblock” > Apply & OK
- Run the installer
- If .Net 5 is not installed on the system, installer will prompt and guide you to download .Net5 installer and run it.
- After successful installation, activation window will come up.
- Close this window
NEW FEATURES IN VERSION 12
Check-In function in Imp Flow
When jobs are processed in Imp Flow, there was no option to add/save them to the "Job Database" maintained by Farm service. A new action “Check-in product” is added to Imp Flow to do this.

Unwinding direction for labels
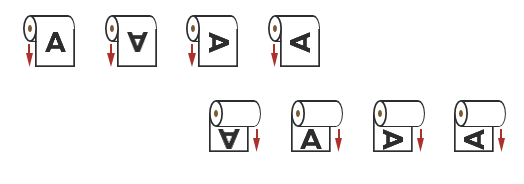
Imp now supports selection of “Unwinding direction”. This can be set in unbound component properties and Imp will place the label on reel-cut layout in required orientation.
Auto-adjustment of gap between labels for continous roll printing
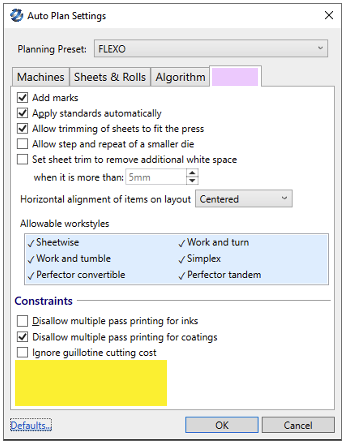
When labels are planned for continous roll printing, the gap between each label should be uniform. Till now, the gap between each label was set by static bleed value. This resulted in layouts with irregular gap in the beginning and end of each layout (sleeve).
Now, in version 12 we have a new Auto-plan option settings as highlighted below to ensure the gap between each label is uniform. This option works with “Rectangular nesting” algorithm only.
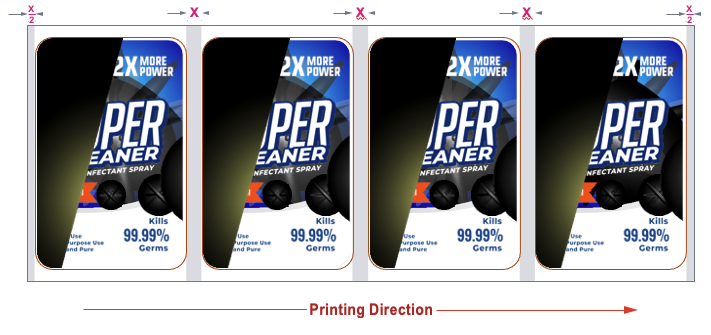
Smart Print & Cut workflow for banners
As ganging is important for overall optimization, so is the job “Metadata” for efficient identification and tracking of jobs on ganged sheets. This is critical for an overall efficient workflow; to add “Barcode or QR code” and “Text mark” with job metadata on each job on the layout.
These marks are added on a tear-off flap on any edge as part of cut-path (red outline) as in illustration below:

This requires users to add the cut-line path and the flap at design stage to each artwork or can be done using automation tools like Switch.
Imp V12 now supports auto-generation of cut-line path with flap along with barcode/QR code, text mark automatically to each artwork.
This feature is implemented by using Imp’s dynamic marks template that allows user to create cut-line path using geometry tools by entering dimensions using parametric expressions such as “TrimWidth” and “TrimHeight” for dimensions.
A new option to “Import geometry from marks” is also added to the Geometry import options to facilitate import of die-lines from geometry marks.
New option “Do not rotate” components on layout
To ensure rectangular unbound jobs are not rotated on the layout, the only option available was to set the grain direction of component and press sheet. This was an inelegant solution. To address this issue, we now have a new option in component direction “Do not rotate”. With this option selected, the components will not be rotated on the layout.
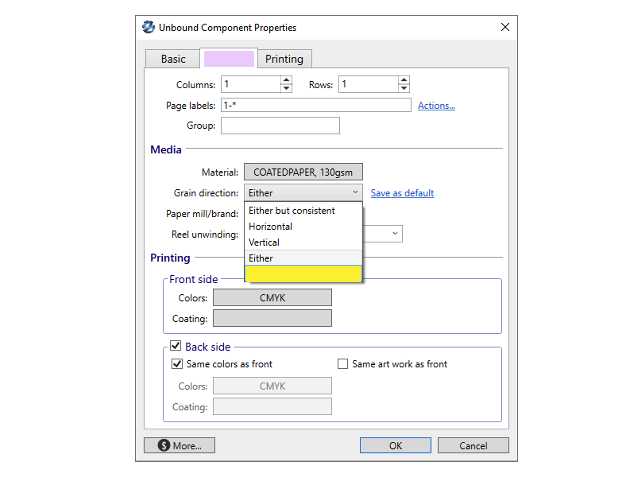
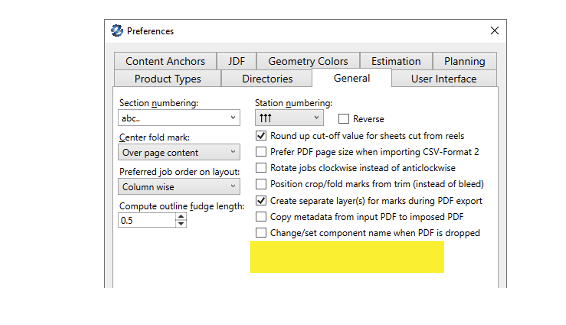
Option to generate “marks” in separate layers
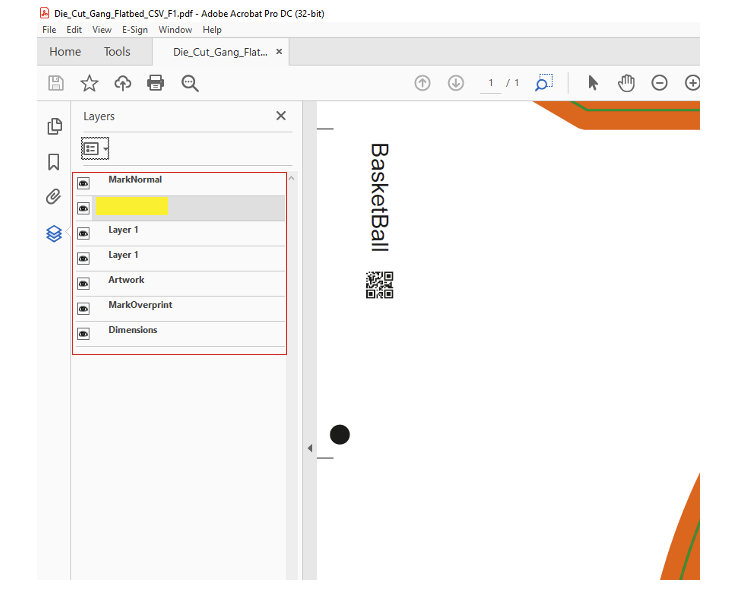
Downstream file processing can be easy if marks are placed in a separate layer in exported PDF. This way artwork and marks are in separate layers and can be turned on or off independently, as per requirement. To generate marks in separate layers we now have a new preference “Create separate layer(s) for marks during PDF export”.
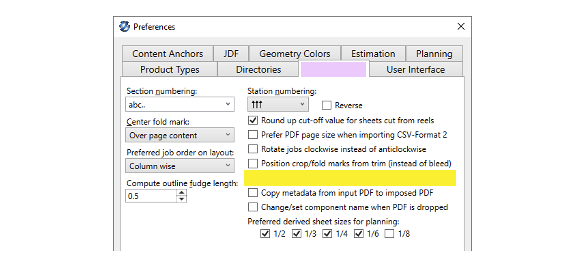
The layers are generated based on set “Prioirty” for each mark. Marks of same priority are generated in same layer. Example: The camera registration marks are placed with “High” priority.
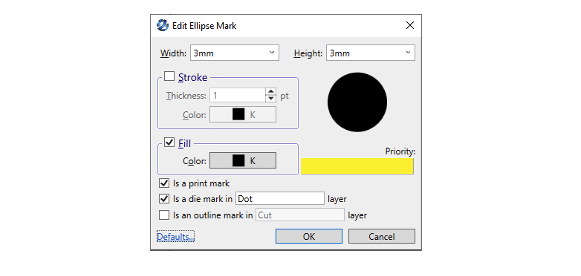
In the final exported imposed PDF, Imp creates a layer “MarksHigh” and generates all marks with high priority in it.
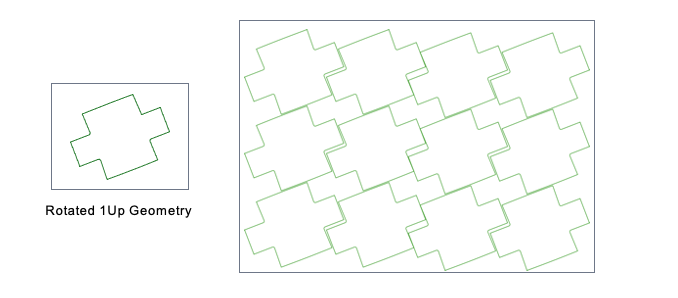
Option to “Rotate” 1Up geometry to an arbitrary angle
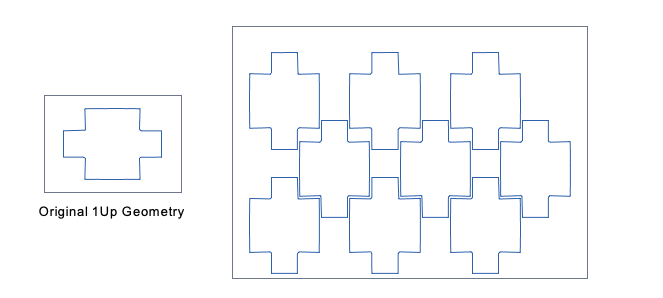
Some die-cut shapes offer better interlocking if they are rotated arbitrarily. Till now Imp supported rotation by 90° angle only. This resulted in wastage on layout as below:
In version 12, under “Geometry” tools in unbound component editor, a new “Rotate Geometry” tool is available
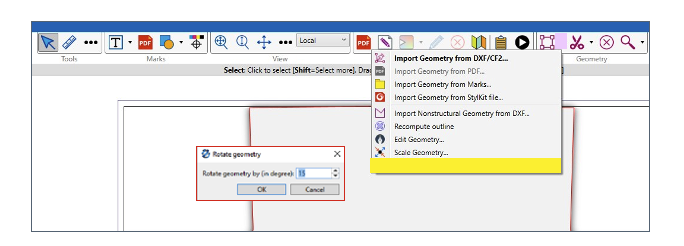
When the above job is rotated by 15°, it results in a better optimized layout.
Collecting & gathering order and positioning of partial signature
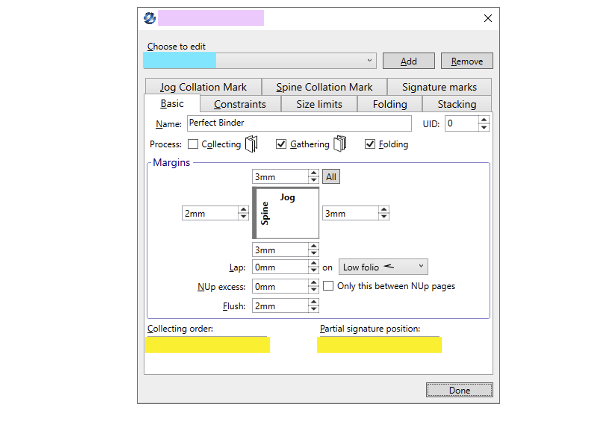
The collecting or gathering order and position of partial signature was controlled through preference setting till now. These were global settings which cannot be modified as per selected binding method on the job.
Now, in Version 12 these settings are moved from preference to “Binding method” database. This way user can create multiple binding methods with differnt collecting/gathering orders and partial signature position.
Rotate all input unbound rectangular jobs by 180°
For some specific printing applications, the incoming unbound rectangular jobs should be rotated by 180° angle.
For this a new settings “RotateAllIncomingUnboundJobBy180=1” in impui.ini file is available. Possible values for this setting in impui.ini are 0 & 1 - 1 to enable and 0 to disabled.
Procedure to set the flag:
- Close Imp or Imp Flow if running
- In Imp V12 installation folder in C drive > InSoft Automation > Imp V12 > Locate impui.ini file
- Open this file in Notepad
Type RotateAllIncomingUnboundJobBy180=1 and Save the file
- Launch Imp and Imp Flow
- Now, all input files will be rotated by 180° automatically on import
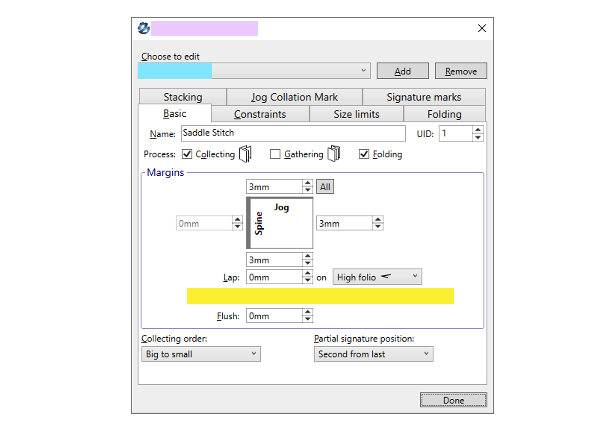
Fixed “N-Up” margin between signatures
For N-Up finishing with fixed blade width, a fixed N-Up value is required. Till now, Imp used to calculate margin between N-up signatures by adding jog and non-jog trim margins, which resulted in more space than required for fixed blade width.
Now, we have a new option in binding method to ensure that only N-Up excess value is applied between the signatures. If the option "Only this between Nup pages" is not selected, the margin between signatures will also include Jog and Non Jog trim margins.
Support for online reel-sheeter in sheet-fed offset presses
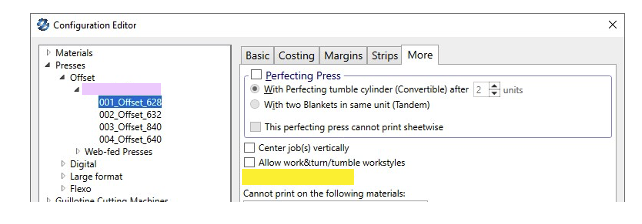
Sheet-fed offset presses with online reel-sheeter attachment can only print on sheets cut from reels. While planning Imp should not consider any mill sheet sizes. Only reels should be considered.
In Imp V12 we have added a new option "Has online reel sheeter" in sheetfed offset presses under “More” tab as below. If this option is selected, only reels will be considered for planning.
Spot inks wash-up/make-ready time in offset presses
When the spot color changes, inking units must be washed which adds to the layouts
make-ready time. It is an important consideration when planning jobs with different spot inks. Till now, Imp was not taking this into account.
Now in Version 12 we have added a new field to enter wash-up or make-ready time for spot inks.
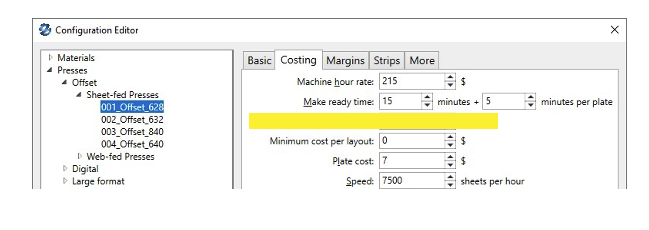
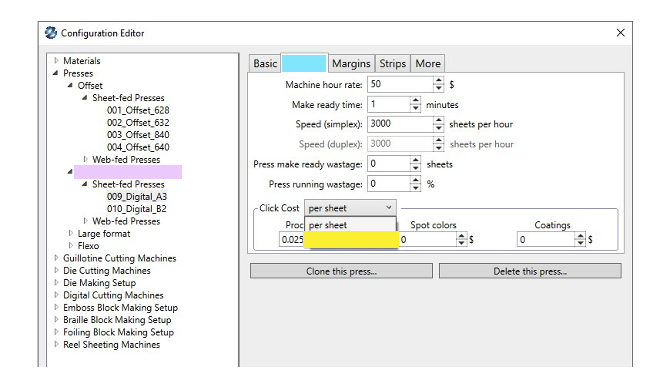
Option to define Click-cost “per area”
Digital presses can have a fixed click-cost irrespective of sheet size or can have different click-cost for different sheet sizes.
In Imp V12 user can define either click-cost common for all sheet sizes or click-cost per sq. meter. For US system, the option will be per sq. feet.
With per sq. meter click-cost, you can get different printing costs for different sheet sizes.
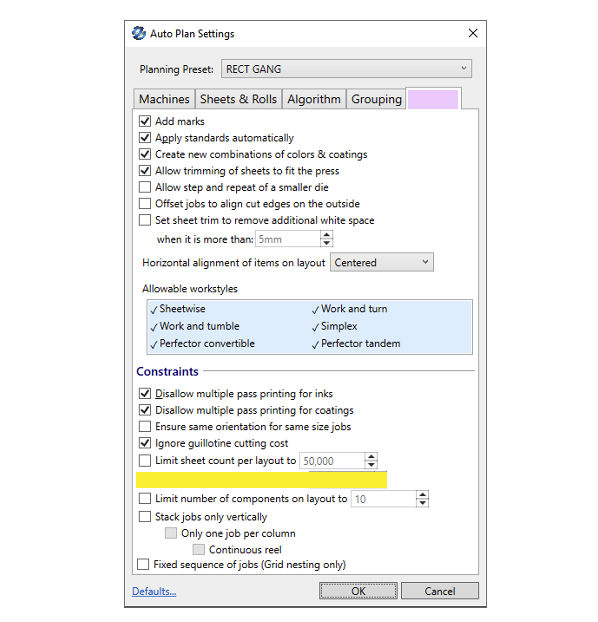
Option to define minimum sheet count
There are some printers who gang small quantities on offset presses. They need to print minimum sheets per layout while ganging.
In Imp V12, we now have an option to define “minimum sheets” in auto-plan settings as below:
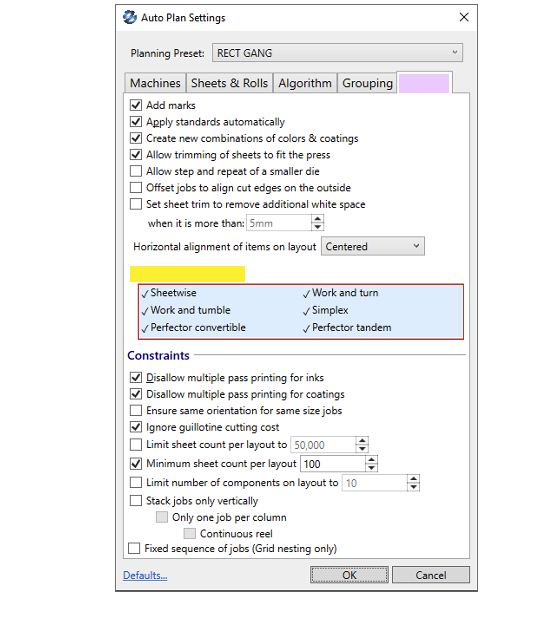
Allow selected workstyles for layout planning
Till now Imp used to select the workstyle depending on the press configuration. Few customers wanted to have control on the workstyle while planning.
In Imp V12, we now have option to select workstyles that must be considered while planning.
Imp Flow - Option to dock print area on the layout
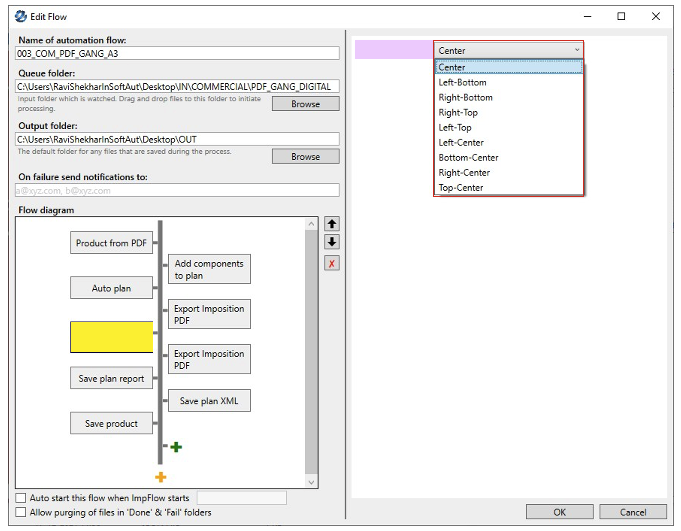
In ImpUI a user can dock the print area to any corner or center of an edge. This functionality was required in Imp Flow hot folder automation as well for handsfree processing.
In Imp V12, we have a new action “Dock print area on the layout” in Imp Flow to select the layout docking position as below:
Imp Flow - Add marks to unbound components
In Imp, we have an option to add “Job marks” to unbound components. As different types of unbound component can have different marks requirement, a user could manually apply a different marks template as per requirement.
In Imp V12, the same can be accomplished in a hands free manner using the new "Add job marks" action.

Support to define different papers and page range in a single bound component in XML input
“Carbon copy forms” are printed on papers of different colors. Till now, Imp's XML input format did not support creation of such bound components where different sections of pages were on different paper type.
To tackle this issue, <BoundComponent.PrintDefs> attribute is introduced in bound component PPXML input to define page range and material on which it needs to be printed. As in below screenshot, pages 1 to 4 are defined on different color papers.

Download latest Imp XML specification document from this link: https://insoftautomation-my.sharepoint.com/:b:/p/ravi/EYMXuyS- jYslDtiUA5OZJuXMBopon7Jj8GvQUgROU0l1Y4w?e=e4O4gv
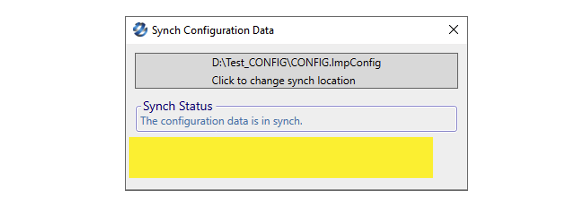
Sync configuration - Disable “Push” option
When using “Sync configuration” feature, any user was able to “Push” and “Pull” configuration data. For a secured working, it is better to give "Push" option only to admin users.
In Imp V12, "Push" option can be disabled by setting "AllowPushConfig=0" in impui.ini file.. Procedure to set the flag:
- Close Imp or Imp Flow if running
- In Imp V12 installation folder in C drive > InSoft Automation > Imp V12 > Locate impui.ini file
- Open this file in Notepad
Type "AllowPushConfig=0" and Save the file
- Launch Imp > Tools > Sync Configuration data
- Push option is not available, only “Pull” option is available to update the latest configruation data
FEATURE REFINEMENTS IN VERSION 12
Die-matching improvements
Imp’s die-search mechanism to find out a matching die for a new job used to consider only the outer cut-line path. Any mismatch in the inner parts was ignored.
In below example, the window in the carton was ignored and die-database showed 100% perfect match.
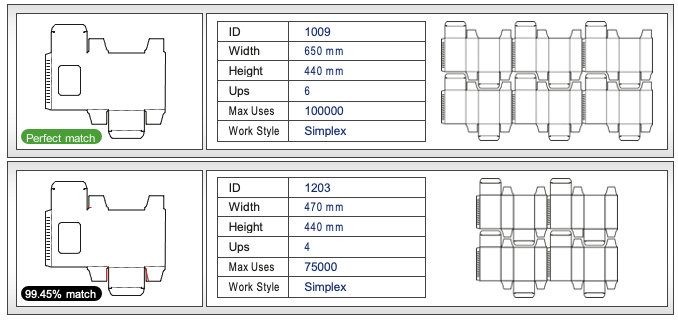
Now, Imp V12 offers die-search considering inner closed paths also.
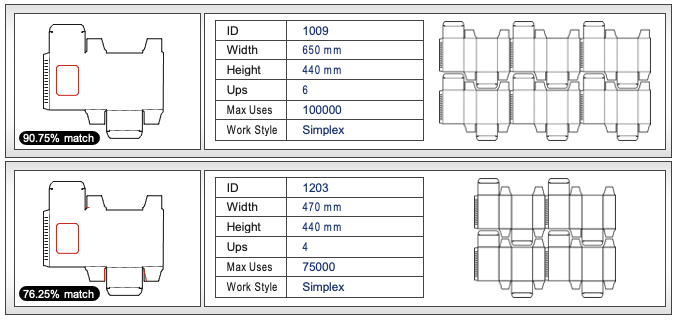
While die-matching, if there are line segments, arcs or any other open shapes inside cutline path, these will not be considered.
“Allow trimming of sheets to fit the press” should work for reels
In Imp’s auto-plan settings, “Allow trimming of sheets to fit the press” option if selected will trim the big mill sheets to fit the press. This option was limited to sheets only. Now it is extended for reels also, with maximum of 25% trim wastage.

Option to control derived sheets
Imp can plan on derived sheet sizes from mill sheets as per the constraints of printing and finishing devices such as guillotine cutting, die-cutting or digital cutting devices. Till now, user can’t control which derivates to be used.
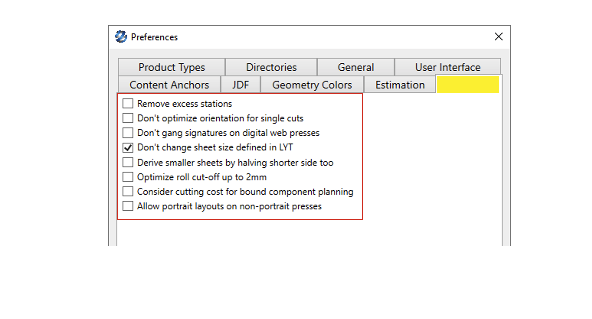
In Imp V12 preferences, user can now select the derivatives to be considered for planning:
Impui.ini flag settings moved to preferences
Impui.ini file settings flags are provided as a first cut of development delivery for specific requiremetns. Once the features stabilize, they are moved to Imp’s preferences.
Many features developed in Imp9 are now moved to preferences in Imp V12. Below is screen- shot of these new options under planning tab:
Bound jobs ganging
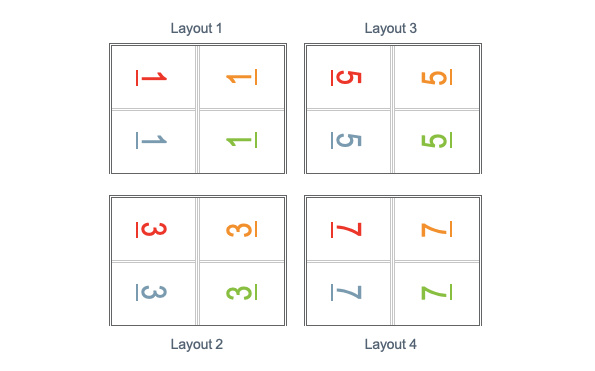
Imp's ganging engine used to gang only signatures of a single bound component. It does not combine signatures of different bound components, together on the same layout. This results in greater number of pallets for finishing as each layout will be cut, collated, and finished separately.
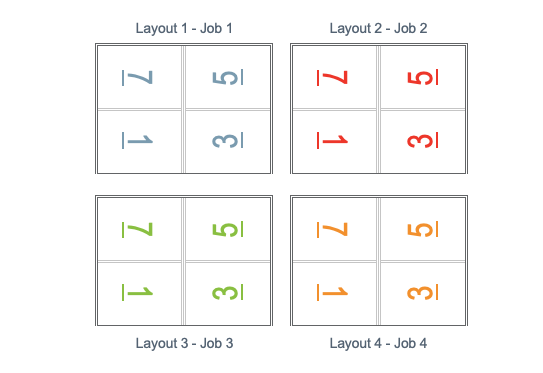
In Version 12 of Imp, this issue has been addressed. Now, the software can plan signatures of different bound components (but same page count) on the same sheet for better control and efficiency in collation and finishing.
Ignore orientation while saving and re-using LYT files
Till now, Imp’s LYT files are saved with job orientation. A LTY file saved using a portrait job can’t work for a landscape job of same size.
Now, LYT files used in Imp V12 are orientation free. Users can use LYT files saved even in older versions, using any orientation - portrait or landscape, and they will work for both orientations.
Support to import additional geometries from PDF file
Till now, Imp used to support import of only 3 geometries from input PDF files as Cut, Crease and perforation layers as below:
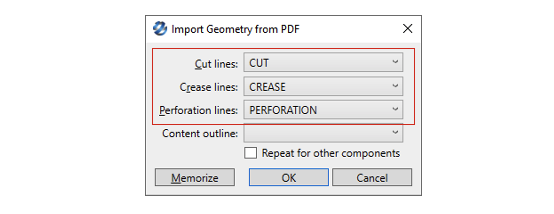
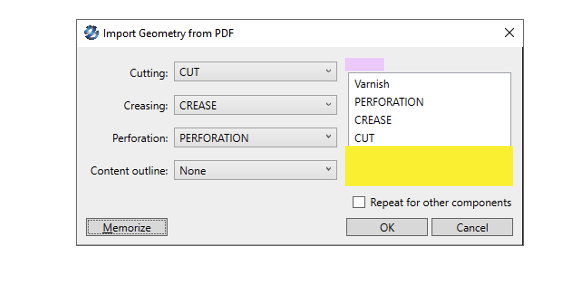
In case there are more geometries such as “Kiss Cut” “Half Cut” “Drill” in the input file, Imp used to ignore these.
Imp V12 can now import any number of geometries under “Others” tab:
Support to Import CF2 dies with 1Up placed in arbitrary rotation
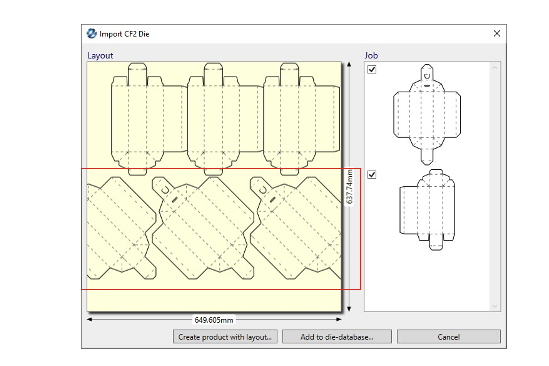
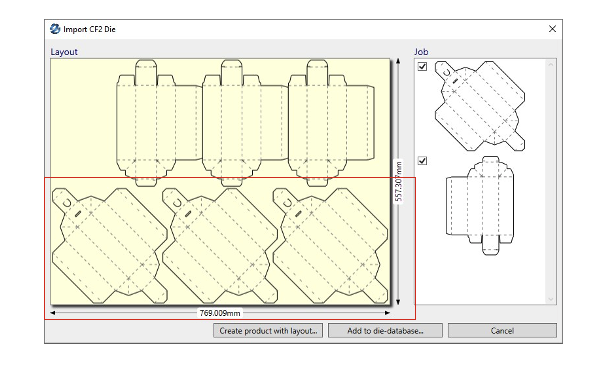
Till now, Imp could only import CF2 die layouts with ups placed in orientations of 0°, 90°, 180° & 270°. If 1Up designs are placed at an arbitrary angle, as in below image, Imp used to skip the placements in bottom row.
Imp V12 supports the import of such die-layouts with 1Up placed at arbitrary rotation.
Digital Printing - Ignore make-ready time and wastage for similar layouts in a plan
Till now, Imp considered added make-ready time and wastage for every layout even if some of them are on the same press, sheet and workstyle. On digital presses, such similar layouts can be printed with single make-ready. This is fixed in version 12.
Option to control auto-start of flows for different users
The option "Auto start this flow when ImpFlow starts" is a convenient option to automatically start flows when ImpFlow is started. However, in multi-user environment, this leads to problems.

In version 12, each flow can be assigned a user affinity and only on that user's ImpFlow install will that flow auto-start on startup.
For this, set “UserName” in impui.ini file. This is not system user name. It is just a unique name for an Imp user.
Follow below procedure to set the impui.ini file:
- Close Imp or Imp Flow if running
- In Imp V12 installation folder in C drive > InSoft Automation > Imp V12 > Locate impui.ini file
- Open this file in Notepad
Type "UserName=XYZ" (XYZ is only for sample) and save the file
- Launch Imp and Imp Flow
- In Imp Flow > Select the flow > Edit > Enter the UserName as defined in the Impui.ini file in “Auto start this flow when ImpFlow starts” field. This flow will only start for this user.

Version 13
Download the release notes here
Version 14.4
Imp version 14 build 14.4.00 is now available with some new features & refinements as listed in the documents below.
All customers under annual support and maintenance are eligible for an upgrade to this release.