ZePrA
Vereenvoudiging van de kleurenautomatisering
ZePrA is een kleurenserver voor rechtstreekse kleuranalyse en een snelle, foutloze en kosteneffectieve aanmaak van Device Links-profielen.
ZePrA is een gesofisticeerde kleurenserver die geautomatiseerd kleurbeheer en conversie vereenvoudigt voor elke gebruiker – zonder de complexiteit en hoge prijs van oudere workflowoplossingen. De tool werkt vlot, met een snelle, flexibele rendering van een werkbare printeroplossing voor de vereenvoudiging, duplicatie en wijziging van configuraties en wachtrijen voor de routinetaken van het dagelijkse productiewerk. Kleuren worden snel en flexibel geanalyseerd, zodat de printers onmiddellijk en foutloos de nodige Device Links-profielen kunnen aanmaken, zonder omslachtige integratiefases.
De ZePrA Smart Color Server kan voor een onmiddellijk resultaat in een bestaande workflow worden geïntegreerd. De gebruiksvriendelijke interface vereenvoudigt de aanmaak van Device Links-profielen in elke workflow.
ZePrA maakt zijn beloften waar dankzij de succesvolle combinatie van Smart Color Server, Smartlink en PantoneLive® Support. De ZePrA Smart Color Server analyseert kleuren ongelooflijk snel. SmartLink maakt rechtstreeks Device Links aan met de geavanceerde kleurtechnologie van ColorLogic. De ingebouwde PantoneLIVE® Support geeft gebruikers met een PantoneLIVE®-productielicentie inline toegang tot de Pantone®LIVE-bibliotheken in ZePrA. De meer geavanceerde functies van ZePrA, zoals meerkleurenopties of geavanceerde steunkleurconversie, kunnen worden toegevoegd wanneer de uitrusting wordt geüpdatet en geüpgraded.
ZePrA is verkrijgbaar in een reeks flexibele en aanpasbare pakketten, van instapniveau tot XXL, op maat van kleine tot grote bedrijven.
| Kenmerken | ZePrA Entry | ZePrA Basic | ZePrA L | ZePrA XL | ZePrA XXL |
| Enkel ondersteuning pixelbestand | Ondersteuning PDF + pixelbestand | Ondersteuning PDF + pixelbestand | Ondersteuning PDF + pixelbestand | Ondersteuning PDF + pixelbestand | |
| Bestandsconversie | |||||
| JPEG/TIFF/PSD/PSB | x | x | x | x | x |
| x | x | x | x | ||
| Ondersteuning van kleurruimte | |||||
| RGB, CMYK, Grijstint & LAB | x | x | x | x | x |
| Multicolor | x | ||||
| Steunkleuren (alternatieve kleurruimte) | x | x | x | x | |
| Geavanceerde steunkleurconversie | x | ||||
| Iteratie van steunkleuren | x | ||||
| Ondersteuning van PantoneLIVE | x | ||||
| SmartLink voor RGB, Grijstint & CMYK | x | x | x | ||
| SaveInk voor SmartLink (CMYK) | x | x | |||
| Overige | |||||
| ZePrA aansturen via command line | x | x | x | x | |
| Afvlakken | x | x | x | x | |
| Gradatiecorrecties | x | x | x | ||
| Multithreading | x | x | x | ||
| PDF + Afvlakken + CLI + Pixel-ondersteuning inbegrepen - DLS Basic set inbegrepen | PDF + Afvlakken + CLI + Pixel-ondersteuning + Gradatie + SmartLink + Multhireading inbegrepen, CoPrA SP + Reprofiler SP inbegrepen - ColorAnt niet inbegrepen | Zelfde functies als L-pakket + SaveInk Add on voor SmartLink inbegrepen CoPrA SP - ColorAnt niet inbegrepen | Zelfde functies als L-pakket + SaveInk Add on voor SmartLink + Multicolor + Steunkleur - CoPrA SP inbegrepen - ColorAnt niet inbegrepen |
ZePrA wordt geleverd door ColorLogic, naast CoPrA, de oplossing voor kleurprofilering, en de oplossingen voor kleurbeheer van ColorAnt. Abonnees van ZePrA kunnen een software-onderhoudscontract nemen om consistent en doorlopend de nieuwste updates te ontvangen.
- Bliksemsnelle analyse
- Intelligente analyse en evaluatie van de tracking
- Beschikbaar als modulaire pakket – van instap tot XXL
- Softwareonderhoudscontract als optie
- Eenvoudige implementatie in elke workflow
- Compatibel met Mac OSX en Windows
- Werkt met wizards
- Integratie met PantoneLive®
- Transparantieafvlakking
- Cloudfuncties
- Inktbesparing en TAC-beperking
- Iteratie van steunkleuren
- Integratie met Enfocus Switch
- Steunkleurrapportage
- Flexibel en aanpasbaar
Benefits
- Rechtstreekse kleurautomatisering
ZePrA analyseert de kleuren snel en flexibel en selecteert vervolgens de beste tools om de vereiste Device Links-profielen voor elke printer foutloos en kosteneffectief te creëren. - Verzameling van kleurentools op maat
ZePrA combineert Smart Color Server met Smartlink en PantoneLive® Support. Samen verzekeren de drie tools een optimale creatie van Device Links-profielen. - Onmisbaar in elke productieomgeving
ZePrA heeft een eenvoudige gebruikersinterface. De oplossing kan moeiteloos in vrijwel elke workflow worden geïntegreerd en verbluft met de kwaliteit en de efficiëntie van de rendering. Ze werkt zelfs met meerkleurenbestanden, past DeviceLink-profielen op elke kleurruimteconversie toe en converteert steunkleuren rechtstreeks.
ZePrA, supplied by ColorLogic, is a sophisticated color server that analyzes color on-the-fly, enabling a fast and flawless creation of DeviceLinks profiles without the delay of long and costly integration phases. Thanks to a triumvirate of tools, ZePrA truly simplifies automated color management and conversion for any user.

Rechtstreekse kleurautomatisering
ZePrA analyseert de kleuren snel en flexibel en selecteert vervolgens de beste tools om de vereiste Device Links-profielen voor elke printer foutloos en kosteneffectief te creëren.

Verzameling van kleurentools op maat
ZePrA combineert Smart Color Server met Smartlink en PantoneLive Support. De drie tools helpen je en wijzen je de weg naar de optimale creatie van DeviceLinks-profielen.
Gebruiksvriendelijke interface
ZePrA heeft een gebruiksvriendelijke interface en kan makkelijk in zowat elke workflow worden toegepast. De tool werkt zelfs met meerkleurenbestanden, past DeviceLink-profielen op elke kleurruimteconversie toe en converteert steunkleuren rechtstreeks.
Talk to our sales team about this product.
Praat met onsContact us to get started.
Praat met onsVersion history
Showing the 5 most recent of 36 releases.
9
New Features in ZePrA 9
DeviceLink Iteration Wizard
Iteration can be necessary to achieve the best possible color match, especially when proofing. To apply an iteration, a special test chart must be converted with the desired color management settings of a given configuration, printed and measured. With the measurements the DeviceLink profile can be optimized. After one to three iteration cycles, a closer match in terms of DeltaE values is achieved. This process is error-prone if done manually, however, it is easy to accomplish with the help of the DeviceLink Iteration Wizard, which guides you through each step.
The iteration starts by selecting the configuration containing the DeviceLink to be iterated. This can be done in three different ways:
- In the Queues section of the Overview, select the queue and configuration you want to iterate. Open the context menu with a right click and select DeviceLink Iteration.
- Select DeviceLink Iteration from the Tools menu and search for the desired configuration in the Configuration drop-down menu of the appearing DeviceLink Iteration Wizard. You can use the same search and sort functions that you are familiar with from the Configuration drop-down menus elsewhere in ZePrA to find the configuration you are looking for.
- Open the desired Configuration in the Document/Target tab and click on the Iterate button at the bottom of the Conversion section.
The DeviceLink Iteration Wizard dialog consists of two tabs, the Current Iteration and the Archive tabs. The Current Iteration tab contains the actual iteration wizard and typically, if a configuration is selected that has not yet been iterated, the wizard is started directly there. The Archive tab contains all the iteration steps that have been carried out, including all the evaluation details.
The wizard guides the user through the iteration process in four steps:
The first step of a new iteration is the creation of the test chart to be printed. Here, there are two possibilities. Either you use the included Default Iteration Chart, which of course is always optimized for the color space of the given configuration. Or, if you have your own reference file from a custom chart that you want to use, you can select an appropriate reference file (TXT, CXF3, XML) under Custom Iteration Chart.
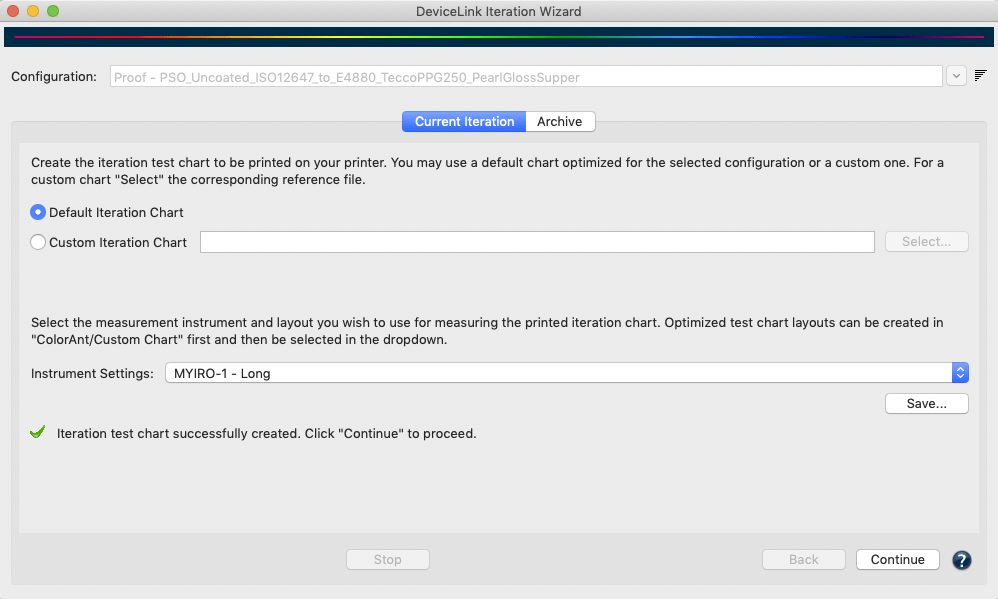
After that, select your measurement Instrument Settings. Various settings for the supported measurement equipment can be selected from the drop-down menu in the Measure Tool (the Measure Tool is included in ZePrA).
Note: Customers using ColorLogic ColorAnt can create their own instrument settings optimized for their specific requirements in the Export Chart tool.
Click Save and select a file format (PDF, TIFF or PSD) to create the test chart in the selected location. All color management settings of the configuration will be applied automatically.
Note: In some cases the creation of the chart may take some time, for example if the Conversion settings SmartLink or Device Profile are used in the configuration, as the wizard will then need to create a DeviceLink profile first.
After you successfully created the chart and the associated reference file, a message and a green check mark indicates that you can now proceed by clicking the Continue button.
The second step consists of two operations. First, the chart created in step 1 must be printed on the printer without color management settings. Then, after drying, the print must be measured. If the Measure Tool is to be used, simply click on the Measure button. You do not need to worry about the reference file and layout, as this is already preselected within the Measure Tool. Instructions on how to select your device and make measurements using the Measure Tool can be found here.
Note: Alternatively, you can use the previously exported reference file and measure your printed chart with a different measurement tool. Make sure that the measurements are saved in standard file formats that can be read by ZePrA, such as CGATS TXT, XML or CXF3. The external measurement files can be loaded using the Load button.
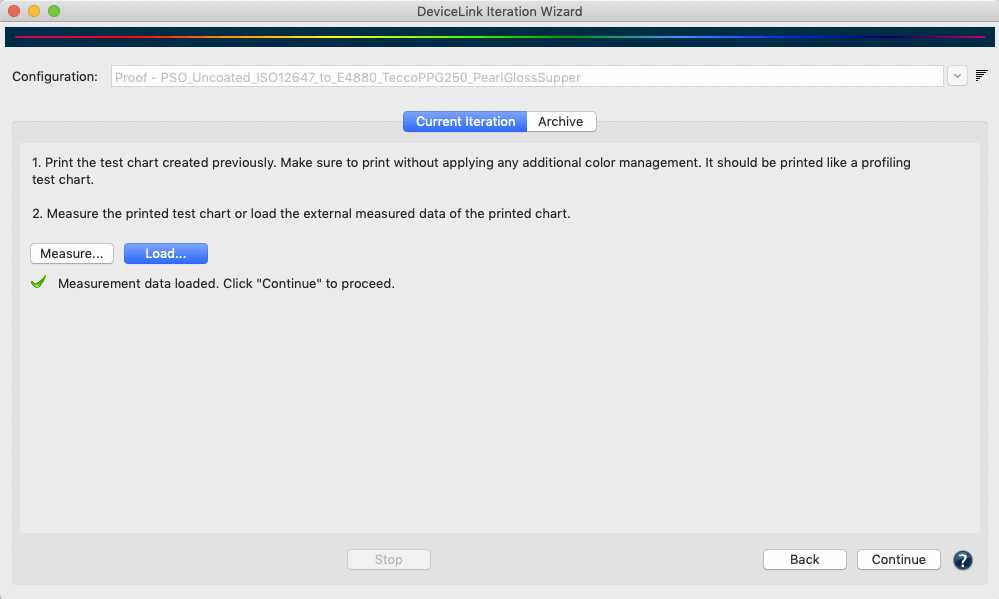
Once the measurement data has been transmitted from Measure Tool or loaded from external sources and it conforms to the printed chart a green check mark indicates a match and you can proceed by clicking Continue.
Note: When loading measurement data that does not match the chart layout or the corresponding patches in the reference file, you are alerted by a warning message and proceeding to the next step is not possible.
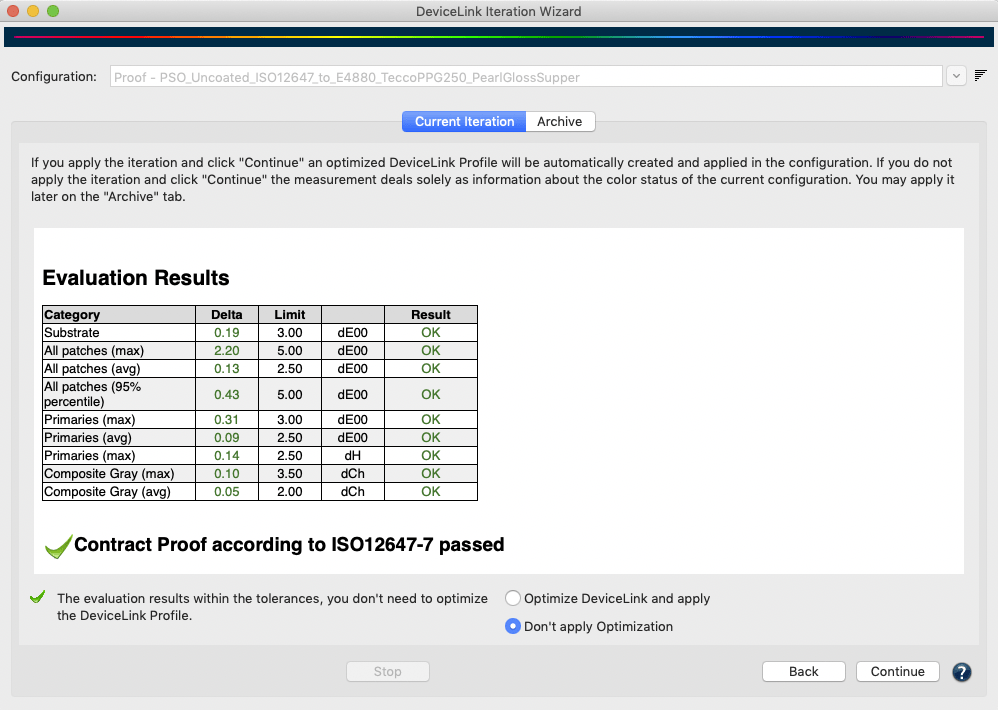
The third step shows the Evaluation Results of the measurements compared to the desired color conversion. If all categories such as substrate, the maximum and average deltaE for all patches, etc. are within their limits they are marked green and the overall result is marked okay. In a proofing case, for example if an absolute colorimetric rendering intent is used in the configuration, the proof print can be evaluated by the DeviceLink Iteration Wizard according to ISO 12647-7. If all categories are within the tolerances after the measurement, the print is a Contract Proof according to ISO12647-7, which is indicated by a green check mark. A further iteration is then not required, hence the Don’t apply Optimization radio button is preselected.
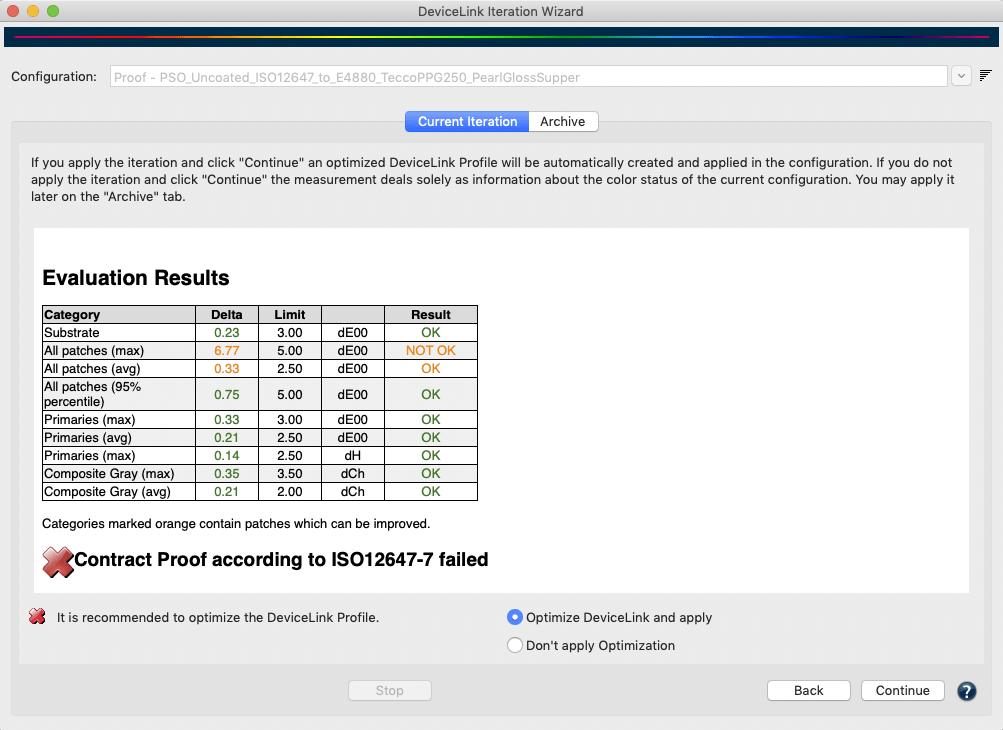
However, the preselection can be overridden and another iteration cycle applied if the results are to be improved even further. To do this, select the Optimize DeviceLink and apply radio button and click Continue. Alternatively, apply the iteration later via the Archive tab.
If only a single category is displayed in orange or red in the table of Evaluation Results, the proof print is considered to be not okay and the validation has failed. In this case, a warning is displayed and it is suggested to apply an iteration to improve the result. The corresponding radio button Optimize DeviceLink and apply is then preselected.
By selecting Optimize DeviceLink and apply and clicking on Continue, an iterated DeviceLink is created on-the-fly and automatically entered in the configuration.
But ZePrA offers even more intelligent features, as it checks for out-of-gamut colors and evaluates whether those colors can be improved. Colors that are displayed in red in the Evaluation Results and Report are considered out-of-gamut and their deltaE00 values can most likely not be improved. Nevertheless, an iteration can slightly change the rendering of out-of-gamut colors, for example, to correct hue errors when colors are far from the desired hue. Colors that are displayed orange, however, can be improved with further iteration. If there are only red colors left, ZePrA informs, that further iterations are of no use and preselects the Don’t apply Optimization radio button. If, however, there are orange displayed colors, the color values can be further optimized and ZePrA suggests Optimize DeviceLink and apply.
The fourth step concludes the iteration cycle. Here, there are three options to choose from. Based on the previous results, the wizard already preselects a logical option for you to follow:
- Optimize DeviceLink Profile again: Runs another iteration cycle, for example to check whether a previously iterated DeviceLink successfully passes the evaluation. If you select this radio button and click Continue, a new iteration cycle starts with step 1 and the creation of a new test chart to be printed.
- View the evaluation results in the Archive tab: If you have already completed several iterations or would like to see the evaluation results once more, select this option. When you click Continue, the Archive tab opens with the last iteration step highlighted.
- Close this dialog: If the evaluation results are fine or if you want to end the iteration process you can simply select Close this dialog and by clicking Continue the iteration is ended.
Spot Color Iteration Wizard
ZePrA 9 includes a new Spot Color Iteration Wizard that replaces the old dialog. It is much easier and faster to use. The user is guided through all steps and the evaluation results and pass/fail information are provided directly in the wizard.
Starting the Spot Color Iteration Wizard is already genuinely easy in ZePrA 9: If a job with spot colors has been converted via a queue in ZePrA and the configuration used has the spot color conversion enabled, then the Spot Color Iteration Wizard can be started from the ZePrA Overview dialog in the Processed Jobs section by simply right-clicking on this job and selecting Spot Color Iteration. Here we assume that the user wants to print the spot colors of this job optimally and that a better match can be achieved by iterating these spot colors.
The wizard guides the user through the iteration process in five steps:
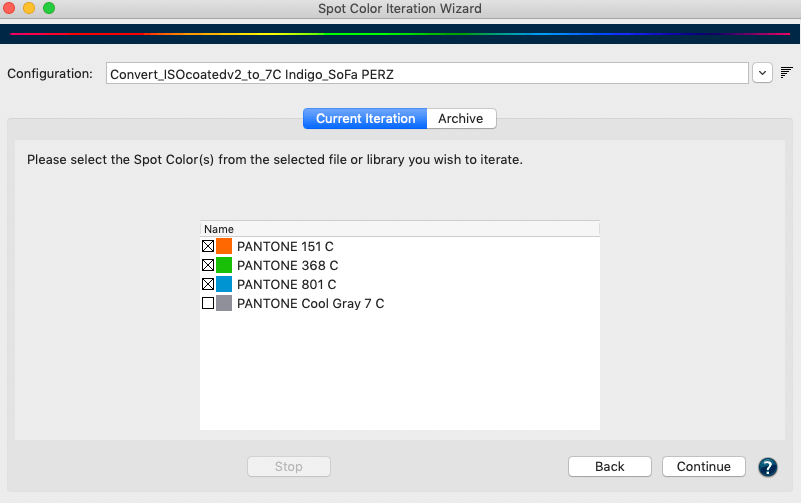
Step 1: When the Spot Color Iteration Wizard is started via the Processed Jobs the first step is the selection of the Spot Colors to be optimized. All spot colors of the job (PDF or image file) will be automatically extracted and used in the wizard. You can select the spot colors to be optimized and disable the colors that are not to be iterated. By default all spot colors of the job are preselected.
Step 2: After clicking Continue, you can Create a Test Chart with the spot colors previously selected or – even easier – you can use the print job for measuring if it has measurable areas large enough for the full tones. In this case the Don’t create Test Chart option needs to be selected.
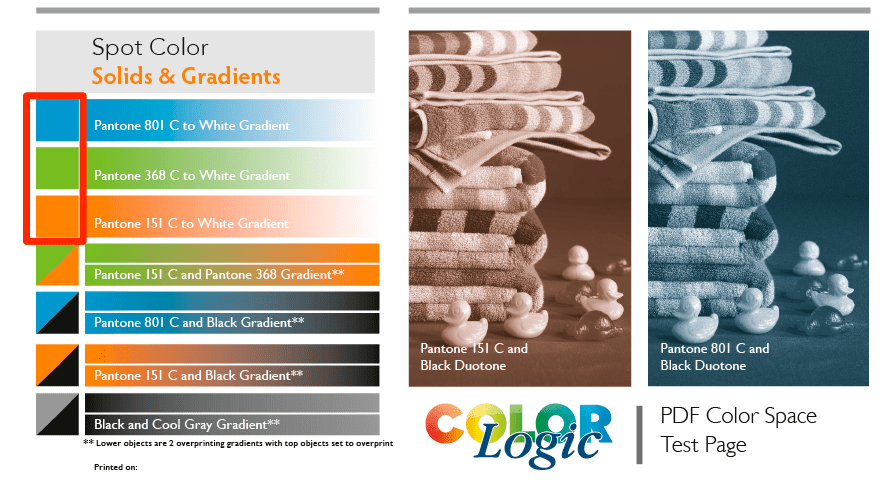
Note: The screenshot of a sample PDF file shows the patches of spot colors that can be used for measuring the spot color full tones. Some prints contain control patches of spot colors that could be used for measuring or, if there are larger areas in the design containing the 100% tone of a spot color, that could be used, too.
When the Create Test Chart option is selected an Instrument Setting must be set and the test chart must be Saved before the Continue button is enabled. If Don’t create Test Chart has been selected the Continue button is available right away.
Step 3: Now the printed spot colors need to be measured. For this purpose, the actual printed job or a test chart created in advance can be used. When using the test chart, it must be printed on the printer without any color management and can be measured after drying. If the Measure Tool is to be used, simply click on the Measure button. You do not need to worry about the reference file and layout, as this is already preselected within the Measure Tool. Instructions on how to select your device and make measurements using the Measure Tool can be found here.
Note: Alternatively, if you have created a test chart you can use the associated exported reference file and measure your printed chart with a different measurement tool. Make sure that the measurements are saved in standard file formats that can be read by ZePrA, such as CGATS TXT, XML or CXF3. The external measurement files can be loaded using the Load button.
Once the measurement data has been transmitted from MeasureTool or loaded from external sources and it conforms to the printed chart a green check mark indicates a match and you can proceed by clicking Continue.
Note: When loading measurement data that does not match the chart layout or the corresponding patches in the reference file, you are alerted by a warning message and proceeding to the next step is not possible.
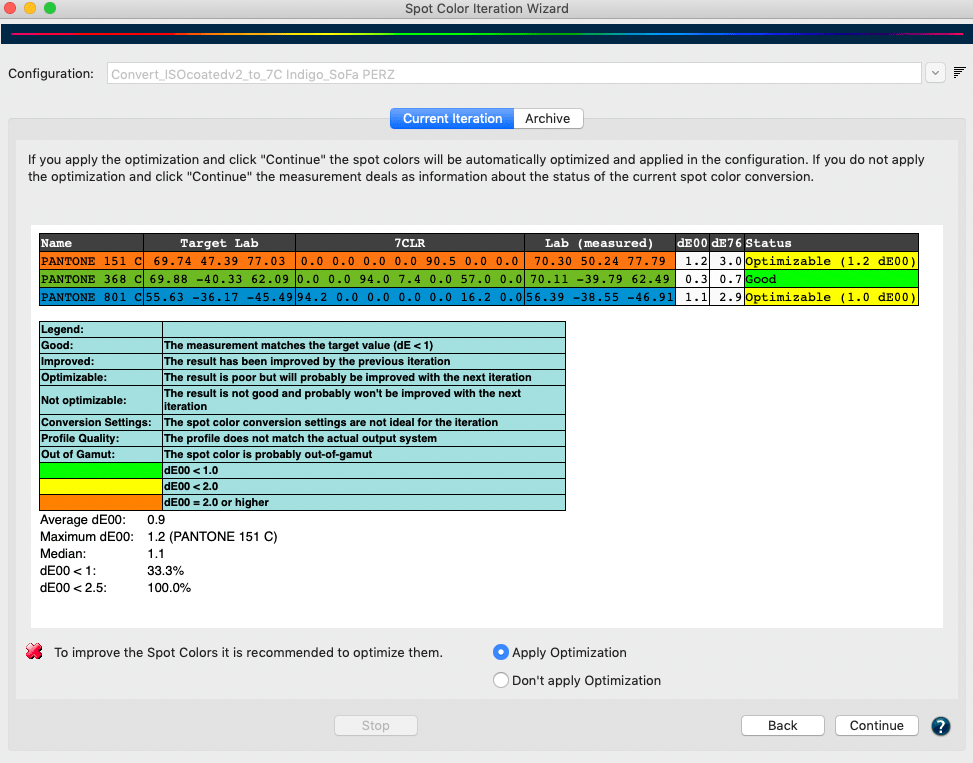
Step 4: In the penultimate step, the evaluation results of the measurements of each spot color are displayed in comparison to the reference Lab values of the original spot colors. In addition to the DeltaE00 and DeltaE76 values, a Status information text is also displayed, either in green, yellow or orange. The Legend below the table explains the indication colors and status information.
In essence, if the spot color match is less than 1 dE00, a perfect match is achieved and the status color is highlighted in green in the table. Further optimization is then no longer required. If the spot color match is less than 2 dE00 but higher than 1 dE00 and the Status column indicates that the match can be improved further, then this is indicated with a yellow color. And finally, if a spot color has a higher deviation than 2 dE00 the color is marked orange. If a color is not optimizable or out-of-gamut, it can not be improved which is indicated in the Status information column, too.
ZePrA preselects one of the two options (Apply Optimization or Don’t apply Optimization) depending on the evaluation results. However, the preselection can be overridden and another iteration cycle can be applied if the results are to be improved even further. To do this, select the Apply Optimization radio button and click Continue. Alternatively, if you just need the measurements for evaluation select the Don’t apply Optimization radio button.
Step 5: The concluding step of the iteration cycle contains three options and a checkbox to choose from. Based on the previous results, the wizard already preselects a logical option for you to follow:
- Optimize Spot Colors again: Runs another iteration cycle, for example to check whether a previously iterated spot color successfully passes the evaluation. If you select this radio button and click Continue, a new iteration cycle starts with step 1 and the selection of the spot colors to be optimized.
- View the evaluation results in the Archive tab: If you have already completed several iterations or would like to see the evaluation results once more, select this option. When you click Continue, the Archive tab opens.
- Close this dialog: If the evaluation results are fine or if you want to end the iteration process you can simply select Close this dialog and by clicking Continue the iteration is ended.
The checkbox Repeat Job works independently from the three radio buttons. If it is enabled when clicking Continue the last job is converted again with the configuration. This is especially helpful if the spot colors of that last job have been optimized by the wizard which in turn optimizes the spot color settings in the configuration to improve the spot color rendering.
The Spot Color Iteration Wizard dialog consists of two tabs, the Current Iteration and the Archive tabs. The Current Iteration tab contains the actual iteration wizard and typically, if a configuration is selected that has not yet been iterated, the wizard is started directly there. The Archive tab contains all the iteration steps that have been carried out, including all the evaluation details.
Push-2-ZePrA v2 with Network capabilities
The 2nd edition of the Photoshop extension Push-2-ZePrA has network capability. This eliminates the need for ZePrA to be installed on the same computer as Photoshop.
To make this possible, a Push-2-ZePrA remote server has been integrated into ZePrA 9. The new Push-2-ZePrA Photoshop extension now acts as a client application that can access the ZePrA server from Photoshop over the network.
In this way, several users can work with the extension installed in their respective Photoshop versions over the network with the same ZePrA server. The Photoshop clients can thus be used on different computers, but also under different operating systems than the ZePrA server.
The Push-2-ZePrA v2 Photoshop extension is integrated with a 1-client license in ZePrA XL and XXL. A 5-client or a 10-client multi-user license can be purchased additionally. For ZePrA 9 Entry, Basic and L, the Push-2-ZePrA v2 Photoshop extension and the multi-user licenses can be purchased as add-ons.
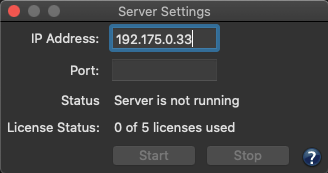
To configure the ZePrA server, go to the Tools menu and open the Server Settings. There you specify the IP address of the computer on which ZePrA is installed and set a Port. Then click Start. The status changes to Server is running and the License Status indicates the number of licenses in use as well as the number of available licenses.
The minimum requirement is Adobe Photoshop CC 2017 and on Apple systems macOS 10.13 and higher is required.
After installation, open the extension in Photoshop, click the Gear icon, enter the previously defined ZePrA server settings (IP and port) under ZePrA remote and click Test Connection. The connection status is displayed. When the connection is successfully established, define your Local Output Path to save the converted files in and click the Home button. You can then immediately use the extension.
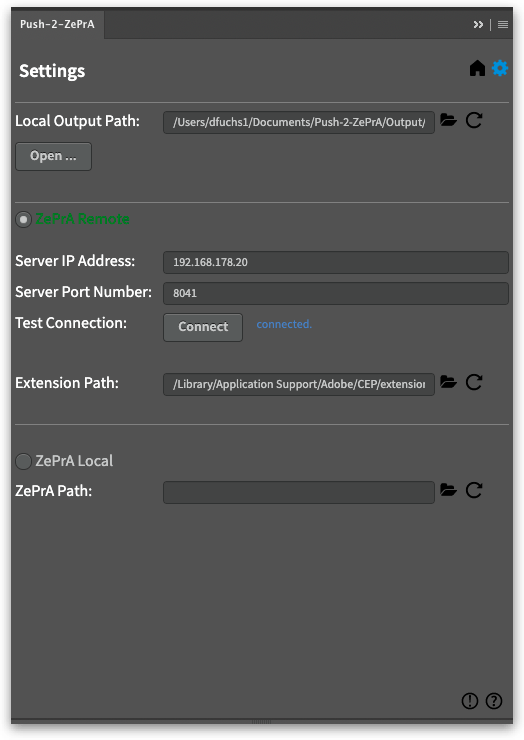
If all available licenses are linked with the ZePrA server, additional Push-2-ZePrA extension users will not be able to connect to the ZePrA server.
Note: In order to use the Photoshop extension, the remote server must be started in ZePrA. Once the server has been started in ZePrA, it will run even if the ZePrA application is closed later on. Only when the computer is shut down, the server is also shut down and must be restarted in ZePrA after the computer is restarted.
Re-designed Images/Vectors dialog
The Images/Vectors tab in the Configuration has been completely redesigned and also offers additional new features. As a result, the conversion options for images and vectors are now easier to understand and configure. To make it clearer how images and vectors are processed, for example CMYK images from PDF files, the main conversion option Convert to Document Color Space has been renamed to Convert with Normalization. This is to clarify that images are first converted to the document color space (this is the normalization step) and in a second step the entire document is converted from the document color space to the target color space. The old name implied that the conversion ends with the first step, when the images are converted to the document color space, which is not and never was the case. The new naming should now make this clearer.
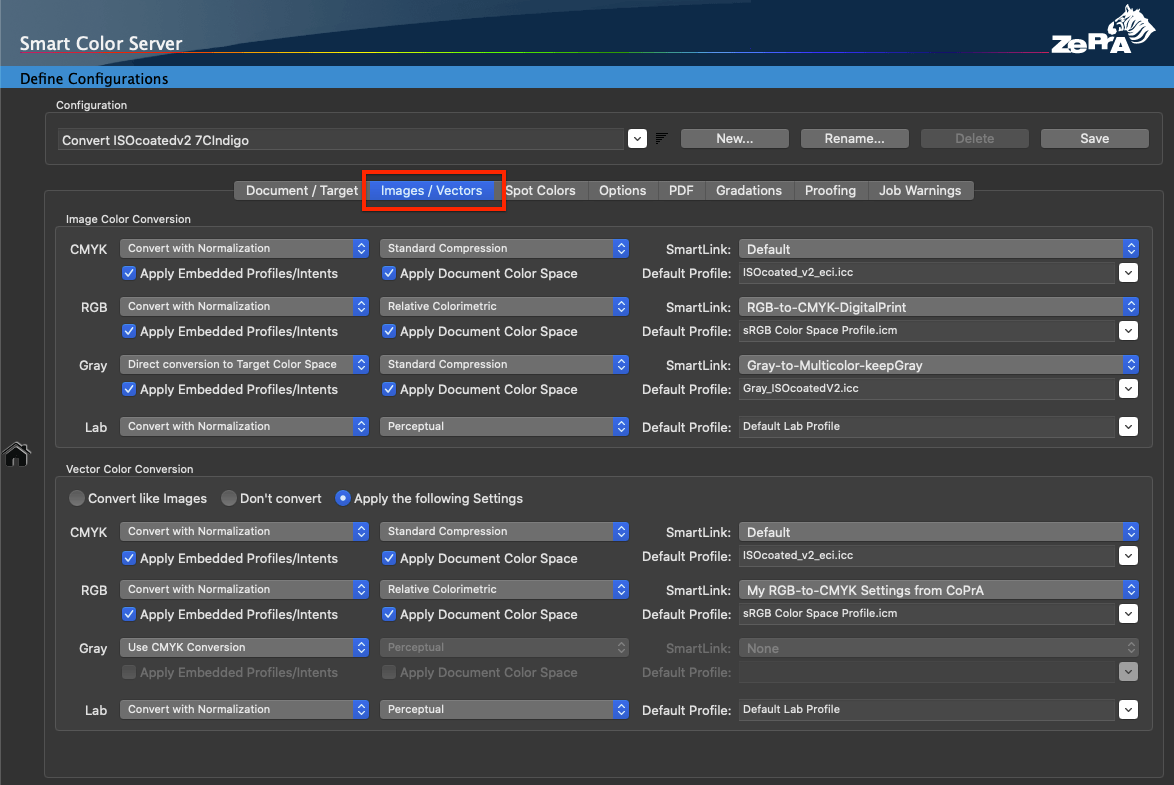
The Apply SmartLink checkbox, which was available in the Images/Vectors tab for each color space in previous versions of ZePrA, has been replaced by a drop-down menu containing all possible SmartLink options for a given color space. This allows users to select a specific SmartLink method for a particular color space conversion, making the conversion tailor-made, which was not possible before. This flexibility is certainly a huge gain for power users, but at the same time the ease of use of the Default SmartLink methods, which have been tried and tested for many years, is still available. The default setting when creating new configurations uses a dedicated default method for each color space and conversion step, but if required, users can deviate from this default method and select other or custom methods.
The new checkbox Apply Matching Document Color Space for each color space is a practical new feature that allows the color space defined as Document Color Space to be applied to undefined images and vectors with the same color space. This makes it possible to set up a single hot folder and configuration for all types of PDF/X files to be converted to a single target color space. For example, it resolves a problem with an RGB document color space and the Prefer Output Intent checkbox when the output intent of a file would be CMYK and vice versa.
This feature replaces the Same as Document Color Space option previously available in the profile drop-down menu. However, this option was only available in a single drop-down menu for the one and only color space that was selected as the Document Color Space. In the past, if the Prefer Output Intent checkbox was selected, this could lead to an unsolvable problem. Since the output intent can be either CMYK, RGB, Gray or even Multicolor, depending on the type of PDF/X file that is dropped into ZePrA, a conflict could arise in the past if the color space manually selected as the Document Color Space and the color space of the output intent did not match. With the new checkbox, the profile from any color space selected as output intent can now be used correctly for converting images and vectors. The checkbox is enabled by default when a new configuration is set up using the Auto Setup Wizard.
If both checkboxes are activated (Apply Embedded Profiles/Intents and Apply Matching Document Color Space), ZePrA first checks whether an embedded profile is available. If this is the case, this profile is used. If no embedded profile is present, ZePrA checks whether the color space of the image matches the document color space. If this is the case, the document color space profile is used for the image. Only if there is no match, the Default Profile that the user can select from the profile drop-down list will be used.
Note: To ensure that a specific Default Profile is used in any case, the checkboxes Apply Embedded Profiles/Intents and Apply Matching Document Color Space should be disabled.
Productivity extensions to the Spot Color Report
The Spot Color Report is a great feature to check the spot color conversion and color rendering of a production file before actually converting and printing. Previously, only one file (PDF or image file) could be loaded and checked against one or more configurations. With the new File List feature, multiple files can now be added and checked simultaneously. In the Preview and the spot color PDF report that can be created with the Save button we have added an Overview and a Best Configuration section that describes how the file(s) were processed with the various user-selectable configurations. In addition, a table of contents (TOC) in the PDF file allows an easy navigation to the details of each configuration. Especially if many spot colors such as an entire spot color library with hundreds or even thousands of spot colors have been evaluated, this is a great help in getting directly to the details of the individual configuration results. The configuration with the lowest deltaE will be automatically determined and listed as Best Configuration on top of the report.
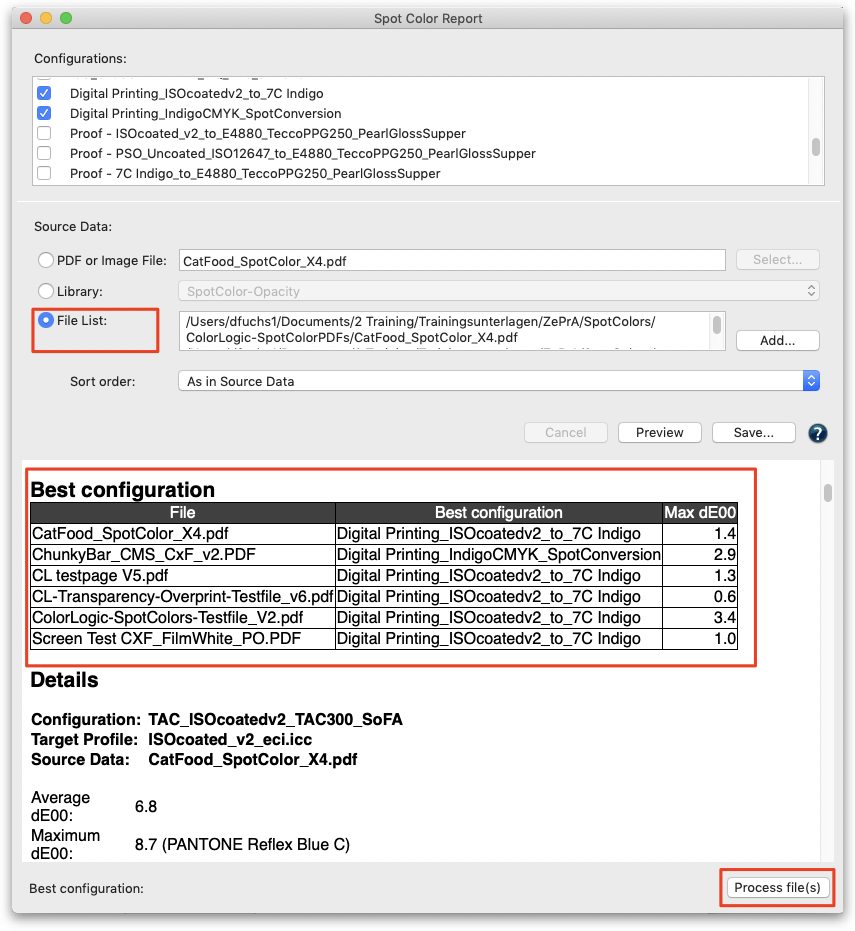
Moreover, selected file(s) can be processed directly from the Spot Color Report window with the best configuration. By clicking the Process File(s) button at the bottom right of the window, the files are automatically moved to the input folder of the corresponding configuration and automatically processed.
Advantages of the new functions for productivity
First, different configurations can be set up, for example for printing with the same printer but using different target profiles with CMYK, 5 colors, 6 colors or 7 colors. Then the production PDF file(s) can be checked with all possible color configurations. It may be found that the production PDF file(s) do not need 7C, but are already well suited with a certain set of 5 colors or even CMYK.
This way, many clicks in digital printing or many plate productions in conventional printing could be saved. After checking the file(s) and determining the best matching configurations, the file(s) can be automatically processed with the configurations having the lowest maximum DeltaE directly from the Spot Color Report dialog.
Job Properties
The Job Properties report, available in the Processed Jobs section of the Overview window when right-clicking on a job, contains additional information about the processed spot colors. When the spot colors of a job are converted to process colors, the report displays similar color information as the Spot Color Report.
For all spot colors of the job, the average and maximum deltaE00 values are listed, as well as the expected dE00 and dE76 values for each spot color. Additional information, for example whether a spot color was iterated, is also provided in the information column of the table.
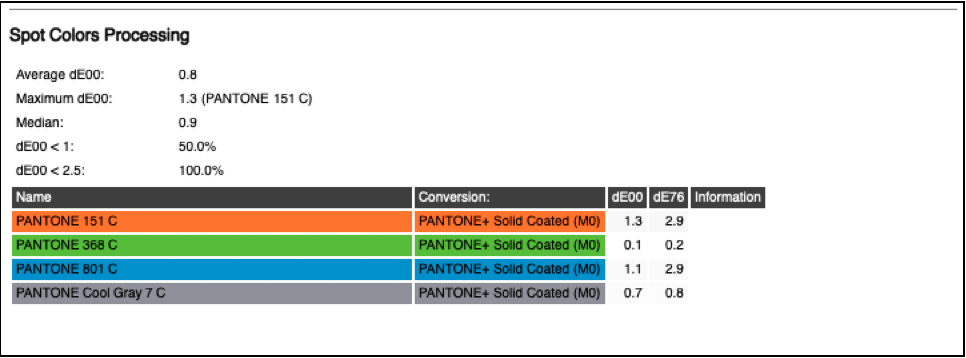
The Job Properties report can be saved in two new formats: Raw data in XML format and Raw data in JSON format. For new workflows it is recommended to use one of these formats. The older XML format is no longer recommended and is only available for compatibility with older workflows.
Calculation of the Ink Amount in converted files
In the Options tab under Configurations, the Ink Saving section has been renamed to Ink Amount. In addition to the Calculate Ink Saving checkbox, which is useful for ink saving conversions as it reports the amount of savings, the new checkbox Calculate Ink Amount in converted File has been added. If the Calculate Ink Saving checkbox is enabled, the checkbox Calculate Ink Amount in converted File is also enabled.
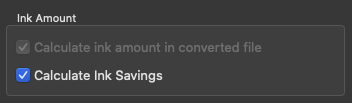
When enabling the checkbox Calculate Ink Amount in converted File, the new section Ink Amount is added to the Job Report (accessible by right-clicking on a processed job in the Overview). It provides the calculated amount of ink for each channel for each processed job.
Note: For some use cases in digital printing saving channels means saving costs and by using specific DeviceLink profiles, a reduction of channels is possible (e.g. removing Black from CMYK). Not used channels can be checked in the Job Report as those channels are marked either “-” or “0”.
If the Job Report is to be saved automatically or used for automation with other tools such as Enfocus Switch or Impressed IWS the new Raw data in XML format should be used. The information can be found in “ConvertedDocumentProperties” in “InkInfo”.
Ease of Exporting Configurations
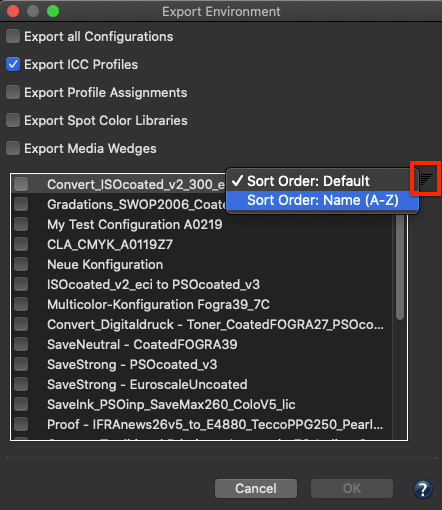
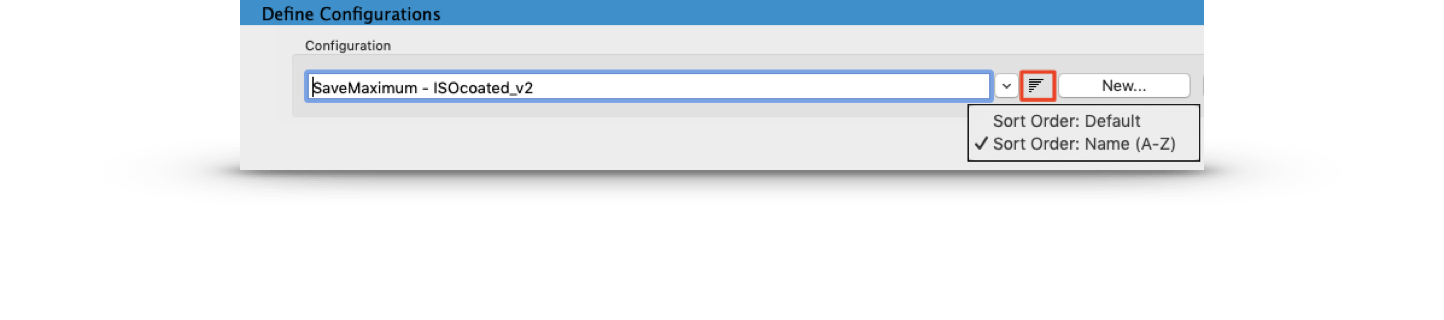
The Export Environment dialog allows configurations to be listed either in the default sort order (by creation date) or in an alphanumeric sort order. The sort order can be changed using the small icon to the right of the list of configurations. The alphanumeric sort makes it easier to find a specific configuration name to export.
Improved Gradations tab
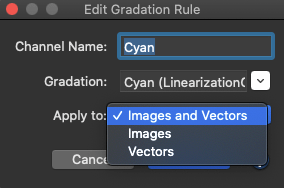
The Gradations tab under Configurations has been improved. First, the two checkboxes Apply Gradations to Images and Apply Gradations to Vector Graphics, which have been available since ZePrA 8, have been moved in the Apply to drop-down menu of the Edit Gradation Rule dialog. In the past the same gradation curve could be applied to Images, Vectors or both, but different curves could not be applied to Images and Vectors. This is now possible as you can set up two rules for one channel (for example the Cyan channel), with one curve assigned to images and the other curve assigned to vectors.
Since the user cannot add or delete the All Spot Colors entry in the table, there are two entries in ZePrA, one for images and one for vectors. If the same curve is to be applied to All Spot Colors of images and vectors both entries must be changed.
Notes:
- When old configurations are loaded or imported and Apply Gradations to Images/Vector Graphics is disabled, the gradation rules will be modified accordingly.
- Configurations which use individual image and vector rules should not be used in older ZePrA versions.
Two buttons for Export and Import of gradation rules have been added in the Gradations tab. This allows to export gradation rules from one configuration and import them into another configuration.
Checking the integrity of hot folders
At program start, all folders of a queue (Input, Output, etc) are checked. If a folder is missing or not writeable, the queue is stopped and a workflow warning is generated. When the program is running, the Input folder is constantly checked, while the other folders (Output, etc.) are not checked for performance reasons. If a job is being processed and cannot be written or moved to its destination folder, all folders in the queue are checked. If a queue has been stopped after checking, it will be started automatically when the folder is accessible again.
Black Start for Spot Color Conversions
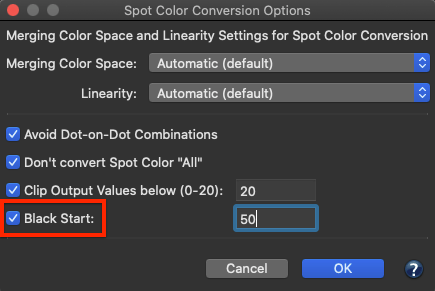
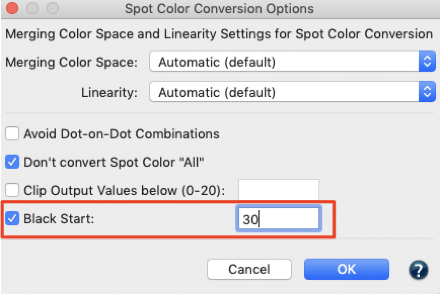
In the Spot Color Conversion Options dialog (under Configurations/Spot Colors/Special Options) is a new feature to define the Black Start for spot color conversions. Typically ZePrA prefers using black when converting spot colors to process colors whenever possible. However, in some applications this can lead to peppering effects for light colors using low resolution printing. In this case a late black start will use more of the other process colors and with a very late black start it can be forced to use no black at all in the process color build.
Preserve White in Image and Vector Areas
Typically, when converting files, image and vector areas that were originally designed to be transparent and do not use ink (e.g 0% ink or white) are also converted using the selected color management settings. When using perceptual rendering intents this leads to 0% ink in the converted file, and in case of proofing with the absolute colorimetric rendering intent this results in a paper simulation. In both cases, ZePrA ensures that the correct paper white (either 0% ink or paper simulation) is used and will place the paper white under the entire art box. In some cases, especially when printing on transparent foils and using white inks, this is undesirable since areas with 0% ink are supposed to be transparent after conversion. For such cases a new exception has been added to the Options tab that applies to images and vectors. When enabled, areas with 0% ink are preserved and will not be color managed. To accommodate the new feature the former section Vector Graphics and Text has been renamed to Exceptions and the new third option Preserve White for Images and Vectors has been added.
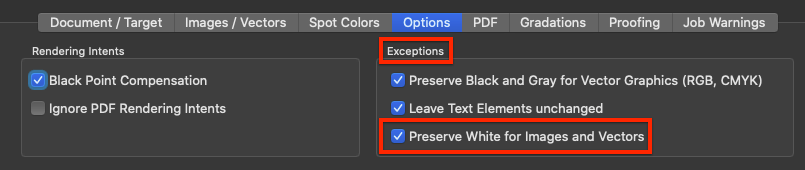
Note: When the exception is enabled and there is a strong paper simulation in the converted file, there will be a hard edge between the preserved white and close colors such as 1%.
General User Interface improvements
ZePrA’s user interface has been further improved, ensuring that text elements are no longer truncated on modern macOS versions such as Catalina (macOS 10.15) and Big Sur (macOS 11). In addition, the dark mode is supported on macOS, too (not available for Windows).
The colors of errors and warnings shown in the Overview dialog have been slightly changed to less colorful colors.
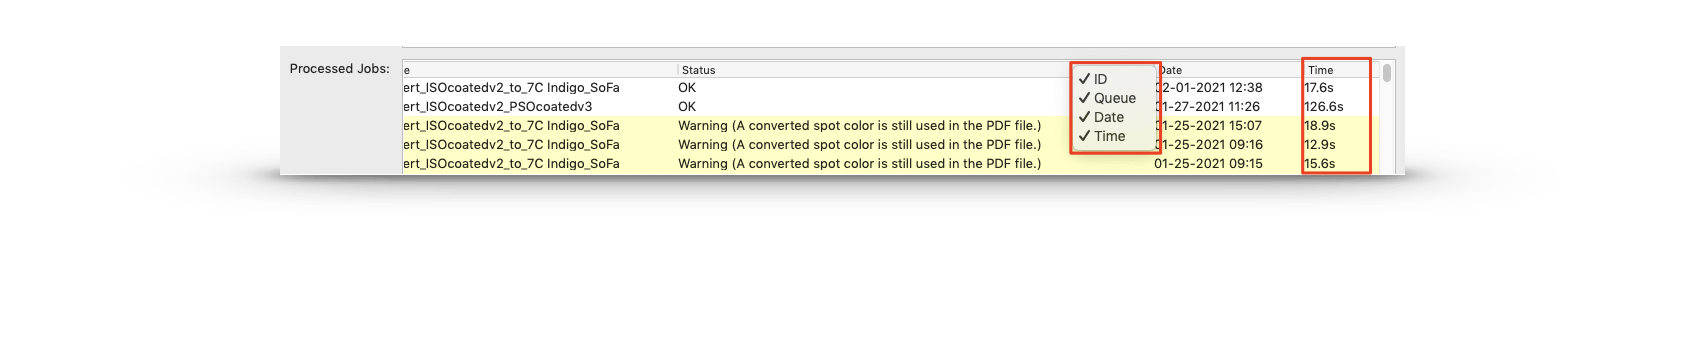
In the Processed Jobs section of the Overview, you can right-click on the header to enable/disable the ID, Queue, Date, and now also the Processing Time. The processing time is displayed in seconds.
The PDF Layers function in the PDF tab and the table in the Spot Colors tab under Configurations have both been provided with an Export and Import function. This allows you to export rules from a configuration and import them into another configuration.
In the drop-down menus for selecting a configuration under Queues, New Queue and Configurations, the sort order can now be changed from default to alphanumeric via an icon. Clicking this icon displays the same drop-down menu as before.
Minor new features
- In the Images/Vectors tab under Configurations, it is now possible to select Multicolor profiles as Default Profile for CMYK.

- With the changed user interface for Images/Vectors in ZePrA 9, we have introduced the new checkbox Apply matching Document Color Space in case there is no embedded profile for CMYK images and vectors and have removed the Same as Document Color Space option from the drop-down menu. To avoid that this leads to an invalid selection message when the Document Color Space is a Multicolor profile we allow any Multicolor profiles with CMYK+X color space in the drop-down menu for the CMYK Default Profile.
- In the Document/Target tab under Configurations, the SmartLink Method drop-down menu provides presets for Multicolor if the checkbox Prefer Output Intent is enabled. This allows for automatic processing of PDF/X-5n or PDF/X-6n files with Multicolor output intent.
- SaveInk Reports with Japanese and other 2 byte language fonts are now correctly shown.
- In the Proofing tab of the Configuration, when enabling the Proofing Information the black text used to display the information is no longer created in RGB but is 100% K only.
- The new ISO 15930-9:2020 standard for PDF/X-6 files is supported partly by ZePrA. Properly defined PDF/X-6 files will be correctly converted. However, flattening such files is not yet properly supported from our third party Adobe flattening engine
9.0.1.
Optimized functions in ZePrA 9.0.1
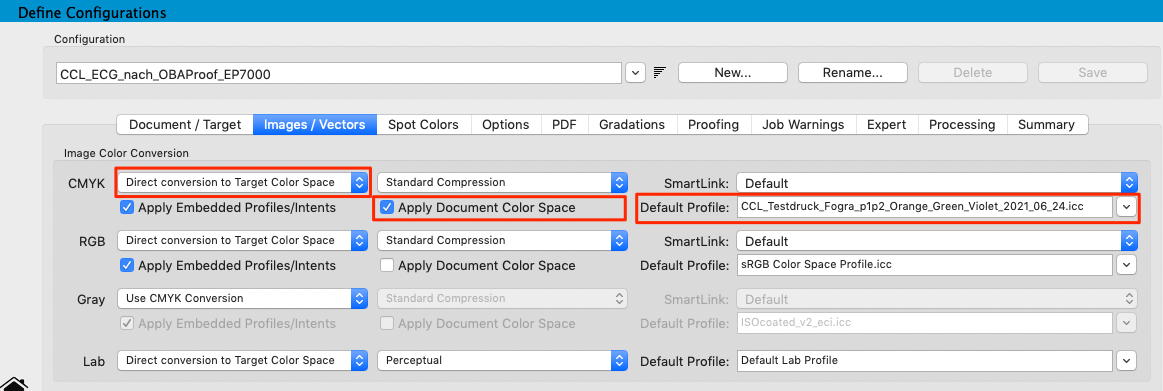
- The behavior of the option Direct conversion to Target Color Space in the Images/Vectors tab of the configuration has been changed for Multicolor Document Color Spaces. If the checkbox Apply Document Color Space is ticket and a CMYK image or vector without embedded profile is to be converted, the profile settings on the Document/Target tab will be used instead of the Default Profile to achieve a consistent result. (Ticket #212611)
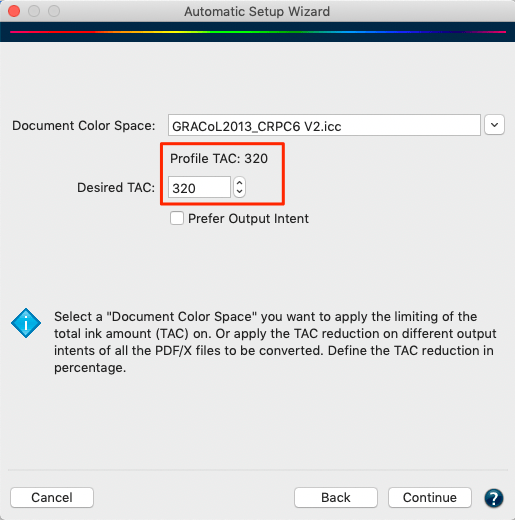
- The Desired TAC setting in the Auto Setup mode Optimize Total Area Coverage has been optimized. For the profile selected under Document Color Space now the indicated Profile TAC is always used. Previously the Desired TAC was not updated but taken from the previous profile used in the wizard and had to be changed manually by the user.
- The maximum number of channels (process colors and spot colors) used for dynamic media wedges is 32. If there are too many spot colors in a file to be processed and ZePrA can’t create the dynamic media wedge for all spot colors a warning message appears now informing that not all spot color have been included in the dynamic media wedge.
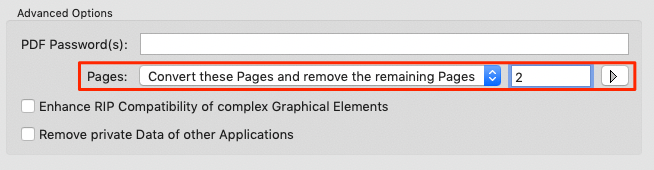
- The manual selection of the Pages to be converted on the PDF tab of a Configuration under Advanced Options is ignored if the Transparency Flattening setting Rasterize Document is selected. However, if there are other settings with or without Transparency Flattening, the Pages selection is taken into account.
Bug Fixes in ZePrA 9.0.1
- Fixed the SmartLink calculation in cases where the SmartLink method is not explicitly set which lead to unintended color conversions. The problem happened with configurations where the SmartLink method has not been explicitly defined for each color space, e.g. when a configuration is created via Auto Setup with DeviceLink and is later switched to SmartLink without changing the SmartLink Method. It could also happen when importing an older configuration from ZePrA 8 with undefined SmartLink Method settings. (Ticket #212661)
- Fixed that a configuration could not be opened for editing and reported a warning message, probably because of a corrupted profile.
- Fixed a PDF error due to a combination of large PDF file size and incremental updates (Ticket #212582)
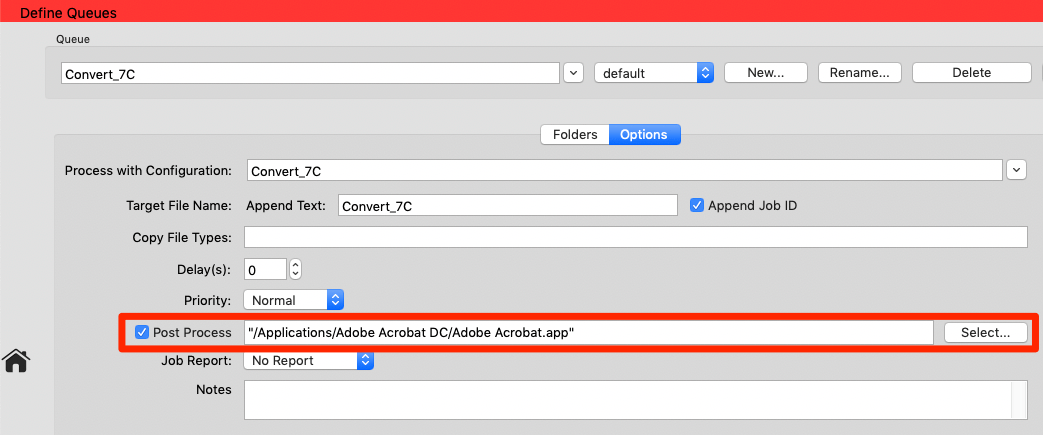
- The Post Process handling in the Define Queues dialog under the Options tab has been fixed. When the user selects an application such as Acrobat to open up converted PDF files after conversions, see screenshot, quotes are added automatically. Quotes are necessary around the selected path for the post processing to work correctly. If there are no quotes ZePrA does not crash any more and batch files are processed now, too. (Ticket #212666)
- Fixed the issue with the DLS-Manager when started with an NFR license loaded under macOS that two wizard pages have been overlapping. (Ticket #212596)
- Fixed a bug where a PDF file with an empty signature form couldn’t be processed.
- Fixed that the Auto Setup modes for SaveInk and TAC reduction produces configurations with a wrong default profile for Gray color spaces. The intended profile must be the same as the one used for CMYK.
- Fixed that the dialog Spot Color Report does not remember its settings when Saving as PDF report and not using the Preview feature.
- Fixed a crash under macOS when writing a JPEG2000 image.
- Fixed crashes when exporting a selected spot color after using a search filter in the Manage Spot Color Libraries dialog.
9.0.2
Bug Fixes in ZePrA 9.0.2
- A major issue with incorrectly coded and corrupted DeviceLink profiles installed via the DLS-Manager has been fixed. This only occurred when DLS-Manager 2.1 which is part of the ZePeA installer of ZePrA 9.0 and 9.0.1 was used to install new profiles. Those profiles were corrupted and caused ZePrA to crash. (Ticket #212753)
There are two fixes in ZePrA 9.0.2.
1. The new DLS-Manager 2.1.1 which is part of the installer of ZePrA 9.0.2 creates correctly coded DeviceLink profiles now.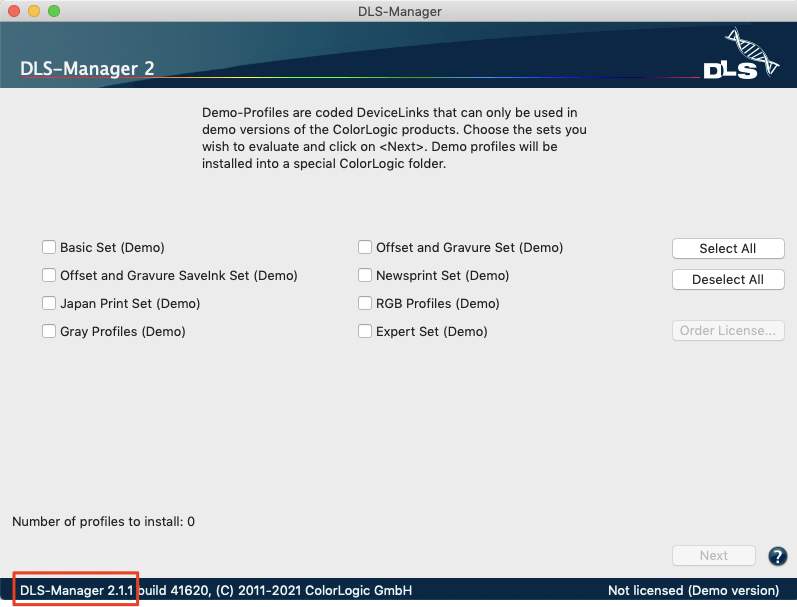
2. Even if there are corrupted profiles on the system, ZePrA will no longer crash. Instead, the message Invalid ICC tag appears when a corrupted profile is selected. If a job passes through a queue in which a corrupted profile is selected, the queue remains active, but a job error message Error (Invalid ICC tag) is displayed.
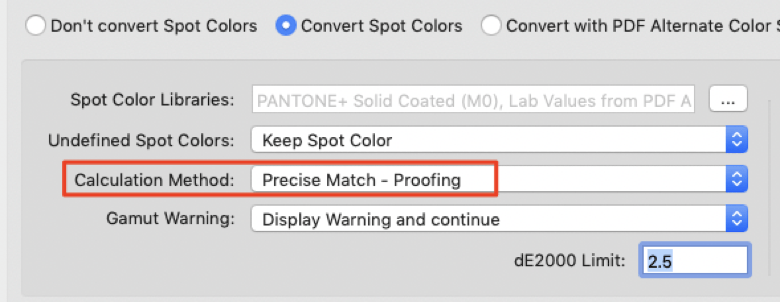
Note: If a client experiences issues with corrupted DeviceLink profiles he should use the new DLS-Manager 2.1.1 provided with ZePrA 9.0.2, reload his DLS license file and reinstall the profiles. This will overwrite all relevant profiles and the problem is solved. - The calculation of spot color conversions has been improved. Spot colors are always optimized with each of the Calculation Methods to minimize the deltaE. In addition, depending on the calculation method, certain restrictions are applied, e.g. that no more than 2 or 3 channels may be used, and if necessary, the channels are clipped. In rare situations the Precise Match – Proofing method did not calculate the smallest dE which would have been the case with one of the other methods. Now, there will be more checks of conversion variants that will always lead to the best deltaE for the Precise Match – Proofing method. (Ticket #212775)
- It has been fixed that the Black Start setting defined under Spot Color Conversion Options has been ignored despite the correct visualization in the user interface. (Ticket #212672)
- The Auto Import folder now no longer stops importing data when files such as “.DS_Store”, “Thumbs.db” or those starting with “._” are recognized. In general and apart from these special files it is intended behaviour that the Automatic Import stops if unsupported files are dropped to that folder. This prevents ZePrA from importing many files in an uncontrolled manner when the user accidentally drops a wrong folder into the Auto Import folder. There is even a workflow validator message for this case and the icon becomes red.
Note: In case the Automatic Import stops working, it is recommended to clean up the folder and remove any unsupported files and then restart the Auto Import folder by enabling the checkbox under Preferences. (Ticket #202059) - An error has been fixed, where the Auto Setup wizard selected an incorrect default profile for Gray color spaces. By default the same default profile that is used under CMYK will now be preselected for the Gray color spaces, too.
- A rare crash of ZePrA 9.0.1 has been fixed that occured when the Queue search filter was reset and some other conditions were met. (Ticket #212707)
- Several smaller issues with applying gradation curves have been fixed.
- The combination of active spot color conversion and disabled vector conversion was not handled correctly for shadings in PDF files. This has been fixed.
10
New automation possibilities and extended CLI in ZePrA 10
The most important new features of ZePrA 10 are the improved and extended automation capabilities. They allow for complex workflows with dynamic changes on a job-by-job basis and additionally reduce the number of required configurations and queues in ZePrA.
The Command Line Interface (CLI) has long been integrated into ZePrA. In ZePrA10, it has been greatly improved and given more flexibility by adding ZePrA Job Control Files. Job Control Files are XML or JSON files with ZePrA commands and are placed in the Input folder of a ZePrA Queue or used as argument in a command line. With the Job Control Files almost every function in ZePrA can be controlled remotely without the need to intervene in ZePrA's user interface. The new Job Control File feature can also be used independently from the CLI in regular ZePrA operation.
The working principle of Job Control Files is explained in this video.
For more details please read the document ZePrA JobOptions Description.pdf and the various options that can be defined in the control file are explained in the document ZePrA_ConfigurationOptions.pdf. To get started, we have compiled a few examples that can be used to familiarize yourself with the functionality and the application (Download here).
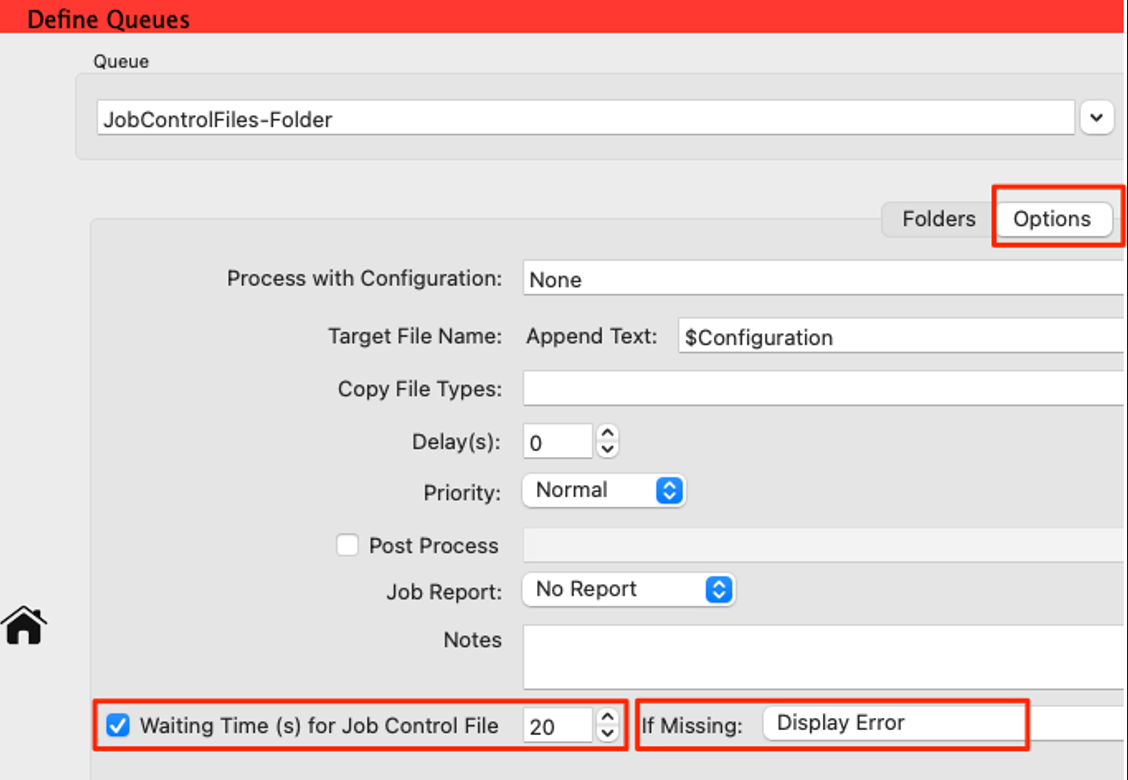
If Job Control Files are to be used within the ZePrA application, it is recommended to enable the checkbox Waiting Time (s) for Job Control Files in the Options tab of the Define Queues dialog. This ensures that ZePrA waits up to the provided time in seconds for an associated job control file containing the processing settings when files are placed in the Input folder, rather than simply processing the files as usual.
Notes: As soon as ZePrA recognizes a Job Control File
that fits to a job the job will be processed even if the waiting time is not finished. It is not necessary to activate the waiting time, as ZePrA will always check for Job
Control Files even if the checkbox is off. If for example the job to be processed and the Job Control File will be placed in the Input folder at the same time an additional waiting time might not be needed. This depends on your workflow and probably the speed of the network.
An additional advantage when activating the waiting time is that it can be defined how to proceed in the event that a Job Control File is not submitted. Therefore, there are three self-explanatory options in the If Missing drop-down menu:
- Process Job as usual with Configuration
- Process Job as usual and generate a Job Warning
- Display Error
Note: In ZePrA 10 it is possible to define a Queue without an associated configuration. The screenshot shows that for the created New Queue under Configuration the option None is selected instead of a real configuration. Since a Job Control File can contain everything needed to process a job it will most likely overwrite the settings of a selected configuration, eliminating the need to assign a Queue with an existing configuration.
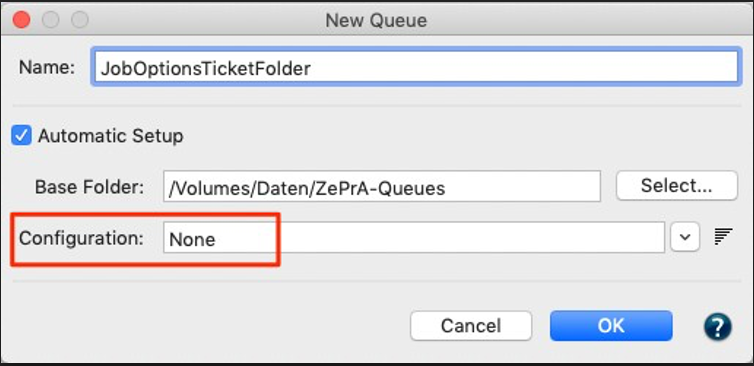
New Auto Setup mode Copy and change an existing Configuration
Among the most frequently mentioned feature requests we received was the more flexible and faster creation of configurations. While the Auto Setup Wizard is popular for creating new configurations and queues, often the same changes need to be made over and over again in new configurations. This can include enabling flattening, adding layer rules, spot color conversion or other settings that are not handled by the Auto Setup. That's why we think it's a good idea to use an existing configuration with all the bells and whistles that clients have set up for their needs and use it as a base to build a new configuration, with just the change of profiles. Voila, the new Copy and change an Existing Configuration Auto Setup mode.
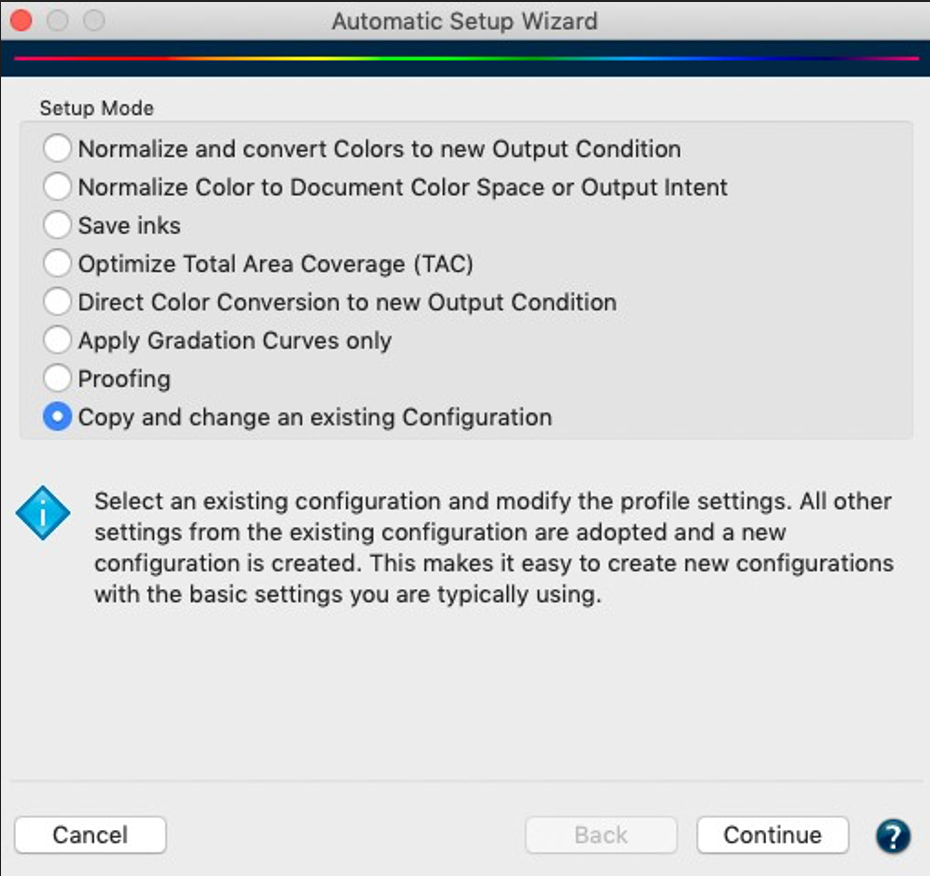
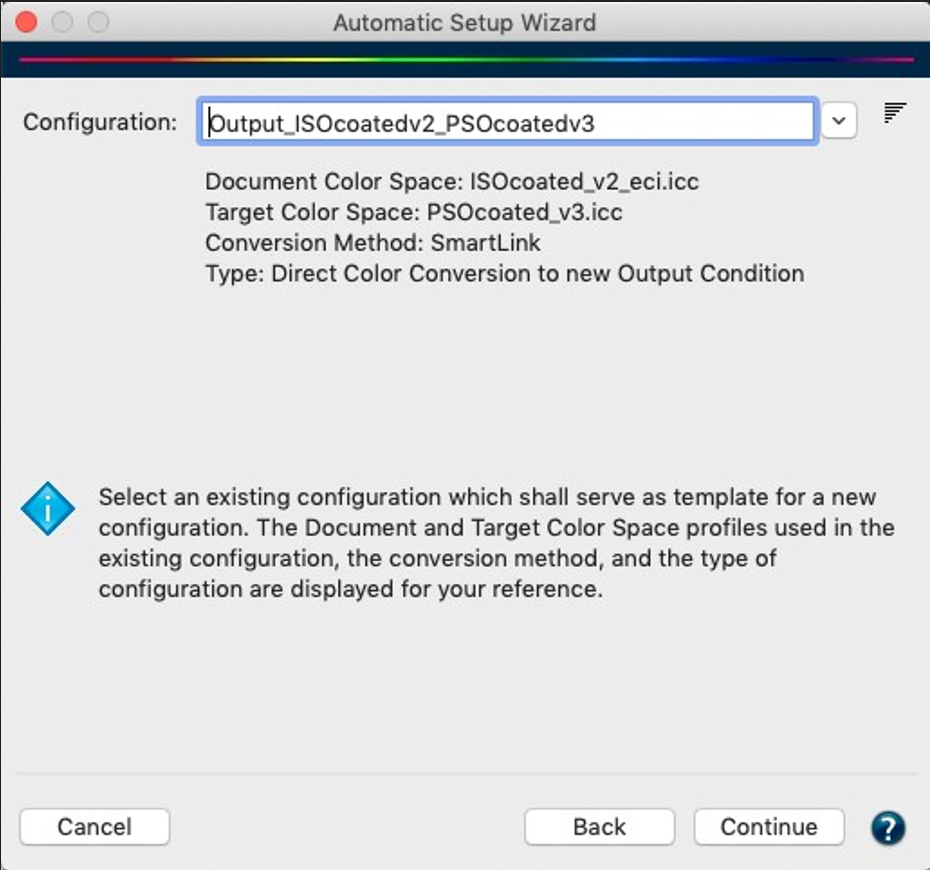
The setup starts by first selecting an existing configuration, and provides a few insights such as which profiles are used as Document and Target Color Spaces, the Conversion Method and the configuration Type. In the next wizard step new profiles can be selected which have to be of the same type as the original profile. For example, if the base configuration uses a DeviceLink as conversion method then the wizard only allows the selection of DeviceLinks, if the base configuration uses SmartLink, the copied configuration will as well use SmartLink etc. Finally, after the new profiles are selected, in the final step the configuration name can be defined and the new configuration and possibly queue name will be created.
Temporary change of the Job-specific configuration settings
Another great new feature is the ability to temporarily change configuration settings on a job-by-job basis. Suppose you are printing various jobs on a digital printer and most of the jobs are to be printed on cardboard, with your configuration in ZePrA defined for this purpose, but one job is to be printed on a different substrate. In both cases the same configuration is used, but with different target ICC profiles. Instead of creating a copy of the existing configuration for this one job, you can use the new feature to load and hold a job and temporarily edit the configuration settings without permanently changing the configuration. To do so, use the new feature Add File(s) to Queue and hold available in the context menu of the Queues section in the Jobs and Queues Overview dialog. This allows to select one or multiple files at once.
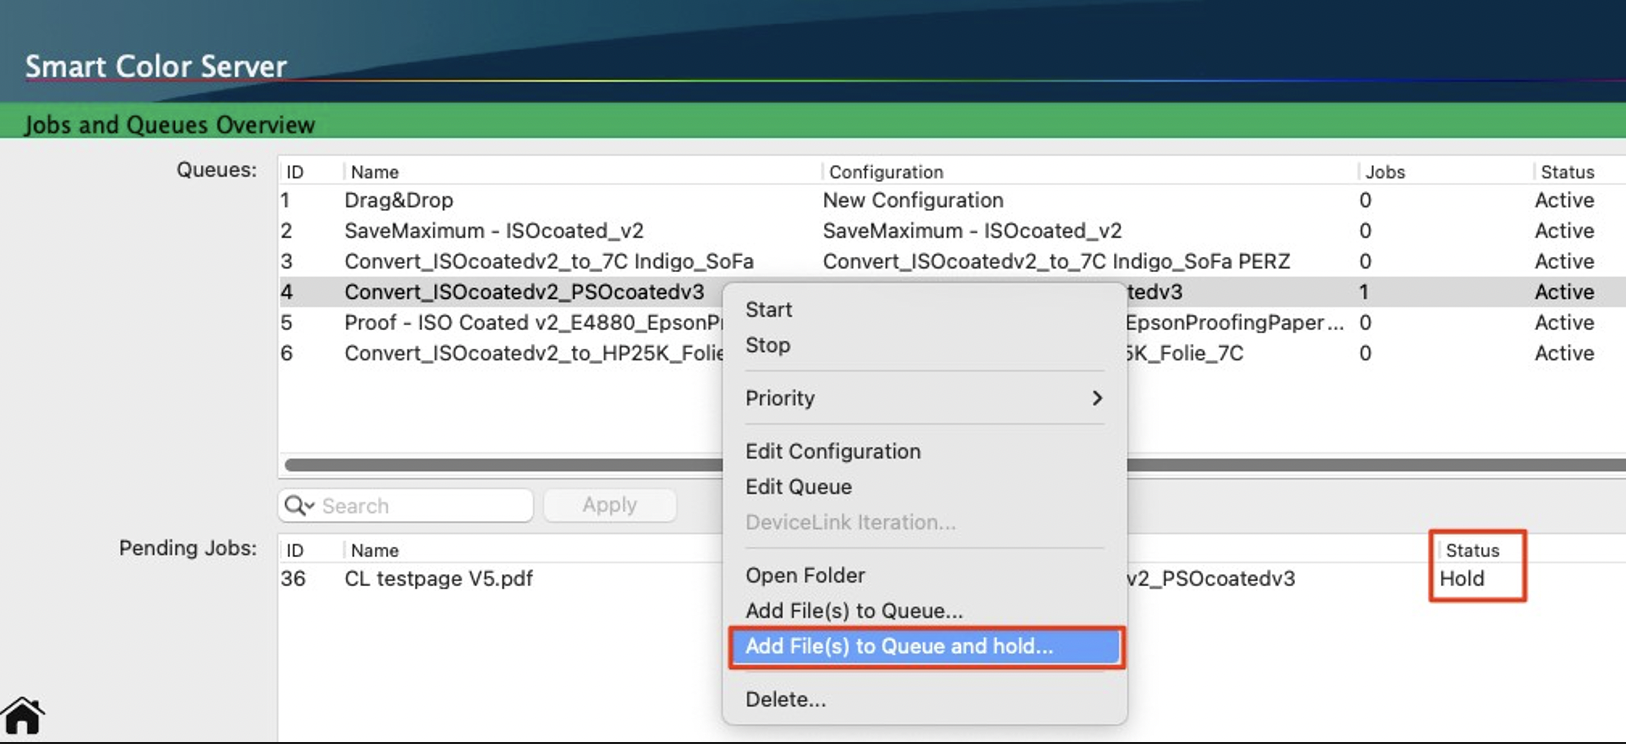
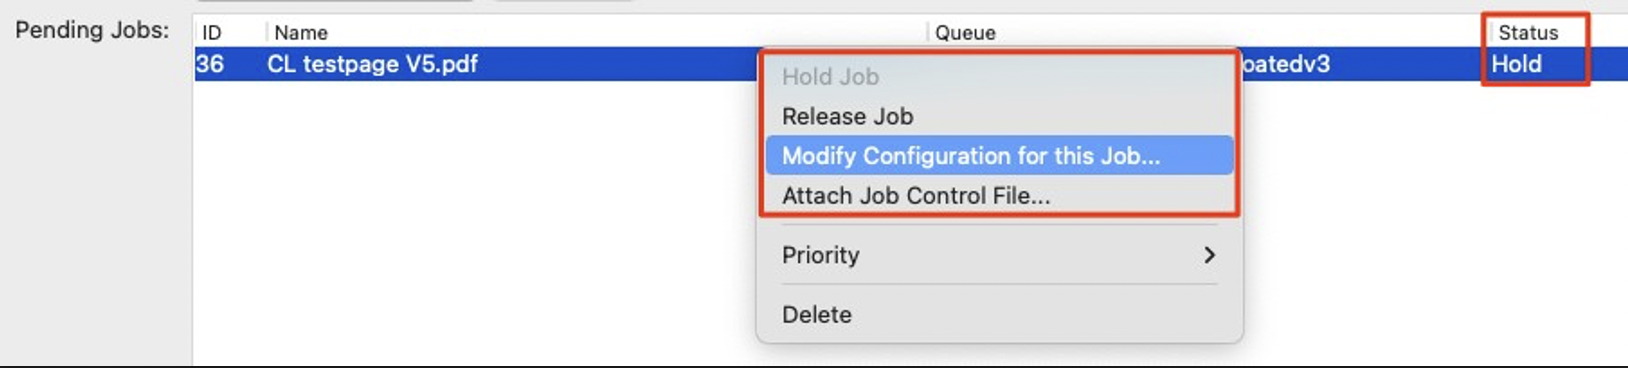
The selected file is paused in the Pending Jobs section. When selecting the job and opening the context menu, four new options appear:
- Hold Job pauses this one job without stopping the queue
- Release Job starts processing the job with the given configuration, including a temporarily modified configuration or including a Job Control File has been attached to the job.
- Modify Configuration for this Job opens a new dialog Edit Job Configuration to define the configuration to be used and modified for this job only.
- Attach Job Control File allows to associate an XML or JSON file with the processing parameters to the selected job. On the contrary to the typical behavior of the Job Control File a potential named job in the file will be disregarded making this option especially useful for manual working.
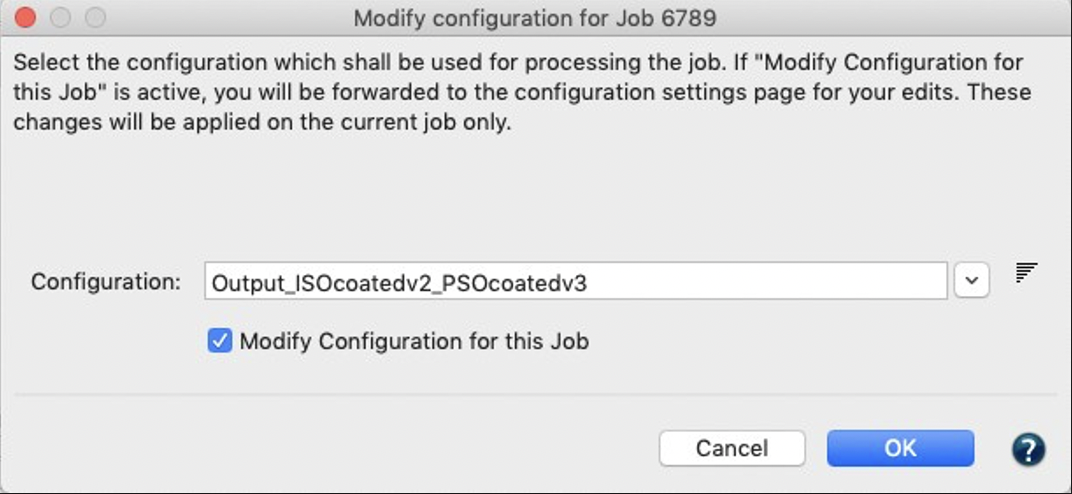
The Modify Configuration for Job dialog allows changing the base configuration to be used for the processing of the selected job. By default the configuration associated with the selected Queue is preselected. In case you wish to make additional modifications enable the checkbox Modify Configuration for this Job and click OK.
If the option Modify Configuration for this Job was selected a temporary copy of the configuration opens in a separate dialog. The dialog is similar to the typical Define Configurations dialog with all options for editing the settings, only the top area of the dialog is different. Under Name the currently used configuration is shown added with some words in brackets indicating that this configuration is temporarily modified for the selected job. Modify the desired settings and optionally change the name of this modified job-specific configuration for easier recognition later on. Once you are done with your edits click Apply to confirm or click Back in case you want to return to the original settings. In both cases the dialog will close and ZePrA will revert back to the Overview dialog.

To start processing the job with the modified settings select Release Job from the context menu of the job. Keep in mind that the edits will be applied to this one job only.
Native support of the M1 Silicon processor for macOS and support of Windows 11
The new generation of Mac computers uses an M1 chip that promises higher speeds if the application is optimized to run natively on this chip. ZePrA 10 is the first ColorLogic application to do so and indeed there is a speed improvement especially when creating SmartLink profiles on-the-fly. Processing of files itself is a bit faster, too. But everything comes at a price. Not all ZePrA functionalities, especially those that rely on third party libraries integrated into ZePrA such as flattening and PantoneLive and measuring colors with spectrophotometers, run natively on M1.
This is not a problem for flattening and measuring, but PantoneLive cannot be used with native M1 support in ZePrA. So if PantoneLive is not used or needed, there is a benefit of faster processing with native M1 support.
If PantoneLive is required however, ZePrA must be started in Rosetta (see screenshot), which is the emulation mode to make sure that legacy software runs on M1 chips, too. To do so simply select the ZePrA.app and right click Information and in the Information dialog tick the checkbox Open using Rosetta and restart ZePrA.
Note: You may use ZePrA with Rosetta to download the PantoneLive libraries you wish to use and then restart ZePrA without the Rosetta emulation. This will allow to get you access to the previously downloaded PantoneLive libraries with ZePrA running natively with M1 for up to 30 days.
That being said, ZePrA runs on the most recent macOS 12 (Monterey) and on Windows 11.
Added new advanced rendering options to ZePrA’s SmartLink
With CoPrA 7 and 8 we have introduced two rendering options for DeviceLinks that calculate the best combination of two ColorLogic rendering intents within one setting: Automatic Paper Absolute and Automatic Paper Relative.
These two options are now available in the Rendering drop- down menu in ZePrA, when the Conversion Method SmartLink has been selected. Use it for best-in-class color conversions for either a gray balance that compensates the paper tint (Automatic Paper Absolute) or that leaves the gray balance with a paper tint as it is (Automatic Paper Relative).
For Custom SmartLink Methods shared from CoPrA there is an additional new option available in the Rendering drop-down menu: Automatic from Preset. This option takes whatever setting has been selected in the shared DeviceLink setting from CoPrA, including the rendering options, be it a merge between two rendering options or chroma or saturation boosts, any exceptions setting and black generation settings.
This option is only available in the drop-down menu when a custom SmartLink method is selected. In other words, in order to use this option, first select your custom SmartLink Method and then use the Rendering drop-down menu to find the option Automatic from Preset on top of the list.
The three new rendering options are available in the Auto Setup Wizard and the Configuration settings for all color spaces.
Note: With previous versions of ZePrA it was not possible to merge two different rendering options for the color conversion as the rendering settings from a shared profiling setting from CoPrA was always overwritten by the rendering setting selected in ZePrA.
Improved Best Configuration selection in Spot Color Reports
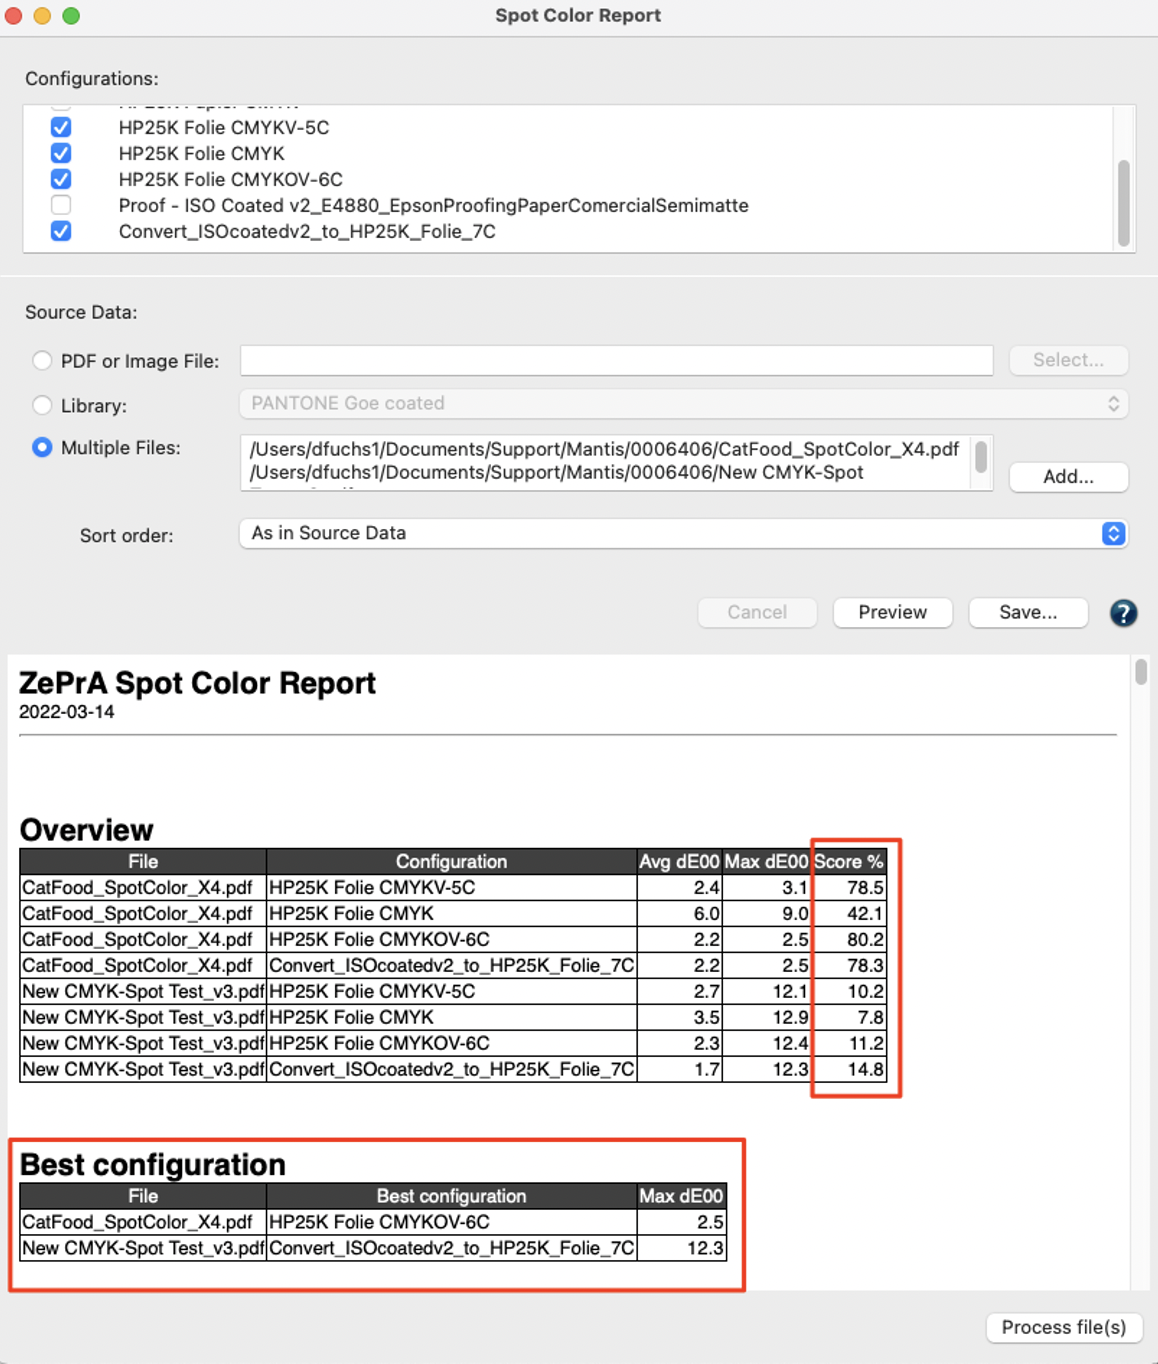
The Spot Color Report allows to automatically determine the Best Configuration from a list of selected configurations to match the spot colors of or or several jobs. In ZePrA 9, the configuration with the smallest maximum deltaE2000 is designated as the best configuration. In ZePrA 10 we are using a more refined method that takes the average deltaE2000, the maximum deltaE2000 and the number of channels into account. For example, if the spot colors of a job can be processed equally well with 7, 6 or 5 process colors on the same press with ZePrA 10, the configuration using 5 process colors is the best because it saves on inks and costs during production.
A Score in percentage (0% - not good at all, 100% - perfect match with 3 process colors) that reports the new method has been added in the Overview section of the spot color report. The configuration with the highest
score will be listed under Best Configuration.
The screenshot shows two files checked with four configurations. The Best Configuration section lists the configurations leading to the best score results for each file.
Improved color rendering of screen previews
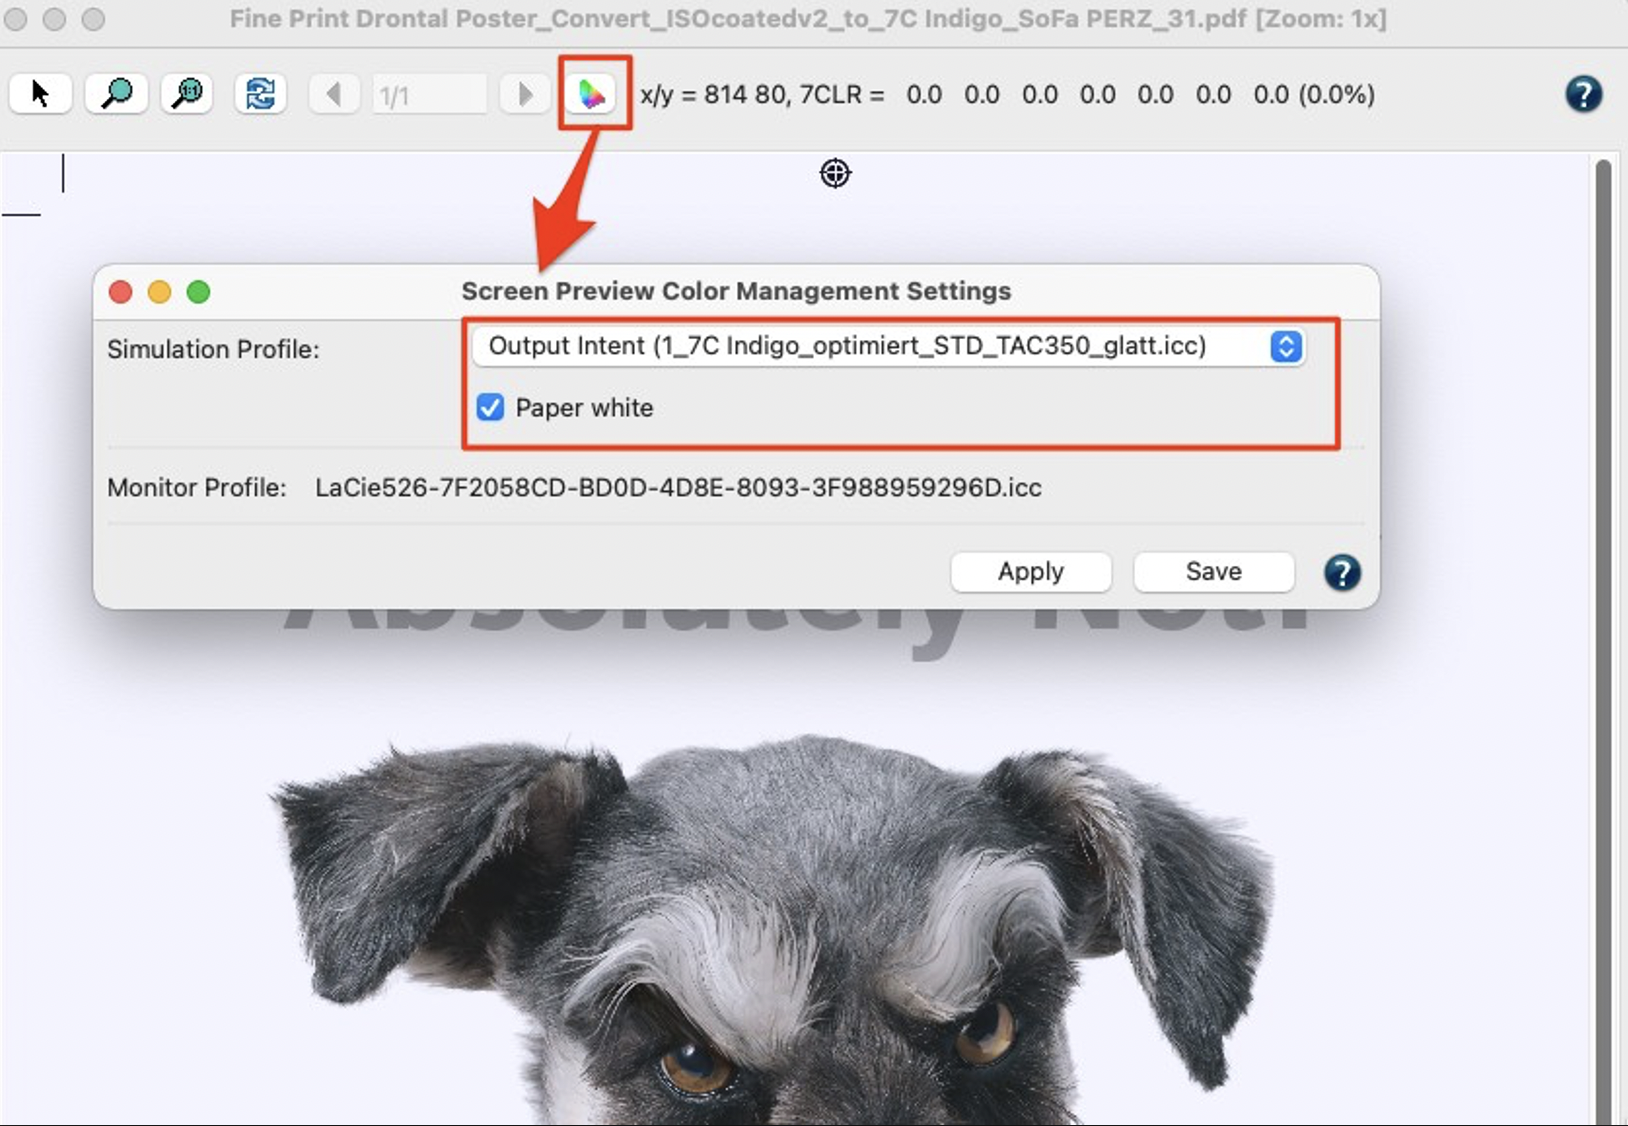
For the Screen Preview functionality accessible via the Overview dialog with right click on a job in the Processed Jobs list ZePrA 10 now uses a rasterized version of the processed file consistently on Mac and Windows. Previously on macOS the build-in Mac preview was used which did not yield good enough results with PDF files with overprints and transparencies. The Screen Preview is only available for Processed Jobs and can not longer be accessed for Pending Jobs. ZePrA is among the very few PDF and image preview applications that allows a true color preview of PDF and image files with multicolor profiles.
Typically, jobs processed by ZePrA contain the target color space embedded as output intent and the Screen Preview will automatically use that profile for display on the monitor profile set in the operating system preferences. If a profile is not embedded then ZePrA will consistently use the target profile from the configuration used to process the file as Simulation Profile and this way a potentially true color preview (depending on the monitor and its calibration state) of files will be possible.
The color management settings dialog will open when clicking the colored ICC icon. The dialog allow selecting the desired Simulation Profile from a drop down - only profiles that fit the color space of the loaded image are available - and the rendering intent with a checkbox for the preview of the image. Clicking Apply and/or Save will apply your settings. If the configuration has embedded the target profile as output intent this will be shown in the drop down with the key word Output Intent and if the target profile is not set to be embedded the key word is Target Profile. In both cases the corresponding profile from the configuration is selected and shown in brackets. If the checkbox Paper White Simulation is on the absolute colorimetric rendering intent is used, if the checkbox is off the relative colorimetric rendering intent is used.
New option to retain subfolders moved into the Input folder
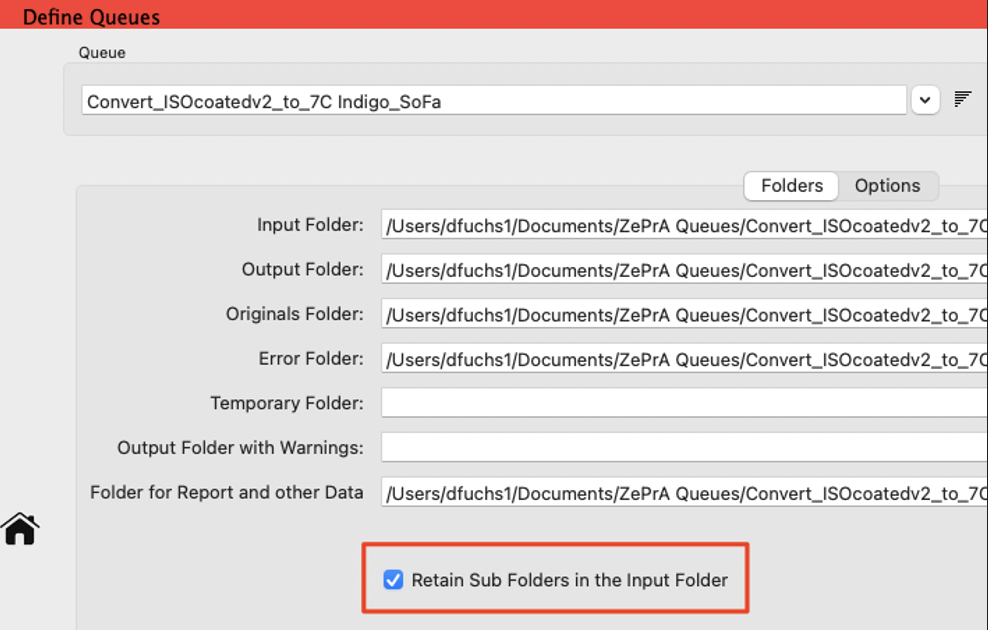
ZePrA allows processing of entire folders filled with files added to the Input folder of a queue. Typically the files from that subfolder will be processed and the same subfolder name will be created in the Output folder with the processed files in it. At the same time the subfolder will be moved from the Input folder to the Done folder leaving the Input folder empty. With the new Define Queues feature Retain Subfolders in the Input Folder under Folders it is possible to leave the empty subfolders in the Input folder. This neat feature is intended for workflows that require subfolders and are connected to ZePrA. If the subfolders persist in the Input folder it is easier for the user to drop new files into the existing subfolders in order to maintain the original structure of files as the converted files will be placed in the the same subfolder name in the Output folder again.
Export configurations as XML or JSON files
Typically when exporting configurations via the Tools menu Export Configurations the exported settings are shared with other ZePrA installations or act as a backup. The preferred and correct file format for such cases is the ZePrA CCF file format which is selected by default.
In ZePrA 10 there are now the two additional file formats JSON Job Control File(*.json) and XML Job Control File(*.xml). They serve a different use case which is related to the new Job Control File functionality.
This feature is available for single configurations and only if all the checkboxes for profiles, spot color etc. are off in the Export Environment dialog. The exported settings are basically the entire pure options used from that single exported configuration. These files are helpful for developers and script creators who wish to understand and use the syntax of the Job Control File for their purposes.
Improved compression methods for images in PDF files
Images in PDF files can have a variety of compression methods. These can be lossless compressions such as uncompressed, ZIP coded, or certain JPEG2000 methods, or lossy methods such as JPEG or other JPEG200 methods. For the new From Source option for Compression Method under Image Quality ZePrA reads the compression method of each original image and and maintains the compression method when converting the file. This is similar to the Automatic
method except if ZePrA 10 recognizes JPEG2000 compressed images in PDF files, it writes them as lossless ZIP compressed images. This improves interoperability with various PDF workflows and viewers.
Note: ZePrA does not support JPEG2000 image file formats such as *.jp2, *.jpf or similar.
Added Timeout Options to assist with Flattening issues
In the Transparency Flattening dialog there are two new features that deal with files that need a very long time for flattening. The default time slot that ZePrA allows for flattening before it actually cancels the flattening process is 30 minutes. After the canceling of the flattening ZePrA creates an error message stating that a file can’t be flattened. However, some PDF files with lots of complex transparency constructs may need more than 30 minutes for flattening. The time that ZePrA grants for flattening to process the file can be prolonged now by entering a larger number of minutes.
Note: It is not recommended to reduce the number of minutes below 20 minutes, though.
In addition, some problematic files may even need hours for flattening and it is not even assured that they will be processed correctly. For such cases there is an
additional checkbox that enables rasterization of the file if the timeout is exceeded. Sometimes rasterizing is the only resort to convert such files correctly. If the Rasterize after Timeout checkbox is on, the settings from the grayed out section Rasterize Document are used. If a defined setting should be used you may change the rasterizing settings in the dialog before applying Rasterize after Timeout.
10.0.1
- The Waiting Time in seconds for the recognition of Job Control Files under Define Queues/Options was not saved when changed and always reverted to the defined default value. This has been fixed. (Ticket #223133)

- A crash of ZePrA when processing special PDF files and in turn an unstable behavior of the ZePrA Switch configurator has been fixed. (Ticket #223129)
- It has been fixed that ZePrA failed in writing the converted file to the Output Folder defined as network path/drive in Windows under Queues/Folders. There has been an issue with the recognition of double slashes that are used for network paths which is now working again. (Ticket #223109)
- The CLI allows writing a Job Report like the Job Properties from ZePrA in various formats with the option –reportfile=<filename>. When the file extension “.json” is used the Job Report can now also be written as a JSON file. (Ticket #223119)
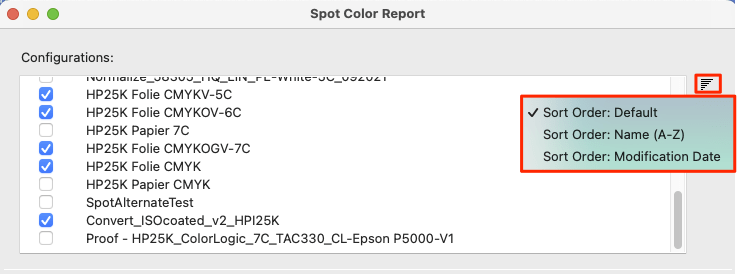
- The sorting of configurations has been added in the Sport Color Report dialog. Now, the icon to the right of the list of Configurations can be used to change the sorting order from Default to Name (A-Z) or Modification Date making finding the desired configurations easier. (Ticket #212626)
- A special PDF file with a slightly incorrect encoding in the original file caused an error message in ZePrA. Now ZePrA corrects the encoding during conversion so that the file is converted correctly and without error message. (Ticket #223104)
- An issue with the quality of spot color conversions when using Opacity settings for spot colors in combination with the printing sequence has been fixed.
- When converting gradients of spot colors, it has been fixed that in some cases an unwanted usage of too much CMY and too little K resulted in an unsmooth rendering of gradations. (Ticket #223080)
- An issue in the user interface where the SmartLink setting was not displayed in the Conversion Method drop-down menu after program startup when navigating to the configuration via the Navigation menu or Sidebar has been fixed.
Note: SmartLink was used correctly for conversion, it was just not displayed correctly in the user interface under certain circumstances. (Ticket #223162) - It has been fixed that in the Images/Vectors the recent files feature in the drop-down menus for profiles recently created DeviceLinks have been missing. Now, when right-clicking on the drop-down menu, the most recently created ICC profiles, including Printer and DeviceLink profiles, are listed.

- The alert message that appeared when trying to login into PantoneLIVE under native Apple M1 platforms has been revised.
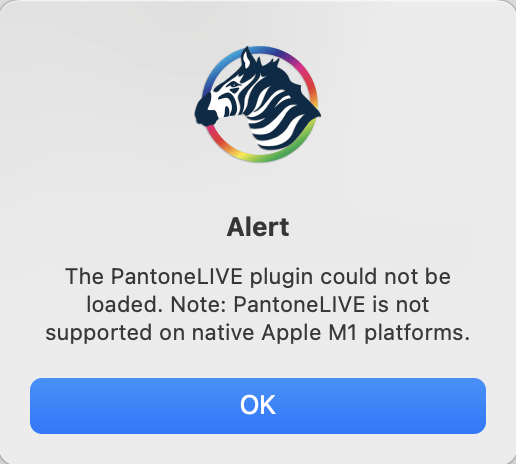
Note: To access PantoneLIVE restart ZePrA with the Rosetta emulation, login to PantoneLIVE and download the libraries you want to use. Then restart ZePrA with native M1 support and you can use the PantoneLIVE libraries for 30 days. - The CLI documentation under Help/CLI Manual has been updated to include the correct link to the Job Control File documentation in the online help.
- Some message texts have been optimized such as shown in some cases in the Troubleshooting dialog and other places of the software.